Showing posts with label Nancy Nickel. Show all posts

Monday, March 16, 2020

Baby Tag Book

Hi, everyone!

It's Nancy back with you today to share a fun new project!
I am using the Library Pocket Tag Book again. I really love this cut file!
I've used it before...you can see that post HERE.

This time I've made something completely different,
just by adding the Baby and Star and Moon cut.

Here's my Baby Tag Book:


I used a fun paper pad that had lots of coordinating pages, all in pink, grey and white.
I cut the "baby" in pink. Then I cut it again in grey.
I offset the two cuts, so there was a bit of a grey shadow behind the pink.
Since it still kind of got lost on the plaid background,
I added a piece of white cardstock behind it. 
I also added a few of the butterflies that are included in the file.


The paper I used is single sided, so I cut two front and back covers, 
and glued them together.


I added the Every Good and Perfect Gift Stamp to the first tag.
I thought it was very appropriate for a baby book.


The four tag pocket pages are all made the same way, using a fun variety of the papers.
The back of each tag is stamped with the Grid Background Stamp.


I added a number of the stars and moons throughout the album.


I added an eyelet to the top of each tag,
and then a piece of glittery grey ribbon.


Finally, I added small binder rings, along with another piece of ribbon.


This is such a fun project to put together,
and it can be customized to any special occasion!

Quietfire Products Used:


Other Materials Used:
Recollections - Little Princess Paper Pad;
White Cardstock;
White Eyelets;
Pink Ink;
Binder Rings;
Grey Glittery Ribbon.

* * * 
Thanks so much for stopping by today!

Wednesday, February 26, 2020

Birdie Thank You Card

Hello, everyone!

It's Nancy back today with a new digital project share!

Spring is just around the corner!
In honour of that, I had to share this wonderful card file with you!

This is the Birdie Thank You Card.


Isn't that adorable?
It's so much fun to put together!
Not only does it make a fabulous card, all put together like this,
but there are so many elements to take out and use on other projects.
The layered labels are wonderful for stamping and decorating.
The scrolled branch would be so pretty on other cards or on layouts. 
Also, the "Thank You" could be used in so many other ways!


 I opted to make my card base from printed paper.
Then I just adhered everything else in place in a pleasing manner.
I added a little piece of red cardstock on the back of the birdhouse,
so that the heart would show red.
Then I used foam tape to adhere the birdhouse on the top of the scrolled branch.
Everything else was adhered in place flat.


Quietfire Products Used:


Other Materials Used:
Recollections Cardstock;
Pink Paislee - Hello Sunshine;
Foam Tape;
Adhesive.

* * * * *
Thanks so much for stopping by today!
I'll be back soon with another fun project! :o)

Wednesday, January 29, 2020

Sparkly Snowflake Shoe

Hello, everyone!

It's Nancy here today with a new digital project share!

Today I am featuring the fun Snowflake Shoe Digital file.
You can find it HERE.

I shared the Fall shoe on my blog several months ago.
You'll find that post HERE.
Today I'm sharing the Winter version:


These shoes are so much fun to put together!


I used some coordinating papers that had a glitter treatment.


To finish it off, I added some glitter to the snowflake embellishments.
I think I need to make a pair of these...in my size! ;o)


Quietfire Products Used:


Other Materials Used:
Papers: Recollections Signature Pad - The Ballet;
Ink: Distress Ink - Walnut Stain;
Stickles: Star Dust.

* * * * *
Thanks so much for stopping by today!
I'll be back soon with another fun project! :o)

Wednesday, December 25, 2019

Nativity Tunnel Card

Merry Christmas, everyone!

It's Nancy back with you! I have the most suitable project to share with you today!
Of all the Christmas projects I made this year, I think this is my favorite!
To me...this is Christmas!


This is the Nativity Tunnel Card!
It's a fantastic file, and so much fun to make!
Knowing that I was going to ink my background, I cut the piece out of bristol paper.
The three design layers were cut from black cardstock,
and the star layer piece was cut from gold foil.


Using an ink blending tool, and several of my blue Distress Inks, I inked the background piece.
I followed the ink order from left to right, beginning in the center, and working my way out. 


Then I mixed a drop of white acrylic paint, some white PearlEx powder, and some water. 
Using a small paint brush, I spattered some stars in the sky. 
Some are big, some are small, some run together and look like shooting stars! ;o)


Although this card looks complicated, it is the simplest design to put together. 
Look at the fabulous detail and dimension!


When I first saw the star, I wanted to use the new Kells Gold Gilding Powder on it.
Since there was a fold in the middle, I opted to cut it out of gold foil instead.
Once I had it all assembled, I decided I really wanted a gilded star. 
I cut out another star layer, inked it with embossing ink, and heat embossed it with the Kells Gold.
I loosely adhered it on top of the gold foil star. 
Now if I want to fold the card up, I simply remove the gilded star, and fold it up!


I couldn't get a photo to show the beautiful shimmer of the stars,
so you'll have to use your imagination!


Here's a top view of the card:


Here's one final look:


Quietfire Design Products Used:


Other Materials Used:
Mixed Media Paper;
Recollections Cardstock;
Distress Inks: Tumbled Glass, Broken China, Salty Ocean, Faded Jeans;
Ink Blending Tool;
Pearl Ex Powder - Micropearl;
White Acrylic Paint;
Scrap of Gold Foil Paper.

* * * * *

Thanks so much for stopping in today!
I hope you have a very Blessed Christmas Season!
I'll be back with more in the new year! :o)

Wednesday, November 27, 2019

Hanging Ornament Boxes

Hello, everyone!

It's Nancy here with you today...sharing two fun Christmas ornaments.
I have used both the
Snowflake Mittens Hanging Ornament Box,
and the Christmas Star Hanging Ornament Box

We'll begin with the cute Mittens one:


Isn't that cute? 
The photo below shows all the cut pieces.


It's such a cool design, and really easy to put together.
You begin by adhering the sides and the bottom of the box.
Then you adhere the red mittens to the insert piece,
and then adhere the mitten cuffs in place on the red mittens.


Next, you slide the insert into the box, and slip the sides into the slots.
It's almost finished already!
Now all you have to do is adhere the top flaps in place, over the loops.


I really like how the insert sides poke out of the box sides.
I used the red snowflakes that were cut out of the mittens
as extra embellishments on the box.


Here's the back of the ornament.
It looks exactly like the front!


Now here's the Christmas Star Ornament:


I went a different way with the paper choices on this one.
I thought the star paper, and the shade of green would work perfectly with the fabulous new
Acanthus Teal Gilding Powder.


This Ornament Box is put together the same way as the last one.
It has a star layer, which I heat embossed in Acanthus Teal,
before adhering it in place on the insert.


The lovely embossing turns this into a very elegant Christmas Star Ornament Box!


Quietfire Design Products Used:


Other Materials Used:
Papers: Pebbles - Home For Christmas,
Craft Smith - Homemade Holiday;

* * * * *

Thanks so much for stopping in today!
I hope you got some good ideas for how to use these fun files for yourself!


See you again soon! :o)

Monday, September 30, 2019

Sunflower Pillow Gift Box

Hello, everyone!

It's Nancy here with you today...sharing a fun new Fall project.
Today I'm featuring the fabulous new Sunflower Pillow Gift Box digital file.
You can find it in the Silhouette Design Store HERE.

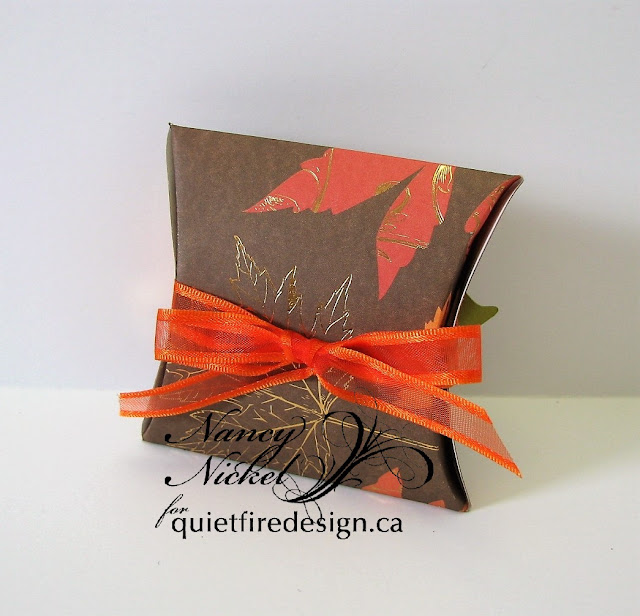
Here's my finished box:


Here's what it looks like cut out:


That's all there is to it!
They're so quick and easy to put together!
I inked around the edges of all the pieces before assembling.
Then it was just a matter of doing a little layering and gluing..
I think a whole basket of them would make a lovely presentation.


I always like to add ribbon to my projects where I can,
so I added a ribbon to the box before adhering the sunflower in place.
Then the ribbon just wraps around to the back and ties in a bow.


I think these little Sunflower Pillow Gift Boxes would look beautiful on a Thanksgiving table.
One at each place setting, filled with a treat, would be a lovely treasure for everyone to take home.
You could even add names to the box and use them as place cards.


Quietfire Design Products Used:


Other Materials Used:

Papers: MAMBI Harvest Specialty Paper Pack;
Ink: Walnut Stain Distress Ink;
Ribbon: Celebrate It.

* * * * *

Thanks so much for stopping in today!
I hope you got some good ideas for how to use this great file for yourself!
See you again soon! :o)

Wednesday, August 28, 2019

Butterfly Heart Card

Hello, everyone!

It's Nancy here today! I'm sharing this beautiful Butterfly Heart Card file,
 that you can find in the Silhouette Design Store right HERE.

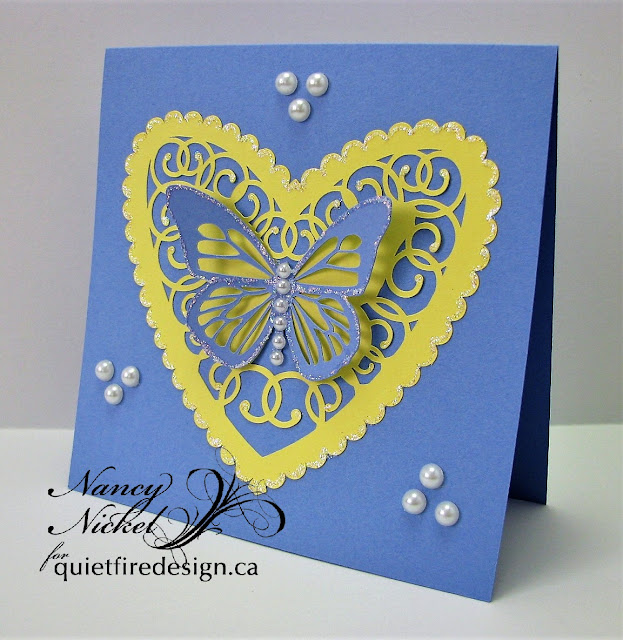
Here's the card I made using this file:


Isn't that pretty?
The file includes three pieces: the card base, the heart doily, and the butterfly.


I cut my card base out of blue cardstock, and opted to use it tent-fold fashion. 
I cut the heart doily out of a pretty yellow. It's such an intricate design but cut beautifully!
Then I cut the butterfly out of the same blue cardstock.


I adhered my heart doily to the center of the card base.
I folded up the wings of the blue butterfly before adhering the body only to butterfly outline on the heart doily.


Then I used my Stickles and added a pretty outline of glitter all around the butterfly,
as well as the heart.
I also added a row of pearls to form the butterfly body.


Finally, I added several more pearls to the card base!
This is such an elegant card that could be made in endless colour combinations.
It's also a fabulous file to use some specialty papers, such a foil and vellum!
Again, the creative possibilities are endless! :o)


Thanks so much for stopping in today! I'll be back soon with another fun project!

* * * * *

Quietfire Products Used:


Other Products Used:
American Crafts Cardstock;
Stickles - Diamond, Star Burst;
Crafts Pearls.