Hello, Connie Nichol here with a couple of Christmas cards I created with Suzanne Cannon's Cardinal Christmas cut file available in the Silhouette Design Store. There's nothing like making Christmas cards in the middle of summer - it's actually pretty fun!
The cut file is so beautiful it doesn't need a lot of embellishments and is very quick to cut and create. Try cutting the bird and the backgrounds out of different colours of cardstock. I made 6 x 6" cards, but the cardinal also fits on a 5 x 7 card base. This yellow bird reminds me of a goldfinch and it makes a nice change from traditional Christmas colours. I added 'berries' with Ranger Enamel Accents, but you could glue on a few beads or embellish the branches with a little bit of glitter glue.
Here's the Christmas Cardinal cut out of more traditional colours. He is very striking. I am not sure which bird I like best. Do you have a favourite?, I am going to remember this cut file for when I need a beautiful bird to accent a scrapbook layout. It would make an awesome blue bird! Have a great July, Connie
Cut the elements.Use a heavy weight card for the base. Cut an extra base if you want to hide the tabs inside.
Adhere all the layers to the base.
Fold all the perforated score lines.
Apply strong double-sided adhesive- Elizabeth Craft Designs to the tabs.***TIP*** Place the tape on waste please paper to make it easier to handle while cutting the small pieces.
Form the tote by adhering the tab at the side first. Burnish well and place a weight on it for a few minutes.
Place a tape runner inside to preform the curved sides. Let that sit for a few minutes.
Remove the tape’s release paper on one side of the tabs on the base.
Align the point on the base with the side seam and work your way around to the other point by
pushing the tabs against the base. Work with one hand inside pushing the tabs into the correct position.
Remove the release paper on the other side and repeat until all the tabs are in place and secure.
Although Monogram Fonts aren’t designed for creating text, they can be really fun to personalize a card! Many of my monogram fonts start with my basic Italic Capitals which I use for teaching calligraphy and this technique works especially well if the basic letterforms are the same in different fonts. It helps make the fonts interchangeable and easy to read when you mix and match them.
Here is how you can make an awesome card or nameplate! If you are receiving this as an email update, click here to watch the video on YouTube.
Thanks for watching! What will you do with your monogram fonts?!
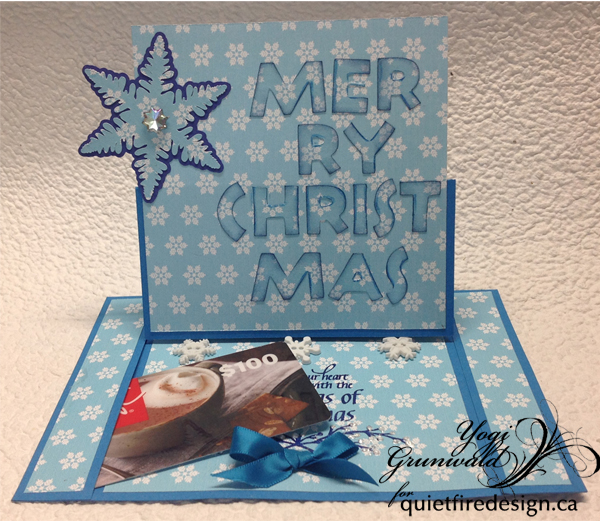
Yogi here today with a center split easel card... Suzanne asked the design team to create some Xmas cards this month so here is my first one of the year. BIG GRIN. I'm using a quote stamp on the floor from Quietfire Design ("May Your Heart..."); These are the electronic cut files I'm using from Suzanne available on Silhouette. Click image to purchase. The OTF fonts Suzanne is coming out with work great in emails, Word, Excel etc. and I'm using it in my Sure Cuts A Lot (SCAL) software - love them
And the digi paper from Suzanne available on Quietfire Design:
Printed the snowflake paper both on 110# white cardstock and a no brand calligraphy practice paper I love that is a bit thicker than normal printer paper. Opened SCAL software, activated the font key and typed the words "Merry Christmas".
Opened the Snowflake box and removed everything except the snowflake, resized it to 2.5" and cut from the printed cardstock. Then printed a shadow layer of the snowflake from the deep blue cardstock and adhered both together. Scored and folded my card structure (see diagram at below). Cut deep blue cardstock to 7"w x 10"h. Score along the 10" side to create a top fold 5". Cut the side panels 1"w by 5"long (to the center score line...). Now score the the center piece that is 5"w x 5"h in half, scoring at the 2.5"h. Cut a piece of snowflake cardstock 4.75"w x 4.75"h and adhere to the bottom scored section. (see pics at bottom of page, you'll see the snowflake cardstock is only adhered to the lower section of the fold)
Adhered the snowflake to the left edge.
Sponged some dark blue Distress (Faded Jeans) around the edges of each letter, then adhered. Since this is cut in the same paper as the background and usually placed so it blends into the background - the technique seems to be being called "Eclipse Technique". I like it...
On the floor: Cut strips of the snowflake paper to cover the side panels and the floor (2pieces - .75" x 4.75" and 1 piece 4.75"w x 4.75"h), adhered to appropriate sections. Adhered the right panel to the floor.
Adhered only the outside edge and front edge of the left panel to the floor creating a pocket for the gift card. Used my stamping Platform to stamp the quote using Versafine "Majestic Blue" and clear embossing. Used a Liquid Pearls "White Opal" and applied dots on the berry sprig. Adhered 3 white snowflake buttons using hot glue to act as my stopper and adhered a small blue ribbon bow with hot glue.