Wednesday, April 1, 2020

QFD Card Monogram Fonts

Hey Artlets!

Did you see the new QFD card monogram fonts? 
There are many to choose from. They are so much fun to work with and perfect to personalize cards for any occasion.

I worked with these:


ON THE MAT

all cut

I chose a yellow background to make the rabbit stand out more.

Paw Print Card Monogram Font


Here is a card with the butterfly card monogram font.


Have a happy day! Stay safe and hang in there!
#comfortcrafting
Kora


Monday, March 23, 2020

Assembling the Romance Shadow Frame


Meet the new Quietfire Shadow Frame! This is part of the new Romance Collection available at the Silhouette Design Store. (if you make a purchase by using this link, I *might* get a small commission!) 


It's a beautiful frame and easy to make. Have a look at this quick video tutorial and with a little paper and glue, you'll be ready to go!
Happy creating! Suzanne

NOTE:  Some shadow frame files have an additional tab on the shorter bar.  Simply add adhesive and tuck inside the adjoining segment of the frame.

If you are receiving this as an email update, click here to see the video!

BUNNY WITH BUTTERFLY CANDY BASKET


Welcome, my crafty friends!

While searching for some Easter decoration, I came across this cute little bunny with a basket (for sweets).

You can find the file here:

 on the mat


all cut

Fold along the perforated lines and glue all parts together.

I love the little butterflies, especially the one sitting on the rabbit´s nose. I also added some ribbon.


Fill the basket with whatever chocolate or sweets you like best. I used some green quilling strips as grass to put into the basket.


Thanks for stopping by!
Kora


Monday, March 16, 2020

Baby Tag Book

Hi, everyone!

It's Nancy back with you today to share a fun new project!
I am using the Library Pocket Tag Book again. I really love this cut file!
I've used it before...you can see that post HERE.

This time I've made something completely different,
just by adding the Baby and Star and Moon cut.

Here's my Baby Tag Book:


I used a fun paper pad that had lots of coordinating pages, all in pink, grey and white.
I cut the "baby" in pink. Then I cut it again in grey.
I offset the two cuts, so there was a bit of a grey shadow behind the pink.
Since it still kind of got lost on the plaid background,
I added a piece of white cardstock behind it. 
I also added a few of the butterflies that are included in the file.


The paper I used is single sided, so I cut two front and back covers, 
and glued them together.


I added the Every Good and Perfect Gift Stamp to the first tag.
I thought it was very appropriate for a baby book.


The four tag pocket pages are all made the same way, using a fun variety of the papers.
The back of each tag is stamped with the Grid Background Stamp.


I added a number of the stars and moons throughout the album.


I added an eyelet to the top of each tag,
and then a piece of glittery grey ribbon.


Finally, I added small binder rings, along with another piece of ribbon.


This is such a fun project to put together,
and it can be customized to any special occasion!

Quietfire Products Used:


Other Materials Used:
Recollections - Little Princess Paper Pad;
White Cardstock;
White Eyelets;
Pink Ink;
Binder Rings;
Grey Glittery Ribbon.

* * * 
Thanks so much for stopping by today!

Monday, March 9, 2020

Southwest Cactus Frame

Hello, Connie Nichol here with one of Suzanne Cannon's newest cut files, the Southwest Cactus Frame available in the Silhouette Design Store here.  It's super cute and just perfect for framing a photo from the Arizona desert.


I love that the back of the frame has a stand so you can easily prop this frame on a shelf or mantel.


Here's the cut file itself - only a few pieces to ungroup and then cut.  The little dots on the cactus provide some texture to look like prickles.  I poked them with a needle to open them up just a little bit more.  Experiment with different colours of cardstock or add a touch of patterned paper to give this frame a different look.  


Thanks for stopping by, Connie

Supplies Used:  Southwest Cactus Frame cut file, Silhouette Cameo, cardstock


Wednesday, March 4, 2020

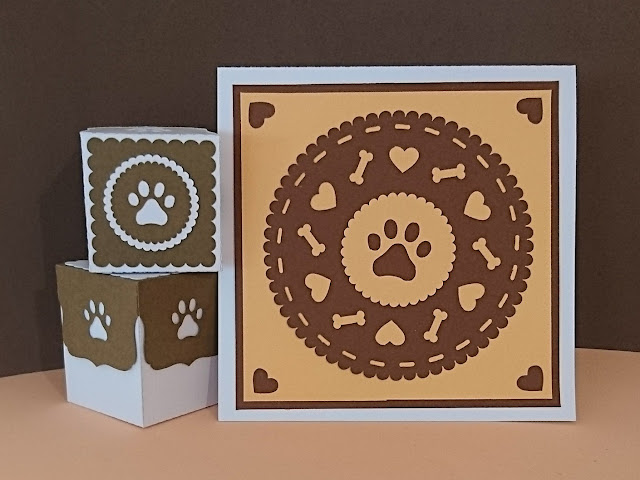
PUPPY DOILY CARD


Hello, digital cutting friends!


Did you see the new "Puppy Doily Card"? I just love it. You can find the digital cutting file here:


On the mat
Open the file and ungroup all elements. Cut in the colours of your choice. 

all cut

I kept the bones and hearts and also the negative from the pawprint.

I put some hearts, bones and the negative from the pawprint inside the card. 

And added four hearts to each corner of the card.

Did you see that the "PAWPRINT GIFT BOX" fits the card just perfect?

Happy week! 
Kora


Wednesday, February 26, 2020

Birdie Thank You Card

Hello, everyone!

It's Nancy back today with a new digital project share!

Spring is just around the corner!
In honour of that, I had to share this wonderful card file with you!

This is the Birdie Thank You Card.


Isn't that adorable?
It's so much fun to put together!
Not only does it make a fabulous card, all put together like this,
but there are so many elements to take out and use on other projects.
The layered labels are wonderful for stamping and decorating.
The scrolled branch would be so pretty on other cards or on layouts. 
Also, the "Thank You" could be used in so many other ways!


 I opted to make my card base from printed paper.
Then I just adhered everything else in place in a pleasing manner.
I added a little piece of red cardstock on the back of the birdhouse,
so that the heart would show red.
Then I used foam tape to adhere the birdhouse on the top of the scrolled branch.
Everything else was adhered in place flat.


Quietfire Products Used:


Other Materials Used:
Recollections Cardstock;
Pink Paislee - Hello Sunshine;
Foam Tape;
Adhesive.

* * * * *
Thanks so much for stopping by today!
I'll be back soon with another fun project! :o)