Tuesday, February 14, 2017

Popcorn Treat Box

Hi there!  Happy Valentine's Day!  It's Suzanne here with one of the new cutting files this week at the Silhouette online store. 


Fill this adorable box with popcorn, cookies or Valentine hearts and you’ll have a winner on your hands!

Instructions:

  1. Download valentine for you popcorn treats box from the Silhouette Design Store (Design ID #179215).
  2. Ungroup all the elements once and remove everything except “for you” and its oval cutting line. Turn on the registration and print and cut with your Silhouette Cameo or Portrait machine.
  3. Turn off the registration and cut the other elements as your normally would. You may cut the additional panels from plain or decorative paper or leave them off or read the next step. Fold all perforated score lines and form box by adding adhesive to the tab.

  4. I decided I wanted panels with tiny hearts on them.  So I made the paper!  You can download my Valentine Tiny Hearts - Digital Paper for free this week from the Quietfire Design website HERE.  Save it in your Patterns folder in your Silhouette software. Turn on the registration marks and move the grouped side panels for the popcorn treats box onto the cutting mat inside the registration marks. Select the panels.  Click the pattern icon and choose the Valentine Tiny Hearts to fill the panels.  Print and cut.

  5. Adhere the panels to the side of the box. 
  6. Assembling the bottom of this box is just like making the bottom of the Quietfire Lanterns and can be seen in detail in the video tutorial here. If you just need a quick refresher: At the bottom, fold the diagonal score lines on the irregular tabs outwards. Apply adhesive to the inside of that folded portion of that tab. Glue this irregular tab over the adjacent tab. Repeat with the two remaining tabs. By pushing your thumb up in the bottom of the box, you will now be able to fold your box flat. When it is returned to box shape, the floor of the box will “lock”.
  7. Layer and adhere the for you oval with the plain red oval and mount on the side of the popcorn box.
  8. Fill and give to someone special!  While you're at it, make one for yourself!


Happy Valentine's Day
and thanks for stopping by!
Suzanne

Thursday, February 9, 2017

XO Love

 
It's Suzanne here today, getting ready for Valentine's Day!
I've paired up one old and one new design for this card. XO is from 3 Valentine's ago, but the Valentine Washi Sticker Planner Tape is brand new this week!


XO - Calligraphy
Valentine Washi Sticker Planner Tape
I love how it turned out and it was so easy to make!  Here is how you can make it, too!

Supplies:
Quietfire XO - Calligraphy, Silhouette Design #53715
Quietfire Valentine Washi Sticker Planner Tape, Silhouette Print & Cut Design #177784
Silhouette Cameo
Silhouette Printable White Sticker Paper
Cardstock in black, red and white
Glue Dots: Micro and Super Strength Premium Permanent Gluetape


Instructions:
  1. Form a 7" x 5" card base from black cardstock. Cut a panel measuring 5.75" x 4" from black cardstock and cut a mat slightly larger from red cardstock and another slightly larger mat from white cardstock.
  2. Cut XO - Calligraphy from red cardstock (I used American Crafts Smooth Cardstock)
  3. Print the Valentine Washi Sticker Planner Tape on Printable White Sticker Paper and cut.  Designer Tip: As an alternative, just print the design on regular copy paper and cut.  Use Gluetape to adhere to cardstock.
  4. Adhere the Washi Tape strips to the black cardstock panel as shown and trim excess.
  5. Layer cardstock panels and adhere together with Gluetape, then mount to card front.
Thanks for dropping by to have a look!
Happy cutting and creating, Suzanne
Wednesday, February 8, 2017

Valentine Heart Flourish/Love

Hi Y'all, Robyn here today to spread a little love
Quietfire Digital Style.
One of the great things about digital is that it is instant!
If you need a last minute image or sentiment for a Valentine,
just download and you are ready to create!
and
The process...
  • Draw a rounded rectangle 3 1/2 x 2 1/2.
  • Resize elements to fit.
  • Sketch "heart flourish" with a red gel pen. DON'T move your mat!
  • Cut edge of the rounded rectangle. Now you can take out your mat!
  • Cut 2 "love" elements, glue together, cover with stickles and glossy accents. Dry well.
  • Adhere "love" element to card
  • Draw a border 
  • Admire!
Many of my ATC's turn into Brave Girl Cards.
I give them away as daily as I can to help myself be brave and remind others to be brave.


Be Brave- get cutting with our files and share your creations with us on Facebook!
Want to visit the desks of crafters all over the world?
Visit my blog on Wednesdays for WOYWW.

Mark your calendar for the Quietfire Design Queen of Hearts Blog Hop!
February 12-17

Sun Feb 12 - Suzanne 
Mon Feb 13 - Wanda and Connie
Tues Feb 14 - Robyn and Teresa
Wed Feb 15 - Kathy Jo and Diana 
Thurs Feb 16 Yvonne and Yogi
Fri Feb 17 Selma

Comment and Questions always welcomed!


Thursday, February 2, 2017

Sweet Critter Heart Pop-Ups Collection

It's Suzanne here today to share some timely heart-shaped pop-up designs which are available in the Silhouette store.  These are little hearts inside a big heart! This design is called Baby Heart Pop Up Heart Card (Design ID #113983) Okay, so not critters - and I promised critters.....

How about Butterflies?  This design is called Baby Butterflies Pop Up Heart Card (Design ID #113986).


Here is another version of Butterflies, Pop Up Butterfly Kaleidoscope Card (Design ID #129521) where they are flying in a much more orderly fashion!  It's fun to put some designer paper on the lower layer so it shows when the butterflies flex their wings!
 
Now we're getting to my favourite critters!  Here are the sheepies!  These were made several years ago for Easter.  This card is called Lamb Pop-Ups in Heart Shape (Design ID #55782) and I just adore these lambies!  I think they're my favs. I love their little ears.  Although....
 
 
 Meet the buns! Here are the Bunny Pop-Up in Heart Shape (Design ID #55778).  Busy Bunnies are all ready to send to your favourite bunny-lover!
All samples were cut with a Silhouette Cameo.
 
If you're mailing these cards, the critters fold flat, just remind the recipient to fluff the critters.
Too much fun!
Thanks for having a look today!
Happy cutting, Suzanne


Wednesday, February 1, 2017

Dangling Hearts Bendi Card - Moi & Toi


Yogi here today and since we're getting close to Valentine's Day, thought I'd do something with "Hearts" BIG GRIN

I'm using an A Way With Words die from Elizabeth Craft Designs "Calligraphic Elements 2" also available on Quietfire Design HERE

Also using a couple of digital files from Suzanne available on the Silhouette onLine store - click on either image to purchase.

https://www.silhouettedesignstore.com/view-shape/173167https://www.silhouettedesignstore.com/view-shape/171913
  And using a sentiment  stamp from Quietfire Design
("Calligraphic Love Bits" 6pce set); 


Opened the "Dangling Hearts Bendi Card" in Silhouette Studio, ungrouped them and repositioned and removed some of the pieces, then cut all the elements I needed from white cardstock. While on the mat painted them with Distress Dabber "Spun Sugar". Allowed to dry and then removed them from the mat.

Ran the bendi card piece through my embossing machine using Spellbinders 2 in 1 "Hearts" folder. Hit the high points direct to paper with Distress "Worn Lipstick"

Inked the large open heart with Versamark and embossed with Distress "Worn Lipstick.

The small dangling hearts were inked with the Versamark and embossed with Inkadinkado "Hot Pink" embossing powder twice, adhered together using embossing powder. A small hole punched out to hang it with some deep rose twine.

The Moi/Toi were cut at the size they appeared on my mat. I then cut a shadow layer, inked with the Worn Lipstick and adhered both layers together. Adhered to the large heart. Added a couple punched circles, adhered them, then adhered some pink medium sized half pearls to act as my dots for the "i's"

The ampersand is a die from Suzanne "Calligraphic Elements 2" set,  cut from a purple toned cardstock.

I stamped the "XOXO" onto white cardstock using the Worn Lipstick, and clear embossed. Die cut with Spellbinders oval die set, sponged the edges and adhered to the card with 2 pink diamond brads.


Tuesday, January 24, 2017

Moi et toi/ Ornamental heart / Heart Spray

Hi Y'all!
Robyn here getting a jump on all things hearts!

On the mat

Inside
***TIPS***
  • These files have teeny tiny lines. Use a double sided adhesive on your card stock before you cut so you don't have to deal with glue. I recommend Stick-it.
  • Press down well on your cut while it is on the mat before removing. Let the stickiness help you  safeguard the fine lines.
  • Take your time! Use a thin spatula to slowly lift the cut off of the mat.  
  • Mat should be just sticky enough to hold the paper. Too sticky and you will never get it off.  

Using the Heart spray card, I created a stencil, and a frame for the
focal heart image.
The shadow box effect enhanced the heart, with out getting too fussy.

The Stencil

Won't you be my Valentine?
Comments and Questions welcomed!


heart spray card
ornamental

Wednesday, January 11, 2017

Mahalo Scrapbook Layout

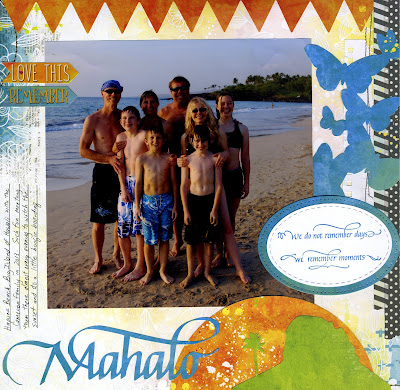
Hello, Connie Nichol here today with a bright and tropical layout featuring Suzanne Cannon's Mahalo Hawaiian scene electronic cutting file.

connie_nichol, quietfire design

Mahalo is a Hawaiian word meaning thanks or gratitude and I was truly grateful for my opportunity to travel to the Big Island of Hawaii and enjoy it with friends and family.  You can find the cut file here in the Silhouette store if you use a Silhouette Cameo, or if you use another electronic cutting machine, you can contact Suzanne Cannon at suzanne@quietfiredesign.ca to request an svg file that can be used in other machines.  I ungrouped the elements shown below and cut each one out of different colours of BoBunny patterned paper.  I also added a beautiful Quietfire Design stamped quote to embellish the page.


We Do Not Remember Days

Mahalo for stopping by!

Supplies:  BoBunny patterned paper and stickers, Versafine ink, Elizabeth Craft Designs stitched oval die, Sakura pen