Showing posts with label digital paper. Show all posts

Wednesday, July 11, 2018

Snowflake - Country Plank - Winter Ice - May Your Heart


Yogi here today with a center split easel card... Suzanne asked the design team to create some Xmas cards this month so here is my first one of the year. BIG GRIN.

I'm using a quote stamp on the floor from Quietfire Design ("May Your Heart...");

These are the electronic cut files I'm using from Suzanne available on Silhouette. Click image to purchase. The OTF fonts Suzanne is coming out with work great in emails, Word, Excel etc. and I'm using it in my Sure Cuts A Lot (SCAL) software - love them

  https://www.silhouettedesignstore.com/view-shape/270464https://www.silhouettedesignstore.com/view-shape/267798

And the digi paper from Suzanne available on Quietfire Design:
http://www.quietfiredesign.ca/Winter-Ice-Patterns-Digital-Papers.html 
Printed the snowflake paper both on 110# white cardstock and a no brand calligraphy practice paper I love that is a bit thicker than normal printer paper.
Opened SCAL software, activated the font key and typed the words "Merry Christmas". 

Opened the Snowflake box and removed everything except the snowflake, resized it to 2.5" and cut from the printed cardstock. Then printed a shadow layer of the snowflake from the deep blue cardstock and adhered both together.

Scored and folded my card structure (see diagram at below). Cut deep blue cardstock to 7"w x 10"h. Score along the 10" side to create a top fold 5". Cut the side panels 1"w by 5"long (to the center score line...). Now score the the center piece that is 5"w x 5"h in half, scoring at the 2.5"h. Cut a piece of snowflake cardstock 4.75"w x 4.75"h and adhere to the bottom scored section. (see pics at bottom of page, you'll see the snowflake cardstock is only adhered to the lower section of the fold)
Adhered the snowflake to the left edge.

Sponged some dark blue Distress (Faded Jeans) around the edges of each letter, then adhered. Since this is cut in the same paper as the background and usually placed so it blends into the background - the technique seems to be being called "Eclipse Technique". I like it...


On the floor: Cut strips of the snowflake paper to cover the side panels and the floor (2pieces - .75" x 4.75" and  1 piece 4.75"w x 4.75"h), adhered to appropriate sections. Adhered the right panel to the floor.

Adhered only the outside edge and front edge of the left panel to the floor creating a pocket for the gift card.
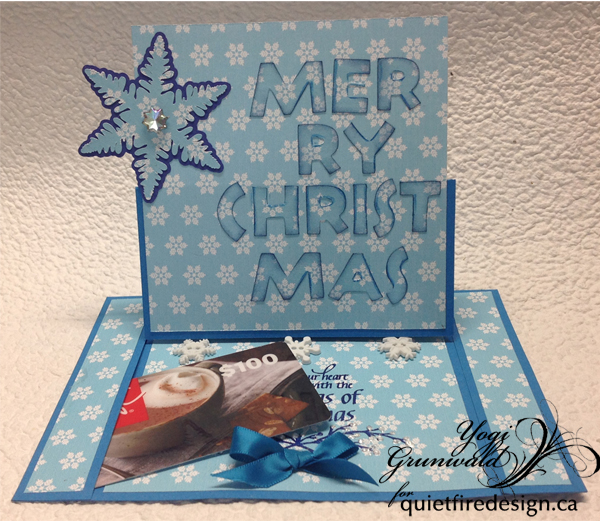
Used my stamping Platform to stamp the quote using Versafine "Majestic Blue" and clear embossing. Used a Liquid Pearls "White Opal" and applied dots on the berry sprig.

Adhered 3 white snowflake buttons using hot glue to act as my stopper and adhered a small blue ribbon bow with hot glue.


Tuesday, February 14, 2017

Popcorn Treat Box

Hi there!  Happy Valentine's Day!  It's Suzanne here with one of the new cutting files this week at the Silhouette online store. 


Fill this adorable box with popcorn, cookies or Valentine hearts and you’ll have a winner on your hands!

Instructions:

  1. Download valentine for you popcorn treats box from the Silhouette Design Store (Design ID #179215).
  2. Ungroup all the elements once and remove everything except “for you” and its oval cutting line. Turn on the registration and print and cut with your Silhouette Cameo or Portrait machine.
  3. Turn off the registration and cut the other elements as your normally would. You may cut the additional panels from plain or decorative paper or leave them off or read the next step. Fold all perforated score lines and form box by adding adhesive to the tab.

  4. I decided I wanted panels with tiny hearts on them.  So I made the paper!  You can download my Valentine Tiny Hearts - Digital Paper for free this week from the Quietfire Design website HERE.  Save it in your Patterns folder in your Silhouette software. Turn on the registration marks and move the grouped side panels for the popcorn treats box onto the cutting mat inside the registration marks. Select the panels.  Click the pattern icon and choose the Valentine Tiny Hearts to fill the panels.  Print and cut.

  5. Adhere the panels to the side of the box. 
  6. Assembling the bottom of this box is just like making the bottom of the Quietfire Lanterns and can be seen in detail in the video tutorial here. If you just need a quick refresher: At the bottom, fold the diagonal score lines on the irregular tabs outwards. Apply adhesive to the inside of that folded portion of that tab. Glue this irregular tab over the adjacent tab. Repeat with the two remaining tabs. By pushing your thumb up in the bottom of the box, you will now be able to fold your box flat. When it is returned to box shape, the floor of the box will “lock”.
  7. Layer and adhere the for you oval with the plain red oval and mount on the side of the popcorn box.
  8. Fill and give to someone special!  While you're at it, make one for yourself!


Happy Valentine's Day
and thanks for stopping by!
Suzanne