Thursday, July 11, 2019

Floral Step Card

Hello, Connie Nichol here today with two different versions of a step card  using a cutting file designed by Suzanne Cannon.  It's available in the Silhouette Design Store here.  The cut file is actually a 'Smile' floral step card, but like all digital files, you can ungroup the components and use whatever you like.  I used everything but the calligraphic smile word.  There are three different shapes of flowers that you can mix and match.


I love the step card base - it is very simple to cut and fold, yet classy and different from an ordinary greeting card.  You can add a stamped sentiment to the front panel, or different die cut sentiments, and of course as many flowers in as many colours as you like!


Here's the beginning stages before I put anything together:


You also have many choices for flower centers. Stack the cut flowers together with a brad or glue, or embellish the centers with small beads, glitter glue, or with stickers and gems.  You can get a huge sheet of 'pearls' and 'diamonds' from the dollar store.  Happy Crafting!


Quietfire Design Products Used:  The Only Time rubber stamp, Happy Birthday - small - metal cutting die, Smile Floral Step Card cutting file

Other Supplies:  Close to My Heart Cardstock, Dollarama glitter stickers, Versafine ink


Monday, July 8, 2019

Tangled Heart Tote and Tag


Hi all! Kora here. 
It´s my turn again. I needed a little gift box to give to a friend for her birthday. As a Mum I am always in some hurry, so I needed a simple and fast project. The Tangled Heart Tote and Tag is an easy project and is done quickly. 

First you must pick the colours of your choice. I decided on plain pink (for the tote body and the tag base) and patterned paper (roses) for the tote layers and the tag layer. 


If you use patterned paper make sure that you put the paper on the cutting mat in the right position (or flip the elements)  Otherwise, as in my case, you will end up with the roses being upside down (one can only learn from experience).

Once you have cut all elements, it´s time to assemble them. It´s kind of self-explaining really. 


You can find a tutorial on how to assemble the tote here.

When finished use some raffia to tie the tag to the tote. Now you can adhere some rhinestones or beads or whatever else you want to use to decorate it. Fill with chocolate and or a little gift. 


Thanks for stopping by. Happy crafting!


Wednesday, July 3, 2019

Bug Love Car Card in a Box Decoration -Surfboard Gift Box - Birds and Animals Dingbat Font - Print and Cut

Hi Y'all!
Robyn here with another  Quietfire Design digital mashup!
My first car was a Beetle, 
and even tho I say learning to drive (in my 30's) 
was the biggest mistake I've 
ever made...
Driving  this 3D love bug will put you (and the critters  of your choice)
in the drivers seat to creativity and miles of smiles!
Not to mention....
Surfs up!
And it folds flat for mailing!
Aside from your Silhouette, no license required.
Full list of files and supplies listed at the end of the post.
On the Mat

Using the 3D car as the base, I added in the surf board
extracted from the Surfboard gift box.
I cut 4 of the top pieces and glued them together for dimension.

On the Mat

After several embellishment and sentiment fails, I decided to print the
Surf's up
right on the outer shell of the car.
  • Ungroup the car pieces
  • place the outer side car on the mat and change the fill color to white
  • Size the surfs up to fit on the car piece
  • Turn on registration marks and place the piece on the mat
  • Turn off cut lines to the car 
  • Send to printer
  • Place the printed paper in Silhouette and turn on cut lines for the car-cut.
On the Mat


One of my working mats!
*****TIP*****
Use  the Text tool to write notes to yourself on the mat while you are in design phase.
If I get distracted, it helps me to remember what/why I was doing when I come back.


Moose and Bear are in their baggies ready to catch some big water!

On the mat.


Please visit and join our Facebook Group
Suzanne Cannon Fan Group
To share your creative journeys with us!
Comments and Questions Welcomed!

Files and Supplies

Wednesday, June 26, 2019

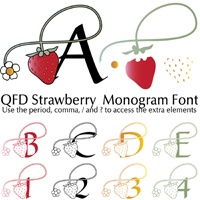
Strawberry Pop Up Card - Strawberry Monogram Font - Happy Birthday

 
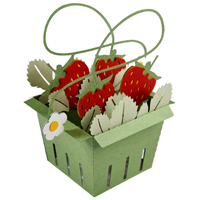
Yogi here today on the Quietfire Digital Blog and I was really liking the strawberry box by Suzanne that she just uploaded to Silhouette on line store... So of course I had to use it BIG GRIN.

Click on images to purchase 


https://www.silhouettedesignstore.com/designs/296166?search=strawberry+basket+card&sortby=relevance&submitted_search=truehttps://www.silhouettedesignstore.com/designs/296165?search=strawberry+monogram&sortby=relevance&submitted_search=true

Cut, scored and folded my cream toned cardstock to create the side folded card structure.

Placed the letters one at a time on my mat using Arial Bold font, then made sure each touched the letters next to it. Grouped and resized to the width I needed (4.5"w). Welded everything together and cut. Colored with Tombow markers. Adhered to card front.

Printed out the quote using the Arial font and cream cardstock, then cut the lines apart. Added a picot on either end and hit the edges with the red Tombow brush end. Adhered to card front.

Cut a misc letter to get the strawberry sprig and then cut it apart from the letter. Or you could just cut another of the inserts, or use the .,? features of the font and weld them together.


On the inside: Opened the strawberry box file and placed the elements I wanted on my mat, copying and pasting some extras. Selected all and resized till I could see one side of my box was approximately 4"w. Cut from white cardstock and while still on my mat colored the elements. I add details when off the mat.

Assembled the strawberries into the box and adhered one side to the inside of the card, making sure when I closed it nothing interfered with closing.

Cut large H & B letters and colored with markers. Adhered to inside. Printed out the rest of the words from cream cardstock, trimmed down, edged with the red Tombow and adhered to inside.

Stamped the "How Sweet It Is" onto white cardstock using Just Rite "Brayton" alphabet letters and a Versafine Clair "Tulip Red" stamp pad. Clear embossed.

Final touch added a couple more flowers to the open space on the left side...


Wednesday, June 19, 2019

Dad's Toolbox Card in a Box-Knotty Font-Make it work- 3D and Print and Cut

Hi Y'all!
Robyn here with another fun and versatile 
3D project
With some Print and Cut personalization.
Dad's day was long gone, 
so thinking outside of the tool box I came up with
the Make it Work theme.

On the mat

Modified the Print and Cut with

I'm still in V2 software!


From there it is easy and fun assembly with the adhesive of your choice!
It's only about 3"x2" and folds flat for mailing!
My DD would have loved the little tool elements in her miniature period!

Please share you creations with us on our
Suzanne Cannon Fan Group 
on Facebook.
Comments and Questions Welcome!

Tuesday, June 18, 2019

Smile!

**We'd like to welcome Kora to the Quietfire Design Team and will let her introduce herself.  We love what she does with Quietfire Digital Designs!  You can follow Kora on Instagram! and she regularly posts things on the Suzanne Cannon Fan Group!  Welcome Kora, it's wonderful to have you with us!!**

Hi all and hello from Austria. Kora here. I´m new to the design crew. I have been crafting for as long as I can remember and I have always loved paper. I am all into cards, little favour & gift boxes as well as stamping and quilling. Suzanne demonstrated the masking technique on „Letters Live“ the other day and while following the video an idea popped into my mind: Try this technique on a T-Shirt! And so I did. I became an aunt in October and the little lad makes me smile whenever I see him – so I decided on putting the word „SMILE“ on a shirt for him. The word smile was taken from the SMILE FLORAL STEP CARD – CALLIGRAPHY“. 


Just enlarge it to the desired size. I used white heavy cardstock. When cut fully, take the lettering off the cutting mat and put it onto the shirt. To ensure the lettering stays in place I used some „spray glue“. Put some newspaper between the front and back of the shirt to prevent the ink going to the back of the shirt.
Now it´s time to put on the fabric dye. Sponge the colour onto the shirt until the whole word is coverd with colour.


When finished, carefully remove the lettering. 

Taataa!! Now you have your very own personalized shirt. I hope you enjoyed the project. Thanks for stopping by.


Wednesday, June 12, 2019

Father's Day Gift Card Boxes

Hello, Connie Nichol here today with a couple of gift card boxes especially for dad.  These are quick and simple to cut and put together and are sure to bring a smile to anyone's face.  They are designed by Suzanne Cannon and are available in the Silhouette Design store here in lots of different designs.


This is the Gears Gift Card box cut out of purple, white and silver cardstock.   Just cut the pieces out with your electronic cutting machine, fold on the scored lines, adhere the tabs of the box with strong double sided tape such as sookwang tape (leave the top open temporarily) and slip in the inserts.  If you cut more than one gift card box, all the gift card box parts are the same size, so you can interchange and mix the inserts up as desired.  The gift card holder is on the back of the box.


Here's a Tool Gift Card Box from the front, side and back.


Sometime's a gift card is the perfect gift, especially for the dad who is hard to buy for.  These little boxes make it extra special.  Thanks for stopping by and Happy Father's Day!!