Showing posts with label Elizabeth Craft Designs. Show all posts

Wednesday, August 8, 2018

Unicorn Lantern- Shoot for the moon

Hi Y'all!
Robyn here confirming
I believe in Unicorns!
I've made quite a few of these lanterns now and they have become my most popular hostess and faerie godchild gifts.
You'll be surprised how quickly they come together.


On the mat
Only 4 pieces. (and window dressing if you use it)

The stamps are Suzanne's for Elizabeth Craft Design


Keep believing!

Comments and Questions Welcomed!

Wednesday, July 18, 2018

Watermelon Tote with Tag- Happy birthday

Hi Y'all
Robyn here with a 3D summer cooler!


On the Mat

  •  Cut the elements.Use a heavy weight card for the base. Cut an extra base if you want to hide the tabs inside.

  • Adhere all the layers to the base.

  • Fold all the perforated score lines. 

  • Apply strong double-sided adhesive- Elizabeth Craft Designs to the tabs.***TIP*** Place the tape on waste please paper to make it easier to handle while cutting the small pieces.


  • Form the tote by adhering the tab at the side first. Burnish well and place a weight on it for a few minutes.
  • Place a tape runner inside to preform the curved sides. Let that sit for a few minutes.

  • Remove the tape’s release paper on one side of the tabs on the base. 

  • Align the point on the base with the side seam and work your way around to the other point by 
pushing the tabs against the base. Work with one hand inside pushing the tabs into the correct position. 
  • Remove the release paper on the other side and repeat until all the tabs are in place and secure. 
  • Layer the leaf tag and stamp your sentiment. Happy Birthday/ A way with Words/Eliazbeth Craft Designs
  • Attach to the tote with ribbon or twine. 
  • Create dimension on the seeds with glossy accents.
Fill your gift tote and give to someone special!

For more watermelon themed files visit 
watermelon box

Wednesday, July 4, 2018

4th of July Star box

Hi Y'all!
Robyn here 
 with a seasonal file with multiple uses- hostess gift, table decor, silent Auction item
(You know they ask you!)
Party Favor, Cake topper?


These long pieces are the sides of the box.
Fold on all the score lines.

Use a strong adhesive-Elizabeth Craft Designs double sided, one point at a time.

Begin with the side without the tab, adding adhesive as you go, place carefully before you press down.
This tape is forever!

Placing a guideline before you stick down the adhesive is helpful.
The liner piece will cover all the marks.

All glued in place

Liner in place

Why will you hide inside?

Enjoy whatever you celebrate! Be Free!

Comments and Questions always welcomed!


Wednesday, April 4, 2018

Happy Birthday Balloon Card in a Box

Hi Y'all!
Robyn here!
The birthday card we've all been waiting for.
Looks like it takes a lot longer than it does to create, can be modified for all ages and genders,
folds flat for mailing
and is tons of fun to make!

On the mat


I added the
Birthday Collection
by
Elizabeth Craft Designs
designed by Suzanne


Many new stamps coming soon!
Watch this space!

Please share your designs with us!
Comments and questions welcomed

Wednesday, January 24, 2018

SURPRISE DRAWERS GIFT TREAT BOX / Funky Love You Gift Box /

Hi Y'all!
Robyn here, still in 3-D mode!
This box has some assembly required and I found it a lot of fun to put the pieces together and embellish.
On the mat

On the mat
I separated out the heart and love for design elements on the drawers.
Love you is from Suzanne's new font collection

Patterned paper was created with new Elizabeth Craft Designs stamps, designed by
Suzanne Cannon
Love and Hearts Collection


Share the Love! Quietfire Digital style!
Comments and Questions Welcomed!


Wednesday, September 20, 2017

Happy Birthday Edge Script Card - You are perfect!

Hi Y'all!
Robyn here, still celebrating !
Lots of new files, dies and stamps here at Quietfire Design.
Mark your calendars!
CardMaker Magazine Quietfire Design Blog Hop this Friday!
There be prizes!

Using an oldie and a goodie from Suzanne's Silhouette Design Store
this file can be glammed up or down for anyone you want to celebrate.


On the mat

is a new die from Suzanne's
Elizabeth Craft Designs A Way With Words
This files is just cut and fold, and can be ready to mail in minutes it you can help yourself from embellishing for hours!
Even with the ribbon, glitter and popped up dies, it fits into a 5x7 envelope with a gift card for first class postage!

Happy birthday to all!
if you want to see what is going on, on my desk please hop over here.
Comments and questions welcomed.

Wednesday, June 28, 2017

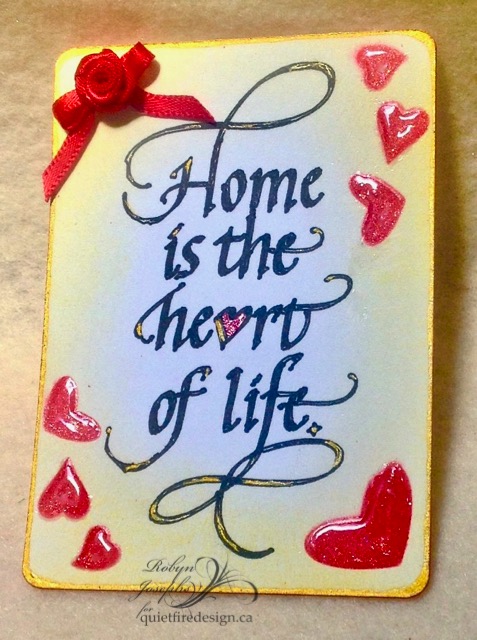
Home is the heart of life/ Sketching with digital files

Hi Y'all!
Robyn here today with one of my favorite techniques,
using pens to sketch digital designs.
It's just as easy as cutting when you know a few tricks.
On the mat
The work mat
  • Draw a rounded rectangle ATC size 2 1/2 x 3 1/2 and resize the quote file to fit.
  • Do an internal offset to fill in as much space as possible. the pen will only sketch on the cut lines.
  • Insert pen into pen holder.This is a .01 micron. you want it to fit snug. this will vary depending on your pen holder. (see tips)
  • To set the depth, put a popsicle stick underneath the holder and it should sketch on the stick when you move the stick around. This is what mine looks like.


  • Set the rectangle to no cut and the quote to cut, speed 5 pressure 10 ( this will vary- see tips)
  • DO NOT MOVE THE MAT AFTER SKETCHING
  • Set the rectangle to cut and the quote to no cut
Pen in place in the Cameo
  • Remove the pen holder and replace with the cutting blade.
  • Cut the rectangle. Settings will vary depending on your cardstock.
Here is how it looks on the mat after sketching and cutting.


Make the card your own by filling in with a fine line pen or brush. 
Embellish the lettering with gold.
It looks like my hand lettering only better!
Suzanne is a wonder! with a broad edge pen.

The hearts are inked and embossed using the 
and that's a technique for another day!
(a bit more on my blog and WOYWW!)

***Sketching Tips***
  • Practice Cut, practice cut, practice cut-this will save you loads of time, paper and ink!
  • The machine doesn't know if you are cutting or sketching. For some reason some sketch better when set to blade.
  • This technique does require experimentation. There are lots of holders and DIY holders out there. Find what works for you and have fun!
  • Sketch with the pen before you set it in the holder to make sure ink is flowing. Some pens work better than others, and sometimes they run out of ink in the middle of a design! If this happens you can pause and insert another pen. Just be sure to not move the mat.
  • Wrapping some tape around the pen, even if it fits snug gives some tooth for the holder to grab onto and helps to keep the pen in place during sketching.
  • When sketching I find setting to the fastest speed and lightest pressure gives the best results.
  • Smooth paper- I use Neenah Classic Crest, 80 and 110, gives the most finished results. Any texture in the paper will cause skipping in the sketch.
I'd love to see your creations!
Comments and Questions Welcomed!