Wednesday, February 13, 2019

Balloon Heart Monogram

Hi Y'all.
Robyn here riding the wedding vortex!
Ray and Jillian are tying the knot in September and the 
Balloon Heart Monogram font
was calling out to me.
The card could be used for save the date, place settings, gift card, thank you gift card, and mirror I love you reminder!


They like simple and elegant- no fuss and if up to Ray, no glitter.
Colors are dark reds and purples and hints of rose gold.


On the mat


The background was made using a mask made from hearts in the
Place the larger heart on the card, and using blender brushes, blend Distress wilted violet.
Remove the larger heart, place the smaller heart and blend Barn door.
Go back and forth a bit, carefully and put a little Delicata gold in the center.
It will blend with the barn door to make a rose gold.

Put the card on the mat and use a  pen to sketch the ampersand. (letter "w")


Cut the monograms-glitz up just a bit with a jelly roll gold pen and glossy accents.
Adhere to the card, adding a clear pop up dot to the balloons for dimension.

Up up and away till the wedding day!

Comments and Questions Welcomed!


Tuesday, February 12, 2019

Flamingo Love You Card

Hello, Connie Nichol here today with a quick card I made for my husband for Valentine's Day. 


The flamingos are actually from a gift card box cut file available in the Silhouette Store but I thought they were just adorable.  I love the way there is a heart in between the two heads and necks.


I cut the large heart from Suzanne Cannon's Hearts Monogram Font file using the period key.  It was easy to fiddle around with the sizing so that it fit the 'love you' stamp perfectly.


The stamp is in the Love and Hearts clear stamp collection.


Last but not least I added a couple of teeny die cut hearts using the Calligraphic Elements 3  die set.  


Super quick and guaranteed to bring a smile to your Valentine's face.  Thanks for stopping by, Connie

Quietfire Design Products Used:


Other Products:  Bazzill and Close to my Heart cardstock, Stickles glitter glue, Versafine black ink.


Monday, February 11, 2019

Assembling the Quietfire Love Train


What an adorable addition to your Valentine's Day decorations!  Get the file at the Silhouette Design Store (It's Silhouette ID 287386). Then the fun begins!  Instead of using my colours, go ahead and brighten it up with patterned papers if you wish.

Assembling the train cars:
Fold up all perforated score lines.  Assemble train car boxes with adhesive. Also assemble the 5th box in this step and set aside - it’s for the locomotive. Add decorative strips along the top edges.  Add wheels to the base by lining up the bar between the wheels with the base of the box.  Repeat for all train cars.


Fold letters along the perforated score lines then up and adhere together at the top of the letter.  Attach one letter in each of the train cars.


Assembling the Locomotive:
Fold the locomotive cab along the perforated score lines.  Attach to the previously assembled box by lining up the bottom of the cab with the bottom of the box.  Attach the locomotive wheels with the bar between the wheels lined up with the bottom of the box.  Add the decorative elements as shown.


I've included four rectangles with score lines which can be folded into a U and used to attach the locomotive to the L car and attach the cars to each other if desired.

Fill with candies and enjoy your Love Train!
Happy creating, Suzanne


Saturday, February 9, 2019

Assembling the Quietfire Card in a Box!

Although the Card in a Box comes in slightly different configurations, they all assemble pretty much the same way!  They're just too cute!

If you have a specific question about a design, please contact me directly using the contact box in the sidebar or even better, my website, and I'll be happy to help you out!>>>>>>>>

Want to see the Sleigh Ride Card in a Box assembly video?  Click HERE!

Want to see the Park Bench Card in a Box assembly?  Click HERE!


What makes them really fun is that they fold flat for mailing.  I've created quite a few variations. Here is a small sampling!


These awesome projects look complicated, but they're really simple!  Here is a detailed video tutorial to help you out.  It's for the Halloween box, but it's basically the same for all of them! These are available in the Silhouette Design Store (try filtering for "card").   Happy creating! Suzanne
(If you're receiving this as an email update, click here to go to the video on YouTube.)


www.quietfiredesign.ca

Wednesday, January 30, 2019

Heart Garden Lantern and Gift Box

Hi Y'all!
Robyn here with hearts on my mind and on the mat!
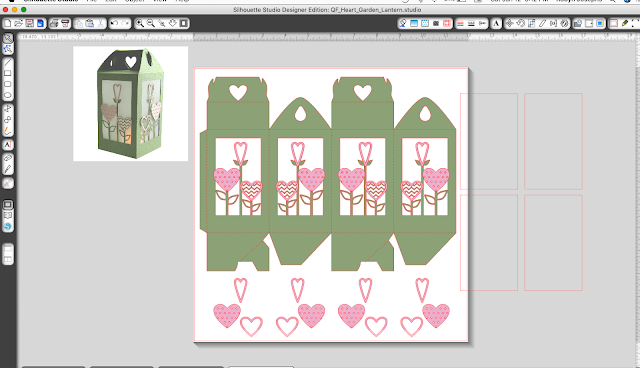
This beautiful lantern is cut in one piece plus a few heart embellishments.
The liner is optional and with a votive candle
the Love Light Glows!
EXCITING NEWS!
Please join the
On Facebook.
In addition to inspiration and a place to share all your creations made with Suznanes Dies, Stamps, Files and Stencils, there will be
Facebook Live tutorials
and Giveaways! 
  

On the Mat


Suzanne is creating sets in the Silhouette Store
The top of the box also makes a lovely card front


On the mat

and a gift card holder
On the Mat

Spread a little love around!

Comments and Questions Welcomed!

Wednesday, January 23, 2019

Fairie Focus: create a sweet Garden Fairy tag!

Hello Crafty Friends!

It may be January but I am thinking of spring, flowers and gardens.  Of course, every gardener knows that fairies help make every garden more beautiful.  Today I am celebrating  garden fairies with a sweet tag created using the Garden Fairy Tag digital cutting file.

Tag instructions:

  1. Use large tag cutting image to cut purple card stock.
  2. Cut and mat purple patterned paper.
  3. Cut green patterned paper the same width as step 2.  Use scissors to create a swooping ground.
  4. Apply Distress Ink along edges of 1, 2, 3.  Use double sided adhesive to mount to tag front.
  5. Cut stem from green card stock.  Cut fairy from light purple card stock.  Apply Distress ink along edges.
  6. Mount stem using liquid adhesive.  Mount fairy using double sided tape.
  7. Cut lilies of the valley bells from white card stock.  Mount using double sided adhesive tape.  Apply Stickles or glitter to bells.  (optional)
  8. Add desired ribbon to tag hole. 
  9. For the final step you can either cut the remaining green stem and leaves from the digital cutting file or add another embellishment.  (I just happened to have a fairie tag on hand and added it to the tag front.)
Thank you for stopping by!  I do hope you enjoyed the fun fairy tag!
Have a happy, crafty day.
Big Hugs,
Kathy Jo

Wednesday, January 9, 2019

Quotemarks Heart Bookmark - Coneflower - Love You


Yogi here today with a Valentine style bookmark for my baby sister who loves reading...

I'm using a design element background stamp from Quietfire Design ("Crackle Background")

And am using a few of Suzanne's electronic files available on Silhouette onLine store. Click images to purchase. 

 https://www.silhouettedesignstore.com/designs/52906?search=suzanne+cannon+bookmarks&sortby=relevance&submitted_search=true 
 https://www.silhouettedesignstore.com/designs/65408?search=suzanne+cannon+coneflower&sortby=relevance&submitted_search=true

https://www.silhouettedesignstore.com/designs/53580?search=suzanne+cannon+Love+You&sortby=relevance&submitted_search=true
Opened SCAL (Sure Cuts A Lot software) and the - Quotmarks, Coneflower & Love You files. See layout below. Cut all from white 110# Staples Cover cardstock.


Inked the crackle stamp with Versamark, repeatedly stamped and then clear embossed. Sponged Distress "Barn Door" and "Mustard Seed" all over. Gently wiped excess inks off crackle area with a damp paper towel.


Extended the heart shape on the 2 small partial bookmarks and cut out. Inked with the Barn Door and embossed with Emerald Creek "Chinese New Year". Adhered to tag - front and back.

Colored the coneflower pieces with the Mustard Seed and then a touch of "Fossilized Amber". Forthe flower head with "Forest Moss and then with some "Brushed Cordury", the stem with the Forest Moss. Adhered all together and then onto bookmark. Added some textural squiggle marks using Liquid Pearls "Avocado".


Inked the "Love You" with the Barn Door and embossed with the Chinese New Year.

Inked the drop out hearts using Versamark and embossed with Emerald Creak Baked Texture "Vintage Beeswax". Adhered to bookmark so the flourishes on Love you fell on the hearts to protect them. Then adhered the Love You.