Wednesday, February 1, 2017

Dangling Hearts Bendi Card - Moi & Toi


Yogi here today and since we're getting close to Valentine's Day, thought I'd do something with "Hearts" BIG GRIN

I'm using an A Way With Words die from Elizabeth Craft Designs "Calligraphic Elements 2" also available on Quietfire Design HERE

Also using a couple of digital files from Suzanne available on the Silhouette onLine store - click on either image to purchase.

https://www.silhouettedesignstore.com/view-shape/173167https://www.silhouettedesignstore.com/view-shape/171913
  And using a sentiment  stamp from Quietfire Design
("Calligraphic Love Bits" 6pce set); 


Opened the "Dangling Hearts Bendi Card" in Silhouette Studio, ungrouped them and repositioned and removed some of the pieces, then cut all the elements I needed from white cardstock. While on the mat painted them with Distress Dabber "Spun Sugar". Allowed to dry and then removed them from the mat.

Ran the bendi card piece through my embossing machine using Spellbinders 2 in 1 "Hearts" folder. Hit the high points direct to paper with Distress "Worn Lipstick"

Inked the large open heart with Versamark and embossed with Distress "Worn Lipstick.

The small dangling hearts were inked with the Versamark and embossed with Inkadinkado "Hot Pink" embossing powder twice, adhered together using embossing powder. A small hole punched out to hang it with some deep rose twine.

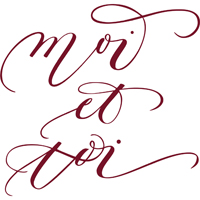
The Moi/Toi were cut at the size they appeared on my mat. I then cut a shadow layer, inked with the Worn Lipstick and adhered both layers together. Adhered to the large heart. Added a couple punched circles, adhered them, then adhered some pink medium sized half pearls to act as my dots for the "i's"

The ampersand is a die from Suzanne "Calligraphic Elements 2" set,  cut from a purple toned cardstock.

I stamped the "XOXO" onto white cardstock using the Worn Lipstick, and clear embossed. Die cut with Spellbinders oval die set, sponged the edges and adhered to the card with 2 pink diamond brads.


Tuesday, January 24, 2017

Moi et toi/ Ornamental heart / Heart Spray

Hi Y'all!
Robyn here getting a jump on all things hearts!

On the mat

Inside
***TIPS***
  • These files have teeny tiny lines. Use a double sided adhesive on your card stock before you cut so you don't have to deal with glue. I recommend Stick-it.
  • Press down well on your cut while it is on the mat before removing. Let the stickiness help you  safeguard the fine lines.
  • Take your time! Use a thin spatula to slowly lift the cut off of the mat.  
  • Mat should be just sticky enough to hold the paper. Too sticky and you will never get it off.  

Using the Heart spray card, I created a stencil, and a frame for the
focal heart image.
The shadow box effect enhanced the heart, with out getting too fussy.

The Stencil

Won't you be my Valentine?
Comments and Questions welcomed!


heart spray card
ornamental

Wednesday, January 11, 2017

Mahalo Scrapbook Layout

Hello, Connie Nichol here today with a bright and tropical layout featuring Suzanne Cannon's Mahalo Hawaiian scene electronic cutting file.

connie_nichol, quietfire design

Mahalo is a Hawaiian word meaning thanks or gratitude and I was truly grateful for my opportunity to travel to the Big Island of Hawaii and enjoy it with friends and family.  You can find the cut file here in the Silhouette store if you use a Silhouette Cameo, or if you use another electronic cutting machine, you can contact Suzanne Cannon at suzanne@quietfiredesign.ca to request an svg file that can be used in other machines.  I ungrouped the elements shown below and cut each one out of different colours of BoBunny patterned paper.  I also added a beautiful Quietfire Design stamped quote to embellish the page.


We Do Not Remember Days

Mahalo for stopping by!

Supplies:  BoBunny patterned paper and stickers, Versafine ink, Elizabeth Craft Designs stitched oval die, Sakura pen


Tuesday, January 10, 2017

Birdie Village Bendi Card, If kisses were snowflakes

Hi Y'all Robyn here with a holiday bendi card customizable for any holiday!

 As you can see on the mat, it's Christmas oriented 
ands a lot of parts!
By changing the colors, and adding a sentiment, this card can be suitable for any occasion.
Here is your blank canvas! Embellish at will!


The sentiment is heat embossed in white.
Comments and Question welcomed!


Friday, January 6, 2017

Relaxing Rocks


Well this just made my little calligrapher's heart sing. (It's Suzanne here with the singing heart)  Vinyl is amazing.  It holds such fine detail!  Why would I ever try to directly letter on a rock?  Especially one this small.  Guess what everyone is getting for Christmas next year?  You guessed it.  Rocks!

I used Silhouette white vinyl on the Cameo.  I shrunk/shrank/reduced the lettering to between 1 and 2 inches.  I placed a small piece of vinyl on the cutting mat and set the blade depth to 1 (the vinyl setting) and cut. After weeding out the excess vinyl from the negative spaces, I used the Premium Transfer paper to transfer the cut vinyl to the rocks.

Here are the files I used (and wow, you get Italic, Foundational and Modern Pointed Pen):

(links go the Silhouette Online Store)


There are other files I'd like to do, like Serenity, Smile, Welcome Home and more! And I need to design some more!

I tell you, I could go on and on and on.  But I need more rocks..... 
I hope this gives you some ideas for decorating your own rocks.  You know you want to try it.

Thanks for dropping by.  Happy cutting, Suzanne

Tuesday, January 3, 2017

Resolutions and Celebrate

Hi Y'all Robyn here sharing my resolution to
create more and worry less!
First ATC's of 2017!

On the mat
Two oldie and goodie files in the Silhouette Store
  • Ungroup the files
  • Draw a rectangle and size to 2 1/2 x 3 1/2
  • Resize the sentiment to fit into the rectangle
  • For sketching- set the sentiment to cut and rectangle to no cut
  • Put pen in the holder and sketch sentiment
  • DON'T MOVE YOUR MAT!
  • Set sentiment to no cut and rectangle to cut
  • Replace pen with blade and cut
These were both sketched and embellished on stash backgrounds


This ATC, the sentiment is cut from glossy paper and colored with alcohol ink
Even at this reduced size, it cut and came off the mat perfectly.
These files work beautifully with vinyl as well.

Make 'um or break 'um, be sure to be creative in 2017!
These cards morphed into Brave Girl cards.
Be Brave and hop over to my blog to view the transformation!


Comments and Questions welcomed.

Wednesday, December 28, 2016

Snowflake Butterfly Scrapbook Layout

Hello, Connie Nichol here today  with a project featuring two Quietfire Design digital cutting files -  'Snowflake Butterfly' and 'Let it Snow'.  These files are available in the Silhouette store here

connie_nichol, quietfire design

The snowflake butterfly cut file is so gorgeous.  I debated whether to cut several small butterflies to use as page embellishments, but in the end, went whole hog and cut out a butterfly to cover most of the page.  
It started out white, as did the 'Let it Snow' title, but that looked too stark, so I added some pinks and mauves with watercolour paint.  I used lots of water and just dabbed randomly to get a variegated look.


Part of the original white butterfly wing


and the water colour paint that I used.  Just wet a brush with plenty of water and a few different colours of paint to customize your die cuts.  Let dry and then add a photo and a few embellishments, but with electronic cutting files as pretty as the snowflake butterfly, let it be the main feature on the page instead of adding too much other stuff.  Happy Scrapbooking!

Supplies:  Close to my Heart cardstock and water colour paints, Martha Stewart border punch, PinkFresh Studio stickers, Imagine Crafts white pico embellisher, Silhouette Cameo.