Wednesday, July 11, 2018

Snowflake - Country Plank - Winter Ice - May Your Heart


Yogi here today with a center split easel card... Suzanne asked the design team to create some Xmas cards this month so here is my first one of the year. BIG GRIN.

I'm using a quote stamp on the floor from Quietfire Design ("May Your Heart...");

These are the electronic cut files I'm using from Suzanne available on Silhouette. Click image to purchase. The OTF fonts Suzanne is coming out with work great in emails, Word, Excel etc. and I'm using it in my Sure Cuts A Lot (SCAL) software - love them

  https://www.silhouettedesignstore.com/view-shape/270464https://www.silhouettedesignstore.com/view-shape/267798

And the digi paper from Suzanne available on Quietfire Design:
http://www.quietfiredesign.ca/Winter-Ice-Patterns-Digital-Papers.html 
Printed the snowflake paper both on 110# white cardstock and a no brand calligraphy practice paper I love that is a bit thicker than normal printer paper.
Opened SCAL software, activated the font key and typed the words "Merry Christmas". 

Opened the Snowflake box and removed everything except the snowflake, resized it to 2.5" and cut from the printed cardstock. Then printed a shadow layer of the snowflake from the deep blue cardstock and adhered both together.

Scored and folded my card structure (see diagram at below). Cut deep blue cardstock to 7"w x 10"h. Score along the 10" side to create a top fold 5". Cut the side panels 1"w by 5"long (to the center score line...). Now score the the center piece that is 5"w x 5"h in half, scoring at the 2.5"h. Cut a piece of snowflake cardstock 4.75"w x 4.75"h and adhere to the bottom scored section. (see pics at bottom of page, you'll see the snowflake cardstock is only adhered to the lower section of the fold)
Adhered the snowflake to the left edge.

Sponged some dark blue Distress (Faded Jeans) around the edges of each letter, then adhered. Since this is cut in the same paper as the background and usually placed so it blends into the background - the technique seems to be being called "Eclipse Technique". I like it...


On the floor: Cut strips of the snowflake paper to cover the side panels and the floor (2pieces - .75" x 4.75" and  1 piece 4.75"w x 4.75"h), adhered to appropriate sections. Adhered the right panel to the floor.

Adhered only the outside edge and front edge of the left panel to the floor creating a pocket for the gift card.
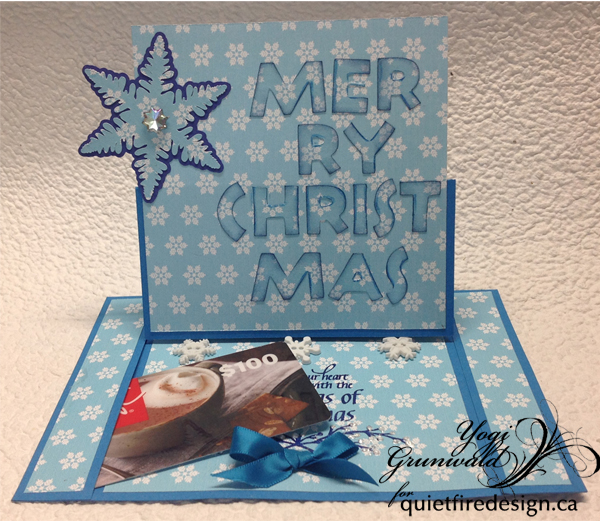
Used my stamping Platform to stamp the quote using Versafine "Majestic Blue" and clear embossing. Used a Liquid Pearls "White Opal" and applied dots on the berry sprig.

Adhered 3 white snowflake buttons using hot glue to act as my stopper and adhered a small blue ribbon bow with hot glue.


Wednesday, July 4, 2018

4th of July Star box

Hi Y'all!
Robyn here 
 with a seasonal file with multiple uses- hostess gift, table decor, silent Auction item
(You know they ask you!)
Party Favor, Cake topper?


These long pieces are the sides of the box.
Fold on all the score lines.

Use a strong adhesive-Elizabeth Craft Designs double sided, one point at a time.

Begin with the side without the tab, adding adhesive as you go, place carefully before you press down.
This tape is forever!

Placing a guideline before you stick down the adhesive is helpful.
The liner piece will cover all the marks.

All glued in place

Liner in place

Why will you hide inside?

Enjoy whatever you celebrate! Be Free!

Comments and Questions always welcomed!


Wednesday, June 27, 2018

Canada Day, Eh?

Hello, Connie Nichol here today with a Canada Day scrapbook layout featuring the Oh Canada dingbat font designed by Suzanne Cannon and available in the Silhouette Design Store.

connie nichol, quietfire design, oh canada dingbat

If you're not familiar with dingbat fonts, they are similar to other fonts except that shapes and symbols take the place of what would normally be letters.  You download the font, double click and select install, and your computer adds it to your font library.  This Oh Canada font features 26 Canadian icons to print or cut - here are some of them.  Absolutely perfect for Canada Day, and of course you can make them any size or colour that you want.  

After installing the font, I cut the title Canada eh? and a handful of other shapes out with my Silhouette Cameo.  I am particularly enamored with the moose.  Such a beautiful silhouette!  With the variety of Canada themed dingbats available in this font, you really don't need any other embellishment.  Just pick your favourites, cut them out and use them to adorn your Canada themed photographs.  Happy Canada Day!!  Hope you all get out and enjoy it.

P.S.  I had saved my volunteer badge and lanyard from last year, so I added that memorabilia as well.


Wednesday, June 20, 2018

Coffee or Tea Dingbat Font- Coffee and Friends are the perfect blend.

Hi Y'all!
Robyn here on vacation this week, so I made two cards last week, using the same files and 
to show you the versatility you get with each purchase from

The shaped card is created from the
Coffee or Tea? Dingbat Font
On the mat

Install the font and you get 26 designs to cut, sketch, whatever !

Design mat

Hints:
  • Make several copies of each image so if you mess up modifying  you have another one handy
  • use text to mark images you want to save, identify. 
    • Set the text in the image to "no cut" right away so you don't forget!
  • Have fun, mix and match, modify and see what happens! It's only on the screen.
  • Cut out dummies with copy paper to make models to see if you like it before using the good paper and vinyl.

New Stamps

Lots of new files and stamps yet to share, so please come back often!
More inspiration to be found at Quietfire Creations-keep your eyes peeled for upcoming designer challenges!

Comments and Questions Welcomed

Wednesday, June 13, 2018

Home On The Range - Heart Of Country Font - You Are The Best


Yogi here today, and since it's almost Father's Day, thought I'd make a nice western card for a guy...

The font "Heart Of Country" works great in emails, Word, Excel etc. I used it in my SCAL (Sure Cuts A Lot)

I'm using sentiment stamps on the floor from Quietfire Design  ("I Don't Tell You Often Enough" 5pce set);

These are the electronic cut files I'm using from Suzanne available on Silhouette. Click image to 

purchase. 

https://www.silhouettedesignstore.com/view-shape/268946https://www.silhouettedesignstore.com/view-shape/267816

Opened SCAL software and the Home On The Range file. Ungrouped, removed some of the items keeping the hat page and the horse page, the square and the hat and leaving all at the size opened. Click on images to enlarge.


Positioned the horse page and hat page. Butted up the edges to meet at the middle. Used the square and enlarged it to hide the opening of the hat page (see 1st pic above). Grouped and then selected it all. Welded (see 2nd pic above).

Selected the "Heart of Country" font and typed each letter for "DAD" separately. Twisted and repositioned them to overlap. Grouped them, resized to a total of 2"wide, and welded together.

Cut away the horse from the easel structure, score and fold to create the easel.

Cut a horse page, color as desired and adhere to front of card. I colored direct to paper with Distress mini pads "Black Soot" for the horse, leaving the tail and feet white. "Tea Dye" for the ground area. I left the frame on the horse page white.

The Hat page, colored the frame with some brown and embossed with Emerald Creek Baked Texture "Dirty Sand" embossing powder. Colored the hat on the hat page with "Antique Linen" and the single hat with "Brushed Corduroy". Adhered to hat page, then onto front of card.

Colored the DAD with "Faded Jeans" and clear embossed. Adhered diagonally across frame edge.

On the floor: Stamped the sentiment using Versafine Black Onyx and clear embossed.
Adhered square gems as my stopper. 


Wednesday, June 6, 2018

Coffee or Tea? Dingbat Font- I don't need an inspirational quote I need coffee/Tea and Thee

Hi Y'all!
Robyn here ROFL!
New stamps, new cutting files and
****FONTS****
Suzanne has a big Elizabeth Craft Design release too.
What's New
with  inspiration
ECD blog here.

The shaped card is created from the
Coffee or Tea? Dingbat Font
On the mat
Install the font and you get 26 designs to cut, sketch, whatever !

Design mat
Hints:
  • Make several copies of each image so if you mess up modifying  you have another one handy
  • use text to mark images you want to save, identify. 
    • Set the text in the image to "no cut" right away so you don't forget!
  • Have fun, mix and match, modify and see what happens! It's only on the screen.
  • Cut out dummies with copy paper to make models to see if you like it before using the good paper and vinyl.

New Stamps

The inside features the mug stains and splats


This quote cracks me up each time I read it!
I hope you will find time to try some of them.
I have a bunch more to show you, so please check back soon!
Comments and Questions Welcomed

Wednesday, May 23, 2018

Butterfly Dragonfly Gift Card Box- You can do anything

Hi Y'all!
Robyn here with a gift card box suitable for any occation.
This box is going to graduate.
I hope they take the sentiment to heart.

On the mat

The box is one piece and folds up easily.
Butterly and dragonfly panels slip in, and are interchangeable with many other designs in
Suzanne's Silhouette Store
The square is a simple pocket to hold the gift card on the back.
Just for you is a print and cut label your an place anywhere.

I used the cut out window and a new stamp to create my pocket.

You can do Anything

Today is the 9th Anniversary of WOYWW.
Folks all over the world share what is on the work desks.
I look forward to the ATC swap every year.
Please join us!
WOYWW 9th

Comments and Questions Welcomed