Showing posts with label Lantern. Show all posts

Monday, February 26, 2024

Assembling the Quietfire Pop-Up Wrap Lanterns


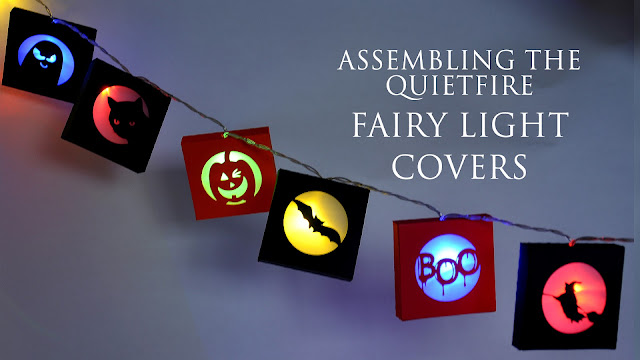
You're going to love making these lanterns!  One colour and oh-so-simple to assemble!  They're fun home decor in natural light and awesomely cute when lighted from the inside.

In a nutshell.... Simply cut (I like 65lb cardstock for these), apply adhesive to the end of the rectangle with the notch and overlap the other end till it covers the notch.  Carefully “fluff” the cut elements on the sides.  Looks great as is, or add a flameless votive candle.


You can find these lanterns on my Silhouette profile HERE. If you have trouble finding them, filter for "Pop-Up" on my personal profile.

And here is how you assemble them....  (shortest tutorial ever!)

If you are receiving this as an email update, simply go to the Quietfire Design YouTube Channel HERE to view the video.

Happy creating!  Suzanne


Monday, October 25, 2021

Assembling the Quietfire Fairy Light Covers

This is the Fairy Light Covers Halloween Collection, but I think you're going to see more of these!


The fairy light covers are so fun and easy to make.  Cut all the same design or mix and match!  Have fun!

I've made a super short video tutorial to show you how to assemble them - but you probably don't need it! These covers slide onto standard mini light string bulbs and can fold flat for shipping and storage. Cut the solid squares from vellum. 

Check out all the Quietfire Fairy Light Covers! You can find these on my Silhouette Design Store pages.*
If you're receiving this as an email update you will find the tutorial on YouTube HERE.


*If you purchase something using this link, I might receive a small commission. Thanks!

Tuesday, July 27, 2021

Lemon Summer Decor Lanter


Hello, all!

A funny thing happened here. Robyn and I both picked the Watermelon Decor Lantern as our blog post project. So after a session of scissor-paper-rock :-) we decided for Robyn to stick with the watermelon lantern and for me to pick another one. Lucky me Suzanne did a couple different ones, so I went for the 
Lemon Summer Decor Lantern.

What a wonderful and fresh summer decoration.

You will need cardstock in the colors of
yellow
white
transparent sheets (for the panels)
I also used Embossing Powder to make the lemons shine :-)


all cut


decorating the lantern


Suzanne did a video on how to assemble the lantern, you can watch it here.


Have a happy, crafty week,
Kora


Wednesday, May 13, 2020

Lanterns-Kindness, Gratitude, Patience, Breathe


Hi y'all!
Robyn here, shining a little light!
Did you ever have to make up your mind?
With 1000's of Suzanne's files to choose from, with instant download it can be a challenge!
I made it easy on myself and chose them all and combined into one.

Illuminated

This Lantern combines all  I love about digital files.
Once I DL them I can do whatever I want.
Ungroup and regroup and every project is uniquely yours with the 
Quietfire Design style.

Another choice is perorated or score.
The models shown here show the perfs so you see what you are getting with the file.
They can be ungrouped and removed if you prefer the scored look.

On the Mat
Kindness Lantern


The working mat


I played around with the overlay words, and no matter what I tried, simple looked the best.
They will not go to waste!

Supplies


Any way you look at it is a good reminder for these times!
Please share your creations with us at
on Facebook.


Sunday, January 6, 2019

Making Quietfire Lanterns - Tutorial

I love making these lanterns!  They come in several different sizes, but they are all assembled the same way. The awesome thing about them is that they can fold flat for mailing or storage till next year!

I create new ones frequently and if you need a little reminder how they are assembled, follow along below.  If you're making your first lantern, check out the Assembling Quietfire Christmas Lanterns from the Silhouette Cutting Files on YouTube or click below. (If you're receiving this as an email update, please click on the link to view the video on YouTube.)

If you wish, there is a slightly shorter refresher video on YouTube HERE.


Use this lantern as a centerpiece or cut a collection of them! Use them as table decorations at each place. Add a vellum panel and fill them with flameless votives or add a tiny plant or treat – do whatever your imagination dreams of!

Here is the short version of the instructions.

  1. Open the file in your software.  Ungroup all the elements, leaving the lantern on the mat.  Cut from desired colour. If there are any on-lays, cut them from your desired colours as well.
  2. Cut the vellum panels if you are going to use them (don't forget to change your blade settings before - and after!) 
  3. Place the lantern face down and fold all the perforated score lines up towards you except for the two shown. 
  4. Adhere the vellum panels inside the lantern now if you wish to use them.
  5. You may add any on-lays at this point.
  6.  Fold sides to create box, add adhesive to the tab and secure. 
  7. To create the bottom, fold the diagonal score lines on the irregular tabs outwards. Apply adhesive to those.  
  8. Adhere this tab to the adjacent (regular shaped tab). Repeat the same with the two remaining tabs. 
  9. By pushing your finger up at the bottom of the box, you will now be able to fold your box flat. When it is returned to lantern shape, the floor of the lantern will “lock”. Assemble the top by sliding side tabs over the notches. 
Voila!  You've done it!  They're so cute, you'll want to make another!
Happy creating! Suzanne