Tuesday, December 13, 2022

Winter Deer Treat Cup/Peace- Mash up Card

 Hi Y'all!
Robyn here with one of the last and not least Holiday cards of the year.
Procrastination was useful as I had so many files to upload to my library the files mixed and mingled in the creative space and this card emerged!

Winter Deer Treat Cup, is an adorable quick 3D project, and I used just the silhouette.
Always make a copy before you start messing with it!
On the mat

Peace is a file I return to again and again in all seasons

Card base and layers,  you can use any of the hundreds of Suzanne's card files.
I thought I was going to use the Joyful sentiment.

Working mat

I cut four peace, layered them for dimension and used a black layer on the bottom for a drop shadow.

You can use the negative as a spacing template, and with some careful cutting get a bonus card out of it.
I wasn't feeling the snowflake, so that will also be saved for another card.


****Digital Cutting Tip****
Use a clean soft brayer to  roll over your paper on the sticky mat.
For these intricate cuts you want the mat to have the least stick possible and still get a good cut and the brayer will help insure good contact.
Brayer again before you remove the paper, to keep the cut on the mat, remove the negative, then roll your mat, not the paper to release the cut.


Supplies
May Peace be your gift this holiday season and in the New Year!
Comments and Questions warmly welcomed.
Please visit us for more inspiration and share your creations at
on Facebook.


Sunday, November 27, 2022

CHRISTMAS A FAIRY LIGHT COVER


Hello, everybody!

Are you getting ready for Christmas? 

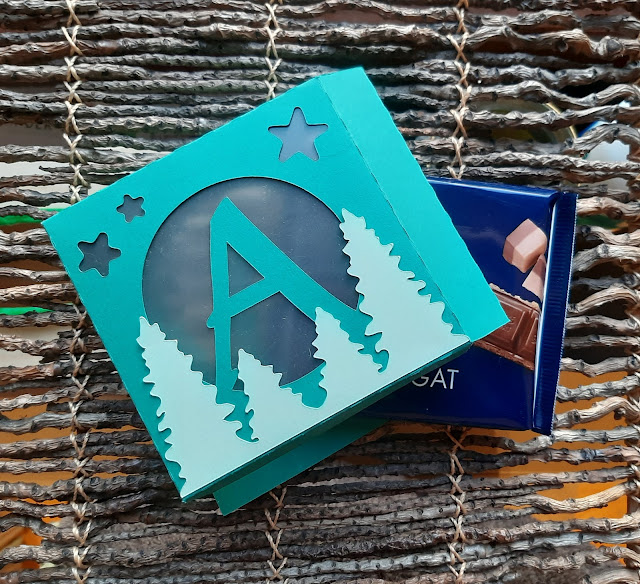
The following digital file was designed to be part of a bundle - using all you will have the word Christmas. You can put electric lights into it, which adds a magical touch. I used just one box the "A". And if you know me, I didn´t put an electric light into it, I -of course- used it as a treat box and put chocolate in.

You can find the digital cutting file here:
Christmas A Fairy Light Cover

all cut


Once you have cut all the parts, it is simply "fold" and if you wish glue them together. 

Have a happy and safe week. I hope your weeks before Christmas won´t be too stressful.

Kora


Sunday, November 13, 2022

Assembling the Quietfire Sleigh Ride Card-in-a-Box

 How about these cuties, loaded with personality! Who would you like to take for a sleigh ride?  I pick the hippos!


These projects are all assembled pretty much the same way except with different characters and onlays (the snowmen have black underlays). 

The sleigh is assembled like a card-in-a-box and will fold flat.  The person pulling the sleigh will require something like a small magnet or Velcro at the top of the head so it can come apart to go flat.

I've made a sample video to show how the snowmen were assembled. Check it out on YouTube HERE.

Enjoy the sweetness! Suzanne

Tuesday, November 8, 2022

Eat Sleep Sing


Hello, all!

Here is a sweet little box with a wonderful message and perfect for a music lover :-)

You can find the digital cutting file here:

all cut

I love how the details of the paper fit perfectly together with the project.


You can even put electric lights inside :-)

Have a happy week!
Kora


Tuesday, October 25, 2022

QFD PUMPKIN TIME MONOGRAM FONT


 Happy Halloween everyone!

I made "place cards" for our Halloween dinner. These are little boxes that can be filled with sweets. To personalize the boxes I used the 

QFD PUMPKIN TIME MONOGRAM FONT


You do not need a cutting machine for the QFD Fonts. They work with any word processing program. Just print the letter in the color of your choice and cut the paper to whatever form and size you wish it to be. 

Have a spooky evening!
Kora


Tuesday, October 11, 2022

QFD LIBRA ZODIAC MONOGRAM FONT


Hello, crafty friends!

It was my friend's birthday recently. I couldn´t stop by to see her, so I decide on making her this card using the QFD Libra Zodiac Monogram Font.

You can find the font here. 

QFD LIBRA ZODIAC MONOGRAM FONT


the monogram printed on a piece of white paper


To add a stary/night sky/galaxy background I used some brush pens. Color your arcyl block and spray some water on it.


Then turn the block upside down and onto the paper. Let the water and color sink in. Leave it to try and decorate it more, if you wish. I added some rhinestones to the stars.


Have a happy and safe week!
Kora

PS: You can find all the zodiac signs on the Silhouette page.


Friday, October 7, 2022

Following the Quietfire Blogs!

Follow my blog with Bloglovin

 For years I've used a service called Feedburner to send blog posts out to subscribers by email.  Unfortunately you might have noticed that those emails are no longer happening.  Feedburner worked extremely well, with no ads included, but for some reason Google discontinued the service....  

I'm suggesting you use Bloglovin' to follow this blog.  It doesn't work the same, but it seems like the best alternative at the moment!

So let's see how this works!

Bloglovin'