Tuesday, October 24, 2017

It's All About the Chocolate & Cookies - Sheri Holt, Guest Designer


I have another project to share today featuring the Happy Birthday Tag Box and Art Deco Floral Frame Card digital cutting files. [Note: svg files, usable by most digital cutting machines, are now available for these projects through Silhouette America]

Sometimes you just need a special little treat for someone and this project was SO EASY!! The hardest part was trying not to eat all those cookies!!!


The card measures 4.5" square and the tag box measures approximately 3.5"W x 1.5"D x 4.5"H. It is the perfect size for about 3 cookies or a nice sized brownie if you choose.
Happy Birthday Tag Box


I used each of the 3 sentiments from My Dark Side Is Chocolate. The first one for the treat box and then the other two for the inside and outside of my card.
My Dark Side stamp set


I used reversible cardstock with a great mix of autumn colors. I think it adds a little something special to the inside of the box but it would be just as lovely in a solid color!


Thanks very much to Sheri for creating this awesome project to share with us!  Do you need a cookie? I do! You can see Sheri's first post on Quietfire Creations HERE and more of Sheri's projects on her blog My Sheri Cards.

Wednesday, October 11, 2017

Periodic Table Wine and Wine is Sunlight Scrapbook Page

Hello, Connie Nichol here today.  I occasionally love to scrapbook  in the 8 1/2 x 11 size, especially if I only have a single photo.  This size comes together so quickly.  Here, I use the Wine periodic table cut file designed by Suzanne Cannon as a page title.


The cut file is available here in the Silhouette Design store in studio and svg formats for any electronic cutting machine.  I cut the periodic table symbols out of patterned paper and backed them with black cardstock.
Quietfire Design also happens to have a wine themed stamp set, so I used a quote by Galileo to embellish my page.  This is such a great stamp set.


I added a few strips of patterned paper and some stenciled shapes reminiscent of  spilled red wine, and I was done.  Be sure to try scrapbooking in this 8 1/2 x 11 size if you have a single photo or want to finish a layout in a hurry.  It's a nice change.  Just cut your title words with your electronic die cutting machne and quickly build the rest of the page around that.  Happy Scrapbooking!

Supplies used:  Simple Stories patterned paper, wood stars and washi tape, Bazzill cardstock, Tim Holtz stencil, Ranger Ink, Quietfire Design stamp and cut file, Brother sewing machine.


Monday, October 9, 2017

Tree: 1, Witch: 0


I just had so much fun making these haunted trees!  The Witch just had to have striped stockings and a polka dotted skirt!  There are three different ghostie characters for your amusement.

New this week are:
Witch in the Tree and
Ghosts in the Tree

Create your own Black Forest for Halloween by cutting the trees in different sizes.  Mix and match witches and ghosts and trees - too much fun!

In the same vein.....
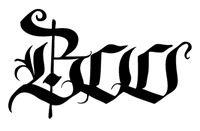
Because we can't leave the Periodic Table alone....

Periodic Table BOO
and
Jack-o'-Lantern Tag Box
 
Cute, huh?

 
Did you know that you can get these files in svg format from Silhouette now?  Sweet!

Happy Halloween!
Don't forget to use the Silhouette Creators discount code when ordering from Silhouette.  It's over there >>>>

Wednesday, October 4, 2017

Merry Christmas Ornament - The Music

 Yogi here today with what I think is an easy relatively quick card... BIG GRIN

I'm using one of the newest quote stamps from Suzanne available on Quietfire Design. ("The Music In My Heart...")

And I'm using 2 Silhouette cut files for this card. Click on either image to purchase. 


https://www.silhouettedesignstore.com/view-shape/107611https://www.silhouettedesignstore.com/view-shape/209594

 
Scored, folded my of white pearlized textured cardstock to create the easel. Cut another piece same size as card.

Stamped the background stamp (Hero Arts "Collage Music Background") onto the textured side of the extra cut piece using Versafine Black Onyx and Tim's Stamping Platform. Moved the stamp over and repeated to fill the whole piece of cardstock. Adhered to front.

Electronically cut the ornament from white cardstock, inked with Versafine Vintage Sepia and embossed with Emerald Creek "Mirror Gold" embossing powder twice to get a really good coating...

Adhered to front adding a gold variegated Sari ribbon bow.

 On the floor:

Stamped the quote onto a piece of white cardstock using the black and clear embossed. Die cut with Elizabeth Craft Designs "Stitched Rectangles" die set. Used my Metallic Gold Pan Pastels to add a hint of color on the white. Adhered to floor with 3D foam tape to act as my stopper.

Electronically cut the holly sprigs, inked with the sepia and embossed with the gold. Adhered to floor. Added some white pearls for the berries. 


Wednesday, September 20, 2017

Happy Birthday Edge Script Card - You are perfect!

Hi Y'all!
Robyn here, still celebrating !
Lots of new files, dies and stamps here at Quietfire Design.
Mark your calendars!
CardMaker Magazine Quietfire Design Blog Hop this Friday!
There be prizes!

Using an oldie and a goodie from Suzanne's Silhouette Design Store
this file can be glammed up or down for anyone you want to celebrate.


On the mat

is a new die from Suzanne's
Elizabeth Craft Designs A Way With Words
This files is just cut and fold, and can be ready to mail in minutes it you can help yourself from embellishing for hours!
Even with the ribbon, glitter and popped up dies, it fits into a 5x7 envelope with a gift card for first class postage!

Happy birthday to all!
if you want to see what is going on, on my desk please hop over here.
Comments and questions welcomed.

Wednesday, September 13, 2017

Kitty Love Hug Bendi Card

Hello, Connie Nichol here today with an adorable kitty bendi card using a cut file designed by Suzanne Cannon.  It's available in the Silhouette Design Store here for the Silhouette or as an svg file for other electronic cutting machines.  I've never made a bendi card before and I was super impressed with how quick and easy it was to create.  I was having so much fun, I made three bendi cards with slightly different variations.  You don't have to just use cardstock when you're creating these - patterned paper is very fun too, or a combination of both.  I added googly eyes from the dollar store to a couple of the kitties.


The cut file is just one big kitty and some hearts, so it is very easy to cut and put together.


I added a stamped sentiment from the Happy Birthday Plain and Simple stamp set from Quietfire Design.


That's it!   Give the Kitty Love Hug Bendi Card a try and make your own family of kitties.  Happy crafting, Connie


Wednesday, September 6, 2017

Lantern Christmas Noel & Halloween Boo - Have Yourself a Merry Little Christmas

Yogi here today with a couple lanterns. Suzanne recently came out with a Christmas lantern available on the Silhouette onLine store.. Love the shape. And while making it, I said to myself it would make a great Halloween lantern...

Click on the file image to purchase (also available in SVG format)

https://www.silhouettedesignstore.com/view-shape/209600

I'm using an A Way With Words die "Noel" from Elizabeth Craft Designs, also available on Quietfire Design HERE (please note, there are a lot of Noel cut files by Suzanne in different calligraphic hands available in the Silhouette store... I just happened to have the die cut on my desk and grabbed it...).

I'm also using a sentiment stamp from Quietfire Design ("Have Yourself A Merry Little Christmas" 3pce set) 

Click on any lantern image to enlarge.

quietfiredigital.blogspot.ca
I opened my SCAL (Sure Cuts A Lot) software and opened the lantern file. It takes about 1 sheet of 12 x 12 and 1 sheet of 8.5 x 11 cardstock. (See below for the layout in SCAL)

I cut everything from white cardstock. Folded along all the score lines. Then inked the lantern sides with Versafine "Vintage Sepia" and embossed with Emerald Creek "Verdigris". Glued the edge, top and bottom piece to close the lantern.

Painted the top piece with Distress dabber "Black Soot" inked with Versamark and embossed with Distress "Black Soot" embossing powder. I wanted a rough texture. Attached a green/gold narrow ribbon through the peak and adhered to the base of the roof prior to adhering to the lantern. Added some hot glue at the peak to ensure the ribbon stays put and to close up the hole I made...

Die cut the "Noel" from an off white cardstock and adhered to front.

Inked the holly leaves with the sepia and embossed with Queen's Gold embossing powder. Adhered to roof and front.

Added Liquid Pearls "Rouge" generously to create berries. When dry, added "White Opal" dots.

 
Stamped the sentiment on white cardstock using Versafine Black Onyx and clear embossed. Drew a wavy line mimicking the sentiment and cut along the line, then cut to separate the words and adhered parts on the three sides.

Here's what the Halloween lantern looks like. I used pumpkin and black cardstock only. Easy Peasy... no painting and I only added glitter to the "Boo" word and the owl's eyes.

I used the same file as the Christmas Lantern and then scavenged in my Halloween files for the various little elements. These are the files I scavenged... Click on any of those images to purchase.
https://www.silhouettedesignstore.com/view-shape/152659   https://www.silhouettedesignstore.com/view-shape/48609

https://www.silhouettedesignstore.com/view-shape/158548  https://www.silhouettedesignstore.com/view-shape/67389

 Click on any lantern image to enlarge.

The first 2 SCAL images are for the lantern layout. The 3rd image is for the Halloween scavenged images. I set them on the top and bottom of my mat and hanging off the edges so I wouldn't waste paper or time for cutting...


 Hope you'll give one of them a try. They go together really easily.