Monday, July 24, 2017

Watermelon box-Layering technique


Hi Y'all!
Robyn here with a summertime fun project!
After Christmas in July, time for some hammock time and  this sweet treat!
The technique I want to share today is layering paper pieces- die cut or digital cuts.
Watermelon Box

On the mat
The text is to help identify what pieces go where.
There are good instructions on the Silhouette Store page.
The only change I made was to copy the seeds and make 4 sets, so I could layer them.

***Layering Technique***

  • While the seeds are still on the mat, leave the number you need for the base layer, and lift the rest out.
  • Apply adhesive, I used a matte medium in a needle nose bottle( left over from baktik days)to the seeds on the mat.
  • Use a pick up stick or tweezers to pick up  the next layer of seeds, press into place, and add as many as you wish to get the desired effect.


I ended up using three layers for these seeds.
Wait a bit for the glue to dry, and lift out your seeds.
It's much easier to let the negative space hold the shapes in place when you are trying to layer.
For even more dimension, add glossy accents.
Celebrate the season with creativity, and don't forget the watermelon!
Comments and Questions Welcomed!

Wednesday, July 19, 2017

Periodic Table SNOW - Using Yarn as a Simple Embellishment

Hello, Connie Nichol here today with a wintery layout featuring the periodic table cut file SNOW, the snowflake spray stencil and some simple embellishment with white yarn.


I started by selecting a favourite photograph and some patterned paper, the beautiful Winter Wonderland line from Simple Stories.  I cut SNOW (sulphur, nitrogen, oxygen and tunsten) from white cardstock using my Silhouette Cameo and adhered it to the corner of the page.  (As always, if you don't use a Silhouette and would like this cut file as an svg file, just email suzanne@quietfiredesign.com).    I then added some snowflakes to the upper left corner of the page using white texture paste and the snowflake spray stencil.  Just goop it on and scrape off.  The fine details of the snowflakes show up beautifully as dimensional accents.


I had a bunch of yarn lying around my craft space for other projects and I thought to myself "hmmm, white yarn would work really well on a snow themed scrapbook page".  So, I added some swirls of yarn to add some texture and interest to the page.  You can use a pencil to sketch out a line, trace it with clear drying liquid glue and then gently place the yarn on top of the glue. 

Sketch out a design in glue.


Place the yarn over top.   Easy and quick, but it's very fun.  Add a few extra stickers or die cuts to embellish your yarn design and call it done.  Happy scrapbooking!

Supplies:  Simple Stories patterned paper, stickers and die cuts, Quietfire Design electronic cut file and snowflake stencil, Silhouette Cameo, Ranger texture paste, Aleene's white tacky glue, Scrapbook Adhesives by 3L tape runner and dimensional foam adhesive.

On the Quietfire site  |  On Elizabeth Craft Designs
Snow on Silhouette


Thursday, July 13, 2017

Let It Snow - Snowman - If Kisses Were Snowflakes


https://www.silhouettedesignstore.com/view-shape/70955Yogi here today... Quietfire is having a Christmas In July week... and I'm doing an easel card for the Quietfire Digital Blog

I'm using the digital file from Suzanne available on the Silhouette onLine store - click on image to purchase


 Also using a quote  stamp from Quietfire Design ("If Kisses Were Snowflakes...");  

Scored and folded my dark blue cardstock. Cut another piece as front. Dry embossed it using Cuttlebug "Winter Wonderland" set. Sanded the high points giving a ghost like look. My embossed paper was a bit shy in size, so cut a piece of an aqua glitter cardstock and created a frame.

Note: Why waste the whole piece of glitter cardstock by layering the dry embossed piece in front... Now I have the drop out piece for another card...

Opened the "Let It Snow - Snowman" on my mat. Pushed the snowman of my mat. Resized the word to 4.5"w, copied and pasted it 2 more times and the just the snowflake 4 times, then cut from white cardstock. While on the mat, painted the word piece with Distress dabber "Broken China". Let dry naturally. Removed from mat and inked with Versamark and embossed with Emerald Creek "Turquoise Shimmer" embossing powder. The snowflakes I embossed with "Psychedelic" embossing powder. Adhere the snowflakes to the word pieces, then onto the card front.


On the floor: Stamped the quote using Versafine Black Onyx on white cardstock and clear embossed. Trimmed down and adhered to a scrap piece of the aqua glitter cardstock. Adhered to floor with 3D foam tape to act as my stopper.

Adhered the snowflake ribbon and the snowflake buttons using hot glue
.

Wednesday, July 12, 2017

Ho Ho Ho Periodic Table of Elements/ Dona Nobis Pacem/ Leaves and Snowflakes Sprays Stencil - Christmas in July!

Hi Y'all!
Robyn here, keeping cool cutting Christmas!
Ho Ho Ho is available now ON SALE in Suzanne's Silhouette Design Store
from  the Periodic Table of Elements Series!
Holiday Geek Out!
On the mat

It's a tradition for me to make an ornament as a gift each year.
This is the first time I've been ahead of the game!
Here is an ATC (you knew it was coming) that with an addition of a hole and ribbon will be a gift card to go with the ornament.

Front
The Ho's were sized to complete the phrase in the smaller space.
Leaf and Snowflake Sprays Stencil

The Back


My sister in law aways says be careful what you do on the holidays, it might become a tradition.
I hope you will include Quietfire Design in yours
and remember all Christmas ON SALE now in the
Silhouette Store.
Comments and Questions welcomed !

Wednesday, July 5, 2017

Canada Outdoor Bendi Card - Thinking of You

Yogi here today with a Canada Outdoor Bendi card. 

Canada Day has just past, but we're celebrating and thinking of it all year... After all we don't turn 150 every day...

I'm using the main Bendi card file and parts of a couple other digital files from Suzanne available on the Silhouette onLine store - click on an image to purchase.


https://www.silhouettedesignstore.com/view-shape/203209https://www.silhouettedesignstore.com/view-shape/131732https://www.silhouettedesignstore.com/view-shape/83847


Opened the "Outdoor Bendi Card" in SCAL, and cut exactly as is from a 12 x 12 white cardstock. Colored the various images using Distress pads and a piece of double sided release paper where needed to act as a mask. Did not use the two overlay slotted rectangle pieces since I hand colored those areas on the main card.

Created the mountains by just drawing pointed mountains... on white cardstock, using the release paper and lightly sponging on one edge with "Weathered Wood" to create shadows to define the mountain edges. Cut around the mountains then hit the upper peaks with the edge of Picket Fence pad and embossed with Emerald Creek "Soft Fallen Snow" embossing powder. It has a nice snowy texture to it.  Adhered to back of Bendi card.

Stamped the "Thinking of You" using Versafine Black Onyx and clear embossed.

Electronically cut out the "Canada" word from white cardstock, inked with "Candied Apple" and clear embossed.

Electronically cut the greenery by ungrouping the file and moving the greenery to the mat. Cut 2 as per the file and  a third one flipped. Cut from white cardstock and colored with various Distress greens.

The maple leaf was embossed with the fallen snow. Adhered all the various elements.


Wednesday, June 28, 2017

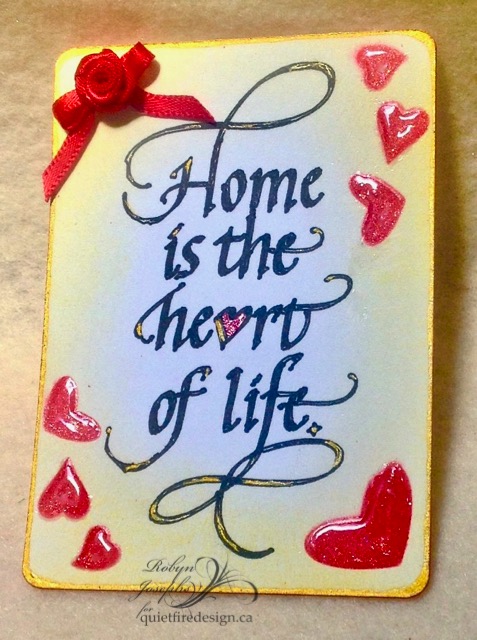
Home is the heart of life/ Sketching with digital files

Hi Y'all!
Robyn here today with one of my favorite techniques,
using pens to sketch digital designs.
It's just as easy as cutting when you know a few tricks.
On the mat
The work mat
  • Draw a rounded rectangle ATC size 2 1/2 x 3 1/2 and resize the quote file to fit.
  • Do an internal offset to fill in as much space as possible. the pen will only sketch on the cut lines.
  • Insert pen into pen holder.This is a .01 micron. you want it to fit snug. this will vary depending on your pen holder. (see tips)
  • To set the depth, put a popsicle stick underneath the holder and it should sketch on the stick when you move the stick around. This is what mine looks like.


  • Set the rectangle to no cut and the quote to cut, speed 5 pressure 10 ( this will vary- see tips)
  • DO NOT MOVE THE MAT AFTER SKETCHING
  • Set the rectangle to cut and the quote to no cut
Pen in place in the Cameo
  • Remove the pen holder and replace with the cutting blade.
  • Cut the rectangle. Settings will vary depending on your cardstock.
Here is how it looks on the mat after sketching and cutting.


Make the card your own by filling in with a fine line pen or brush. 
Embellish the lettering with gold.
It looks like my hand lettering only better!
Suzanne is a wonder! with a broad edge pen.

The hearts are inked and embossed using the 
and that's a technique for another day!
(a bit more on my blog and WOYWW!)

***Sketching Tips***
  • Practice Cut, practice cut, practice cut-this will save you loads of time, paper and ink!
  • The machine doesn't know if you are cutting or sketching. For some reason some sketch better when set to blade.
  • This technique does require experimentation. There are lots of holders and DIY holders out there. Find what works for you and have fun!
  • Sketch with the pen before you set it in the holder to make sure ink is flowing. Some pens work better than others, and sometimes they run out of ink in the middle of a design! If this happens you can pause and insert another pen. Just be sure to not move the mat.
  • Wrapping some tape around the pen, even if it fits snug gives some tooth for the holder to grab onto and helps to keep the pen in place during sketching.
  • When sketching I find setting to the fastest speed and lightest pressure gives the best results.
  • Smooth paper- I use Neenah Classic Crest, 80 and 110, gives the most finished results. Any texture in the paper will cause skipping in the sketch.
I'd love to see your creations!
Comments and Questions Welcomed!


Friday, June 23, 2017

DIY Canada Day BBQ Decorations!

On July 1 2017 Canada turns 150 years old! It's a perfect excuse for a BBQ and/or neighbourhood celebration.
Deck your table out with lots of maple leaves! All it takes is some red and white cardstock (and maybe a little white vinyl) and your Silhouette Cameo or other digital cutting machine.


Instructions:
Although it might be tempting to open all the files and cut all the red elements together and then all the white elements, it might give you a headache keeping track of each bit!  I think it's better to cut each project separately.  Depending on the crowd, most of these decorations can be kept for another year.  All these projects are very simple, with no fancy assembly.  Simply refer to the project photos - email me if you have a problem!  Curious what's in the basket?  Maple fudge*, of course!

Supplies:
You can get these all on the Silhouette site or I've bundled them together at a special price in svg format on the Quietfire Site.

Here are the individual links to the Silhouette Design Store (the designs are spread out as they've been created over time)
Canada Day BBQ Decorations - Design ID #83487
Canada Day Heart Box - Design ID #200525
Canada Day Maple Leaf Basket - Design ID #201626 
Canada Pennants -Design ID #62058

Other supplies
Red Cardstock
White Cardstock
Silhouette White vinyl

 You can cut out some smaller maple leaves out of vinyl and stick them to the rim of your plates (or wherever you might need a maple leaf - windows, railings....!). If you're worried someone might eat them, maybe cut them from cardstock!!


All the Canada Day Designs can be found on my profile on Silhouette, just search for "Canada" to separate them out!  I think a string of the lanterns would be really fun.  They fold to flat for storage.
 
 
Happy Canada Day!
Bonne Fete Canada!
Suzanne
 
*Maple fudge has a high vapour pressure in our home. I guess we'll have to get some more before Canada Day!