Showing posts with label In A Perfect World. Show all posts

Wednesday, December 26, 2018

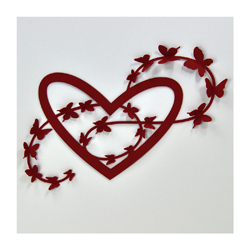
Butterfly Flourished Heart - Valentine - In A Perfect World - Easel card


Yogi here today and Christmas is over at last... and I thought I'd work on the next significant card making event - Valentine's.

I'm using a quote and sentiment stamp from Quietfire Design ("Calligraphic Love Bits" 5pce set); ("In A Perfect World..." 4pce set)

And am using a couple of Suzanne's electronic files available on Silhouette onLine store. Click images to purchase. 


https://www.silhouettedesignstore.com/designs/50365?search=suzanne+cannon+hugs&sortby=relevance&submitted_search=truehttps://www.silhouettedesignstore.com/designs/179785?search=suzanne+cannon+butterfly+flourished+heart&sortby=relevance&submitted_search=true
Scored, and folded my red textured cardstock to create my easel card structure (card size: 7"w x 5"h). Cut another piece from the red same size as card, adhered to front.


Opened SCAL (Sure Cuts A Lot software) and the Heart Butterfly Flourish file. Removed the card base image. Increased size of Heart/Butterfly to 6.7" x 4.5". Selected all and copied/pasted a 2nd image on my mat.


Opened the "Hugs" and increased size to 5"w x 1.9"H. Copied and pasted and selected "Shadow" style.

Cut everything from white cardstock. removed one of the Heart/Butterflies from the mat, cut away the butterfly flourish (keep for later) and inked the heart with Archival "Vermillion" ink pad, clear embossed. Set aside.

Colored the butterflies using Faber Castell Pitt pens and cut away from the vine.

On the other Heart/Butterfly colored the butterflies with the same colors as above. Adhered the cut away butterfly - bodies only. Using an embossing pen, inked the wings only and embossed with Emerald Creek Iridescent Shimmer embossing powder.


Adhered a piece of white "Coral Reef" paper to the card front and then the Heart Butterfly Flourish. 


On the floor:

Inked the "Hugs" using Versafine "Toffee" and embossed with Queen's Gold embossing powder. Inked the shadow layer with the Vermillion and clear embossed. Adhered both layers together and inked with Versamark and clear embossed (this gives a shiny layer to the gold layer and helps adhere the two layers together. Score and adhere to floor to act as a stopper.

Stamped the "Valentine" and the quote on white cardstock using Versafine Black Onyx and clear emboss. Sponge some Distress "Fired Brick" around edges and adhere to floor.

Add some flourish pearls


Saturday, June 25, 2016

Golden Gate Bridge Easel card - Thinking of You die - In a Perfect World

 
Yogi here today using one of the newest files available in the Silhouette onLine store "Golden Gate Bridge" - love it. 


As soon as I saw the newest images, I knew I had to do something with it. So I created an easel to showcase the bridge...

I'm using one of an A Way With Words die sets from Elizabeth Craft Designs created by Suzanne Cannon "Thinking Of You" also available on Quietfire Design HERE

I'm also using a quote stamp from  Quietfire Design  ("In A Perfect World" 4pce set); 


Here's what I did:
The card is 7"w x 5"h when closed
 
I opened the "Golden Gate Bridge" onto my mat.

Placed a standard image of a frame onto my mat to create the window, sized it to my finished card size, then resized the bridge image to fit within the confines of my frame.   Cut both pieces.

I copied and pasted the frame from page 1 to page 2. Placed another basic rectangle image on my mat and sized it to the same size as the frame, then placing the rectangle alongside the frame and welding the 2 together. The weld line will be your score line for a standard top fold card. I decided to block in a section of the window so the floor isn't as visible when the card is closed.


So I placed another rectangle to partially fill the window frame opening. I created it so it would fill half the window.

I used one of the basic images for the state of Illinois (gave me the best contour to create my hilly area...). Placed it along my center line, stretched it, copied and pasted it a couple times to fill the whole width.

I then selected everything and weld it together.

This is a preview of the welding which you should always check prior cutting.

Everything was cut from white cardstock. After cutting I scored to create the easel shape. PS: I cut little slits on the frame edge where the hilly area meets the frame so I wouldn't score through my hills...

The hilly area was stamped with Bees Wax "Coastal Rocks" using "Pumice Stone" and here and there with "Ground Espresso". I just kept inking and stamping till I covered the whole width. PS you can use any nice texture stamp to create your hill details. Mask off the bottom edge with some torn post it notes.

The water area was sponged with "Broken China" and then some "Blueprint Sketch" in a streaky fashion. Used the same technique but without re-inking the sponge for the sky. Added a couple doodle birds.

The outer frame was dry embossed using Darrice "Brick Wall" moving the folder to emboss the whole frame. Sponged with "Pumice Stone" and high points hit direct to paper with "Weathered Wood". Adhered to card front.

The bridge was inked with Distress mini direct to paper with "Carved Pumpkin" then embossed with Emerald Creek Hot Stuff "Thanksgiving" embossing powder. Adhered to frame.

Die cut the "Thinking of You" from white cardstock, inked with "Black Soot" and embossed with Emerald Creek "Onyx Frost" embossing powder. Adhered to frame

On the floor: cut a rectangle the width of the card by 1.25".  Die cut the letters(Elizabeth Craft Designs "Alphabet Caps" from black cardstock and adhered to the stopper adding a deep pink gel heart. Scored at the 1/4" and adhered to floor of card to create the stopper. The view is the back of the stopper.