Showing posts with label Happy Birthday. Show all posts

Wednesday, February 28, 2018

Happy Birthday Balloons Box Card/ Happy Birthday Gears Box Card, and more!

Hi Y'all!
Robyn here with
  Suzanne's latest Silhouette files to the rescue
as I have hundreds of spring birthdays!
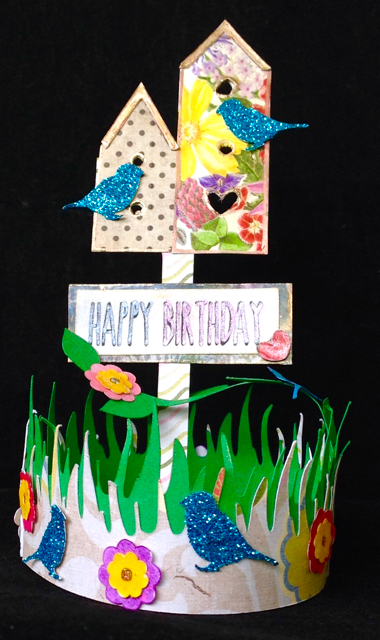
I'm highlighting two of the new birthday card boxes- they fold flat for shipping- they are all one piece (and embellishments)
and
 are all on sale right now 50% off!

on the Mat
Scraps make great balloon bunches! and put some into your card for an opening surprise.

The little long tab on the top is the only place you need to put adhesive.

On the mat
15 minutes or less for this one!
Grunge it up or not!
***12yo male gender identity testimony***
"Cool Miss Robyn!"

Others in this collection:
Happy Birthday Flourished Box Card


Thanks for visiting and I encourage you to get cutting!
Do ask if you have questions and comments are welcomed.

Wednesday, December 27, 2017

Balloon Celebration Tunnel Card/ Happy Birthday

Hi Y'all Robyn here with not Christmas!!
My SIL's birthday is Dec 26, so we need to be sure to make a fuss over her that is not Christmas!
Quietfire Digital to the rescue!

On the Mat


Ungroup once and you will see the three layers and  cover bits.
Layer one


Layer two


Layer three

All you need is a good strong adhesive and you are good to go!


Please give a tunnel card a try, and share your creation with us!

Comment and Questions Welcomed!

Wednesday, August 9, 2017

Flourished Logo Happy Birthday Paint Chip Cards

Hi, Connie Nichol here today with a quick and easy idea for birthday cards.  I was messing around with some leftover paint chip samples (much too pretty to toss out!) and playing with ideas for using them in scrapbook layouts (check out the upcoming fall issue of Creative Scrapbooker Magazine). With only minor embellishing, the paint chips also make a perfect background for a colourful card.

connie nichol, quietfire design, flourished logo paint chip


 I cut the flourished 50, 60 and 70 out of black cardstock using my Silhouette Cameo and the cut files designed by Suzanne Cannon in the Silhouette design store (other milestone numbers are also available!).  As always, if you want these files as an svg file for another electronic cutting machine, just email suzanne@quietfiredesign.com.  Here's the flourished 70 cut file.  Isn't it pretty?  Just adhere that to a colourful paint chip.  These particular ones are from Home Depot.  I love paint colour names and the interest that they add to the background.


Adhere a bit of ribbon, stamp a sentiment and attach to a card base.  Done like dinner.  So quick.  The happy birthday stamps I used are from a Quietfire Design set called Happy Birthday plain and simple.  This is so versatile with lots of sizes and font styles to choose from.  Make sure you stamp with a solvent ink like StazOn by Tsukineko or Surfacez by Clearsnap.  The paint chips are a bit glossy and regular dye ink will just smudge and wipe off.


Hope you enjoyed this paint chip recycling idea.  Have a great day, Connie


Tuesday, May 9, 2017

Happy birthday Birdhouse Decoration / Spring Birdhouse Decoration

Hi Y'all!
Robyn here today with a fun new structural card by Suzanne that was calling my name!
Put a bird on it!!!!
It's a mashup of two new Silhouette Files


On the Mat

Using elements from both files, I created this fun decoration that is going out as a birthday card to middle son's special someone!
The Happy Birthday Greeting is Print and Cut.
To facilitate mailing, put double sided tape on the tabs, leave the release paper on the top and offer a few words of encouragement!

This file could be used for so many occasions- table place cards-cake toppers-a lovely thank you to anyone who sits at a desk.
(If you want to see what is on my desk, hop over to WOYWW)
Create Without Limits!!!

Questions and Comments Welcomed


Wednesday, April 26, 2017

Lily Of The Valley - Leaping Fairy - Happy Birthday


Yogi here today - It's that time of year when my Lily of the Valley will start to sprout. I've got loads of them in my garden...

I'm using one of the newer quote stamps from Quietfire Design, as well as part of an Xmas sentiment stamp.

("Always Believe...");  ("Tiny Christmas Wishes" 3pce set)

I'm using a bunch of digital products from Suzanne available on the Silhouette OnLine store. Click on any image to purchase. 

https://www.silhouettedesignstore.com/view-shape/78986http://www.quietfiredesign.ca/Tiny-Christmas-Wishes-Set-of-3-Stamps-Mounted.html

https://www.silhouettedesignstore.com/view-shape/76237https://www.silhouettedesignstore.com/view-shape/56467


Scored and folded my cream toned cardstock to create the side easel, cutting another piece the same size as card for the front - see diagram to create one.  

I started with 8.5 x 11" cardstock. Cut the cardstock to 6" x 11". Scored vertically at the 6" point. The measure vertically to the 5" point and diagonally scored. Note: if you're using a wider than 11" cardstock, measure whatever is past the 6" point and measure that vertically so you have the same measurement on the base as the vertical side.


Selectively embossed the edges using my hard rubber mallet and Cuttlebug Anna Griffin "Rosa" embossing folder. Adhered to front of card.

I had the orangy frame leftover from a previous Oxide background. Adhered to front.

Electronically cut all my elements. Inked the fairy, the word "Fairy" and the "Happy Birthday" using Distress pads direct to paper with layers of "Iced Spruce"; "Peeled Paint"; "Broken China"; and "Salty Ocean" then clear embossing the words.

The leaves were inked with the Iced Spruce and Peeled Paint. Veins put in using a colored pencil. Elements adhered and then adhered to card.

Masked the rest of the words from the stamp, inking only the word "wishes" using Versafine Black Onyx .


On the floor: Created a shadow layer for the "happy birthday" words from the cream cardstock. Adhered the two together, scored down the middle, then adhered the bottom portion of the word to the floor as my stopper.

Stamped the quote onto a previously decorated cardstock (Colour Burst Liquid Metals) using the black and clear embossed. Adhered to floor.

The butterflies were cut from the Liquid Metals background and adhered to front and floor. Gems adhered to bodies.

Final touch added the rhinestone flourishes.


Wednesday, April 19, 2017

Happy Birthday Scrapbook Page - with Cupcake #3 Digital Cut File

Hello, Connie Nichol here with a festive birthday layout featuring a Quietfire digital cupcake cut file, star stencil and Happy Birthday metal die.  Everything just went together!


This is a very simple layout of my youngest son's third birthday that just uses various scraps of cardstock that I had on hand.  I started with cutting the flourished cupcake 3 with my Silhouette Cameo.  The numbers zero through nine are available in the Silhouette store in groups of two and can of course be used individually or combined together.  If you like, you can also just cut the number and leave out the cupcake.  These would make such beautiful birthday cards.   Imagine the possibilities.....
In the upper right hand corner of the page, I wanted to add a little bit of texture so I added some stars with the Star Stencil.  I used transparent texture paste from Ranger - it goes on white, but dries clear.  I sprinkled it with clear glitter while it was wet and let it dry.  The result is some very subtle sparkly stars.


Then pretty much all that was left to do was to add a title, so I used the Happy Birthday die from Quietfire Designs.  Quick and easy.  So dust off your birthday party pictures and get them scrapbooked.  An electronic cupcake cutting file can be used to add the perfect numbers!


Saturday, August 6, 2016

Butterfly Tunnel Card - May the Wings - Follow Your Dreams - HB


 Loving this newest file from Suzanne - Butterfly Tunnel Card... This is what the file looks like :
https://www.silhouettedesignstore.com/view-shape/144374

I'm also using a few quote/sentiment stamps  from Quietfire Design: ("Butterfly Circle - May the Wings" 5pce set); ("Follow Your Dreams"); ("Happy Birthday Plain and Simple" 7pce set)

Please note: opening the files in the Silhouette Studio software is best. Opening in other software like SCAL or ECAL etc, may change some of the score/cut lines.


For this card I opened it in Studio software. I used my selection tool to select the whole file and clicked ungroup ONCE. Careful if you click more than once, your score lines may move... Lesson learned.

I moved the various elements off my mat to cut each portion of the card from cream toned cardstock. It takes a minimum of 3 pieces of 8.5 x 11" cardstock. More if you want more butterflies BIG GRIN... The card when closed is 5.25"w x 7"h

I also cut one of the butterflies from thin cardstock to create a stencil/mask which I placed over the butterfly frames to ink only the butterfly using a corresponding color to the embossing powder I would use. Distress "Wild Honey" with Emerald Creek Hot Stuff "Thanksgiving" embossing powder; and "Cracked Pistachio" with "Verdigris" embossing powder. Make sure you clean the areas of excess embossing powder from the body and surrounding areas. After heat setting used a brown Zig marker for the body.

I also cut 2 blackout layer butterflies. Use the Trace feature, select the butterfly, and click on the "Trace Outer Edge" - cut.

I inked them with the opposite pad, glued them to the back of the butterfly, then sprinkled with the embossing powder and heat set.

Inked the birthday stamp using the honey all over and hitting here and there with pistachio, clear embossed, repeated around the whole border. Looks like some of my stamping had a bit too much ink... C'est la vie. - a distressed look ROFL.


Stamped the quote "Follow Your Dreams..." using Versafine Black Onyx and clear embossed. Then adhered the edges of each butterfly frame to the edge of the card.


PS Finish the front of your card prior to assembling the inside unless you're adhering a separate layer to the front like I did.

I sponged the front edges with the honey and then some "Dried Marigold".

Cut another piece of cream cardstock about 1/4" smaller all around. Stamped the quote and circle with the black and clear embossed, sponged the edges with the honey and marigold. Adhered to card front.

Inked the butterfly with the pistachio and embossed with the verdigris.  Colored the body and adhered to card front by the body only, lifting the wings.

Applied Quickie Glue to the alternate small butterflies at the top of the card and applied glitter Stampendous "Light Copper" and Stickles dry glitter "Eucalyptus"

Final touch added a bunch of beige toned rain drop flowers and some white pearl flowers.


Saturday, July 30, 2016

Happy 65 - Sunflowers - How Old Would

Another of my friends is having a 65th birthday and I thought I would use a couple of Suzanne newest digital files "Flourished Happy Birthday" and "Flourished 65" and I paired it up with the "Sunflowers" all of them available on the Silhouette onLine store.
This is what the files look like:
https://www.silhouettedesignstore.com/view-shape/65806https://www.silhouettedesignstore.com/view-shape/143009https://www.silhouettedesignstore.com/view-shape/143006

I opened the "Happy Birthday" Silhouette file in Sure Cuts A Lot software . Ungrouped the words and hid the word "Birthday". Opened the "Flourished 65" and moved it into a pleasing arrangement with the Happy., selected all and enlarged it to about 4.75" square. Welded everything and cut from cream toned cardstock. Inked it with Versamark and embossed with Pearlescent embossing powder. Also cut a shadow layer and painted it with Distress acrylic dauber "Walnut Stain". Adhered both together.

Opened the "sunflower", adding another flower image, cut from the cream toned cardstock. Painted with the acrylic daubers "Mustard Seed" for the flower, Walnut Stain for the flower center and "Mowed Lawn" for the leaves and stem. assembled the flowers and added glue to the centers adhering some "Nut Brown" Flower Soft .

Side folded my forest green toned Bazzill Monochromatic card. Adhered a piece of dark green/gold variegated ribbon, then my word and flower elements,

On the inside: Stamped the quote ("How Old Would You Be...") using Distress Picket Fence and embossing with Emerald Creek "Glacier White" embossing powder.

Masked the quote and stamped the daisy/sunflower (Stampendous "Jumbo Daisy") using Archival "Saffron" and embossing with a bright yellow embossing powder. Added color using Prisma colored pencils in a yellow and orange.