Wednesday, October 31, 2018

Snowflake Monogram Font - To Appreciate The Beauty

quietfiredigital.blogspot.ca
Yogi here today and I had an urge to create this snowflake card. Love this OTF font from Suzanne

I'm using a couple of the newest stamp sets from Quietfire Design  ("To Appreciate The Beauty..." 3pce set); ("Let It Snow..." 6pce set)

And am using a couple of Suzanne's electronic files available on Silhouette onLine store. Click images to purchase. 


https://www.silhouettedesignstore.com/designs/270459https://www.silhouettedesignstore.com/designs/69217

quietfiredigital.blogspot.ca
Scored, and folded my white cardstock to create my easel structure (7"w x 5"h). Cut another piece same size as front. Also cut a piece from a deep blue thin cardstock.
quietfiredigital.blogspot.ca
Typed the letters - S N O W, one letter at a time using the "Snowflake Monogram.otf" font from Suzanne. Overlapped the snowflakes to make sure everything was touching something else. Selected everything and increased the size to 6.7" x 2.26". Cut from white cardstock. Inked with Distress Picket Fence and embossed with Emerald Creek "Soft Fallen Snow" - love that texture... Adhered to the blue thin cardstock.

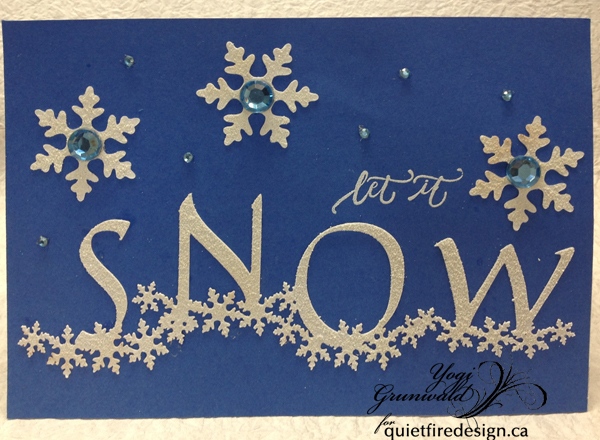
Stamped the "let It" using the Picket Fence and embossing with Ranger "White" embossing powder. Adhered the blue cardstock to the white and then onto the card front.

Selected one of the snowflakes from the "Let It Snow Flip card" electronic file and cut from white cardstock 3 times. Inked with the Picket Fence and embossed with the Fallen Snow. Adhered to card front. Added large mid toned blue rhinestones to each center. Also adhered mini of the blue rhinestones adding a dot of Glossy Accents to hold them in place.

quietfiredigital.blogspot.ca
On the floor: On another piece of blue cardstock and using my Tim's Stampin Platform, stamped the quote using Versafine "Blue Lagoon" and clear embossed. Offset my cardstock by about 1mm, both from the bottom edge and the left side edge and re-stamped using the Picket Fence and embossing with the White embossing powder. to the floor.

Stamped the snowflake borders with the Picket Fence and embossed with the Fallen Snow.

Drew the outline of the Snow word onto white cardstock. Cut with scissors, inked with the Picket Fence - masking off the rest of the cardstock, and embossed with the Fallen Snow. Scored the length, trimmed off the excess cardstock to about 1/2" and adhered to floor to act as my stopper.


quietfiredigital.blogspot.ca

Wednesday, October 24, 2018

Creepy Halloween Tag Treat Box!

Hello Crafty Friends!

Halloween is next week...do you want to make some cute treat boxes for the ghouls, witches and pumpkins on your treat list?  Well, you have come to the right spot!  This sweet tag treat box is perfect for...err...sweets.  :)

I used the Halloween Tag Treat Box (design ID 149603) to cut orange, black and purple card stock.  (As an FYI, there is also a moon that part of the set but I wanted to make the front creepy with irregular gold stars.  That's right, I pulled out glitter for this project!  A girl needs her glitter.)

You can create the box using just one color for the base but I decided to mix and match.  
 And I did an offset cut for purple to create a layer on the front.  The tree and bats have metallic glitter (Stickles Gunsmoke) for more fun and extra creepy highlights.
Isn't the tree cool?  The limb shapes are so eerie!

Thanks for stopping by!  I do hope you enjoyed this fun to make Halloween Tag Treat Box.
Have a creepy, crafty day!
Eeekkk!
Kathy "Eyes of Newt" Jo

Wednesday, October 10, 2018

Maple Leaf Flip Cards with Autumn Quotes

Hello, Connie Nichol here today with a couple of autumn greeting cards.  I used the Maple Leaf Flip Card cutting file available in the Silhouette Design store here.  I cut the card base out of patterned paper that I found in my stash and then added some leaves cut out of metallic cardstock.  There's just something about a little bit of gold on a card that makes it extra special.


These cards were the perfect base for stamps from the Quietfire Design autumn collection, so I stamped with Versamark ink onto white cardstock and embossed with fine gold embossing power to match my shiny maple leaves.  The cards were quick and simple to make, but oh, so pretty sitting on my fireplace mantle.  


Here's the Quietfire Autumn Collection stamp set:


Thanks for stopping by and have a wonderful autumn!


Wednesday, October 3, 2018

Hanging Bat Popcorn Treat Box

Hi Y'all!
Robyn here going batty !
If you are into all things Halloweeny
 will be your happy place!
These treat boxes go together quicker than you can say
Eye of Newt!

On the Mat

All I added was a bit of silver washi tape behind the hanging bats eyes
and some  glimmer pen to the  upright bats.


Comments and Questions Welcomed!