Tuesday, November 17, 2020

Star Shaped Lantern Tutorial


Hello, artlets!

Christmas is on its way. As I love starts and lanterns this project is just perfect: a Star Shaped Lantern.
you can find the digital file here:
STAR SHAPED LANTERN

on the mat

all cut


one star is cut from clear vellum


assembling the lantern


You can now put an electric candle inside or a led light.

Happy crafting! 
Stay safe,
Kora


Monday, November 16, 2020

Assembling the Christmas Advent Village Houses


What a fun way to celebrate the countdown to Christmas!  Fill each cubbyhole with a chocolate or small gift (dispensers measure approximately 1.75” each). 

The full set consists of 

Christmas Advent Village 1-5 Candy Canes
Christmas Advent Village 6-10 Forest Rudolph
Christmas Advent Village 11-15 Gingerbread man
Christmas Advent Village 16-20 Snowman
Christmas Advent Village 20-25 Santa
Christmas Advent Village 20-25 Nativity

You can find them at the Silhouette Design Store: http://bit.ly/2oAR9e6 (if you use this link, I *might* get a small commission!) You can always find them by going to my Silhouette page and filtering for 3D Christmas items.

Instructions:

Open the file and separate out all the elements.  A lot will be colour grouped.  Just check to make sure that similarly coloured elements are not overlapped before cutting - such as the roof in 6-10.

Designer Tip: Each drawer has a print and cut label. If you're making the whole set, collect all the print and cut drawer fronts on one Silhouette page and print as many as you can in at once to maximize your printing and minimize your time!

  Cut and form all the drawers (cut 5) and stack and adhere them as shown.  Form the house and slide it over the stack of drawers. Add all the layered embellishments.  Collect them all!

For more details on the house construction, please watch the video! If you are receiving this as an email update, click here to go to YouTube: https://youtu.be/oB2roV87WGk


Tuesday, November 3, 2020

BBQ Birthday Gift Card Box


Welcome to November!!!

Today I am sharing a project I did for my sister´s friend. She asked for a barbeque for her birthday, so I did the matching gift box and card.

This is a combination of two digital files:

Cut all elements in the colors of your choice.


If you wish you can decorate the "Happy Birthday" as I did.


Check out the video to see how to assemble the box.


I decided to use the negative of the cut too and make it into a card :-)


Thanks for stopping by.
Happy crafting!
Kora


Tuesday, October 27, 2020

Spider Card Monogram Font /Halloween Washi Border Planner Stickers

Hey Y'all! 
Robyn here, with an anniversary card for my B and SIL
Diana and Brett
 married on Halloween!
Even counting cutting time, this card can be made in less than 30 minutes.


On the mat
Fonts can be used with most word processors too, without a cutting machine.


SIL being crafty, enclosed in the envied are these
Some assembly required!

On the Mat

Supplies

Tricks and Treats- why choose?
Please share your creations with us on the
on Facebook.


Tuesday, October 20, 2020

SLIM CARD ENVELOPE


Hello, again!

Remember my last blog post featuring the Bracket Frames Slim Card Base? As promised, here is the matching envelope (for all slim cards by Suzanne).

Please find the digital cutting file here: Slim Card Envelope

on the mat


all cut

Happy fall, you all! :-)
Kora


Tuesday, October 13, 2020

Garden Letters Mini Booklet Album with Pop up

 Hey Y'all!
Robyn here enjoying the last days of the  fall garden.
This mini booklet could be a planting planner
with some pop ups to keep you smiling!


On the Mat

Pop up elements were created from these files


On the mat


Supplies
Whatever the weather, your creativity will grow with Suzanne's digital files!
Please share your creations with us at
on Facebook.

Comments and Questions Welcomed!


Tuesday, October 6, 2020

BRACKET FRAMES SLIM CARD BASE


Hello, crafty friends!

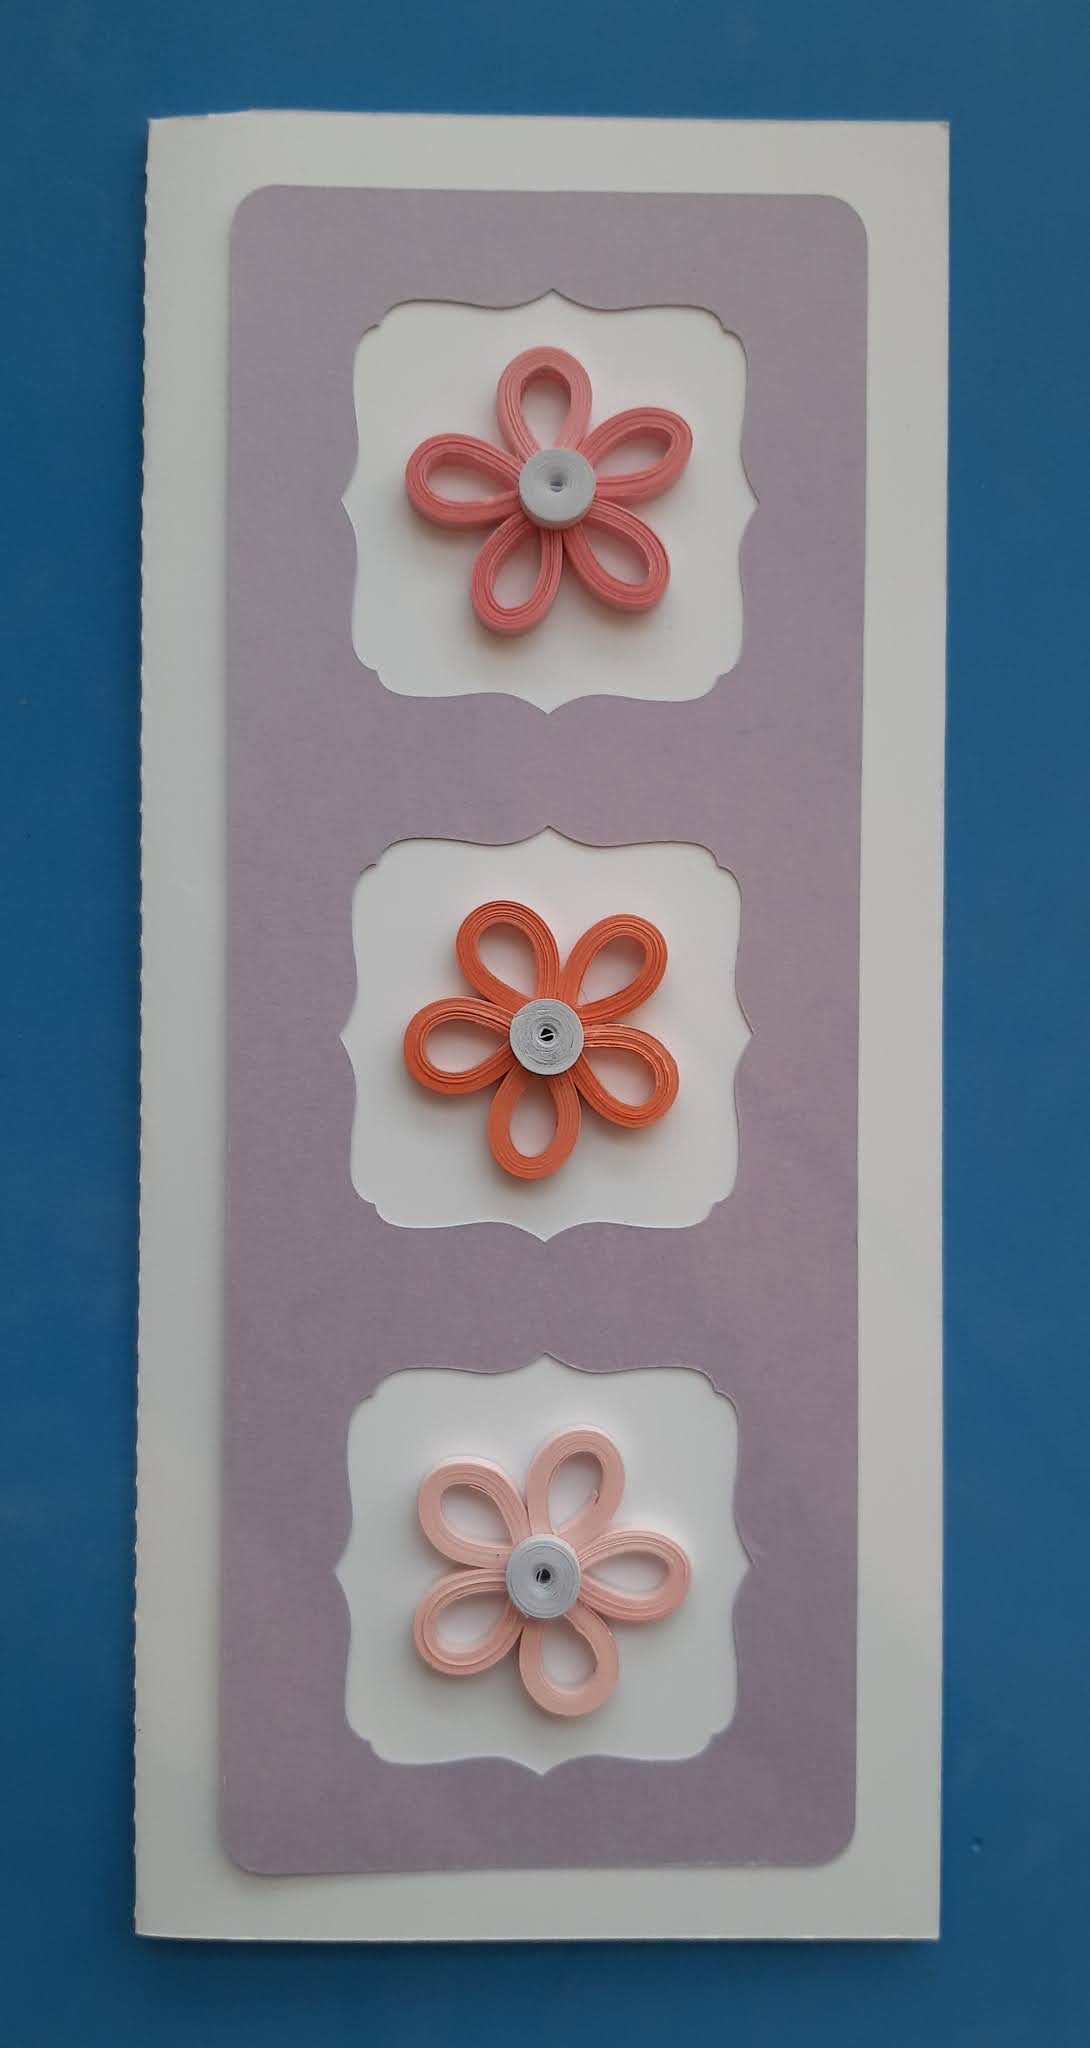
Suzanne designed several slim cards recently. Here is the Bracket Frames Slim Card Base. You have three frames you can fill with anything: stamps, photos, or in my case quilled flowers. 

You can find the digital cutting file here: Bracket Fames Slim Card Base


on the mat


all cut

put together

Now it´s time to decorate.

The quilled flowers were decorated with pearls.


Check out my next blog post to see how the matching envelope is made. 
Have a happy week,
Kora