Showing posts with label Yogi Grunwald. Show all posts

Wednesday, August 29, 2018

Twinkle Twinkle - Shoot For The Moon

Yogi here today and I had an urge to create this twinkle card. Love the lyrics. I remember creating a calligraphic piece of it in a class I took with Betty Locke eons ago...

I'm using a quote stamp on the inside from Quietfire Design "Soar Collection" 8pce set also available on Elizabeth Craft Designs HERE

And am using the "You're A Star" font from Suzanne available on Silhouette and the Twinkle Twinkle file. Click image to purchase. 


https://www.silhouettedesignstore.com/view-shape/66584https://www.silhouettedesignstore.com/view-shape/267818


Scored, and folded my white cardstock to create my side fold card (7"w x 5"h) splicing another piece on the inside. Adhered a piece of deep blue paper to the front.


Opened my SCAL (Sure Cuts A Lot) software. Resized the star spray to 3.595"w x 2.442"h and the words to 5"w x 3.92"h. Cut from white cardstock. Inked the star burst with Versamark and embossed with silver embossing powder.

Inked the words with Versamark and embossed Emerald Creek "Winter Mistake", but didn't like the lack of contrast against the blue so reinked with Versamark and silver embossing powder. Don't know if you can see it but the words have a beautiful textural effect now. Love the contrast between the stars and the words. Adhered to front.

On the inside - left side:
In Excel, I created the text for the lyrics in Arial font and the letter "H" using "You're a Star" OTF font. Printed out on white cardstock. Die cut with Elizabeth Craft Designs "Stitched Rectangles" die set. Inked around edges direct to paper with Distress "Faded Jeans"
On the inside - right side:
Adhered a piece of the deep blue paper. Stamped the quote using Versamark and embossing with silver embossing powder.

Punched out a 1"circle from white cardstock. Put some blue streaks through the moon and adhered to inside.


Wednesday, July 11, 2018

Snowflake - Country Plank - Winter Ice - May Your Heart


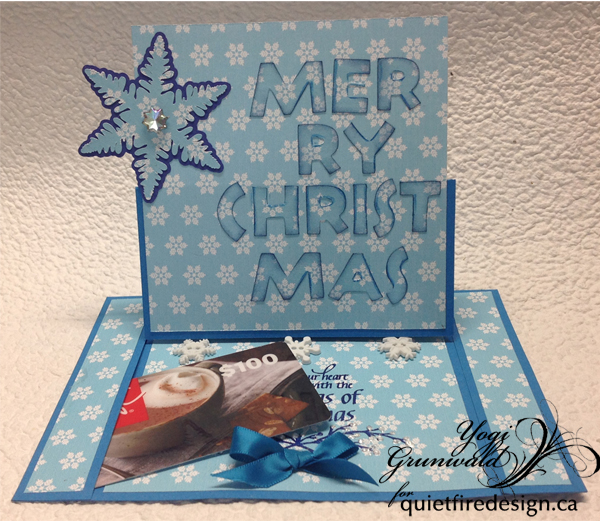
Yogi here today with a center split easel card... Suzanne asked the design team to create some Xmas cards this month so here is my first one of the year. BIG GRIN.

I'm using a quote stamp on the floor from Quietfire Design ("May Your Heart...");

These are the electronic cut files I'm using from Suzanne available on Silhouette. Click image to purchase. The OTF fonts Suzanne is coming out with work great in emails, Word, Excel etc. and I'm using it in my Sure Cuts A Lot (SCAL) software - love them

  https://www.silhouettedesignstore.com/view-shape/270464https://www.silhouettedesignstore.com/view-shape/267798

And the digi paper from Suzanne available on Quietfire Design:
http://www.quietfiredesign.ca/Winter-Ice-Patterns-Digital-Papers.html 
Printed the snowflake paper both on 110# white cardstock and a no brand calligraphy practice paper I love that is a bit thicker than normal printer paper.
Opened SCAL software, activated the font key and typed the words "Merry Christmas". 

Opened the Snowflake box and removed everything except the snowflake, resized it to 2.5" and cut from the printed cardstock. Then printed a shadow layer of the snowflake from the deep blue cardstock and adhered both together.

Scored and folded my card structure (see diagram at below). Cut deep blue cardstock to 7"w x 10"h. Score along the 10" side to create a top fold 5". Cut the side panels 1"w by 5"long (to the center score line...). Now score the the center piece that is 5"w x 5"h in half, scoring at the 2.5"h. Cut a piece of snowflake cardstock 4.75"w x 4.75"h and adhere to the bottom scored section. (see pics at bottom of page, you'll see the snowflake cardstock is only adhered to the lower section of the fold)
Adhered the snowflake to the left edge.

Sponged some dark blue Distress (Faded Jeans) around the edges of each letter, then adhered. Since this is cut in the same paper as the background and usually placed so it blends into the background - the technique seems to be being called "Eclipse Technique". I like it...


On the floor: Cut strips of the snowflake paper to cover the side panels and the floor (2pieces - .75" x 4.75" and  1 piece 4.75"w x 4.75"h), adhered to appropriate sections. Adhered the right panel to the floor.

Adhered only the outside edge and front edge of the left panel to the floor creating a pocket for the gift card.
Used my stamping Platform to stamp the quote using Versafine "Majestic Blue" and clear embossing. Used a Liquid Pearls "White Opal" and applied dots on the berry sprig.

Adhered 3 white snowflake buttons using hot glue to act as my stopper and adhered a small blue ribbon bow with hot glue.


Wednesday, June 13, 2018

Home On The Range - Heart Of Country Font - You Are The Best


Yogi here today, and since it's almost Father's Day, thought I'd make a nice western card for a guy...

The font "Heart Of Country" works great in emails, Word, Excel etc. I used it in my SCAL (Sure Cuts A Lot)

I'm using sentiment stamps on the floor from Quietfire Design  ("I Don't Tell You Often Enough" 5pce set);

These are the electronic cut files I'm using from Suzanne available on Silhouette. Click image to 

purchase. 

https://www.silhouettedesignstore.com/view-shape/268946https://www.silhouettedesignstore.com/view-shape/267816

Opened SCAL software and the Home On The Range file. Ungrouped, removed some of the items keeping the hat page and the horse page, the square and the hat and leaving all at the size opened. Click on images to enlarge.


Positioned the horse page and hat page. Butted up the edges to meet at the middle. Used the square and enlarged it to hide the opening of the hat page (see 1st pic above). Grouped and then selected it all. Welded (see 2nd pic above).

Selected the "Heart of Country" font and typed each letter for "DAD" separately. Twisted and repositioned them to overlap. Grouped them, resized to a total of 2"wide, and welded together.

Cut away the horse from the easel structure, score and fold to create the easel.

Cut a horse page, color as desired and adhere to front of card. I colored direct to paper with Distress mini pads "Black Soot" for the horse, leaving the tail and feet white. "Tea Dye" for the ground area. I left the frame on the horse page white.

The Hat page, colored the frame with some brown and embossed with Emerald Creek Baked Texture "Dirty Sand" embossing powder. Colored the hat on the hat page with "Antique Linen" and the single hat with "Brushed Corduroy". Adhered to hat page, then onto front of card.

Colored the DAD with "Faded Jeans" and clear embossed. Adhered diagonally across frame edge.

On the floor: Stamped the sentiment using Versafine Black Onyx and clear embossed.
Adhered square gems as my stopper. 


Wednesday, May 16, 2018

Spring Flowers Dingbat Font Iris - Thank You - Give Thanks

Yogi here today and Suzanne came out with a Spring Flower Dingbat font which I love...

The font works great in emails, Word, Excel etc. I used it in my SCAL (Sure Cuts A Lot) software.

I'm using a quote stamp on the inside from Quietfire Design ("Give Thanks" 2pce set);

These are the electronic cut files I'm using from Suzanne available on Silhouette. Click image to purchase. 


Opened SCAL software, activated the font key and typed the letter "k". resizing it to approx 6.25"h.


Used a basic rectangle shape and increased it to 7"h x 8"w. Placed the iris overlapping the right edge and having an overall width of 10". Copied and pasted a 2nd Iris for later. Grouped the 1st Iris with the rectangle and then welded them together.
If you are using a 12 x 12 cardstock everything can go on one page as the image. I used an 8.5 x 11" white cardstock so had to add a page with my other details.

Cut the card/Iris. Scored and folded to make it a 5 x 7" card. Embossed the tile background (Elizabeth Craft Designs "Trendy Tiles") only on the front of the card.

Electronically cut that 2nd Iris and the Thank You which I had sized to approx 4"w from white cardstock. Inked the word with some Distress "Dusty Concord" and embossed with Emerald Creek "Mardi Gras" embossing powder. Has a nice glittery sheen to it. Colored the Iris with a few shades of green both direct to paper and sponging to give variations in the colors. The flower I inked with "Mustard Seed" near the base of the flower and then with the Concord on the rest of the flower.

Adhered the flower and the word to the front of the card.

On the inside:

Stamped the quote using Versafine Black Onyx and clear embossed. 


Wednesday, April 18, 2018

Chalkline Font - Coffee & Chocolate Chip - Life Doesn't Have To Be...


Yogi here today and I've been itching to do a coffee card...

I'm using one of Suzanne's fonts that work great in emails, Word, Excel etc., it's an OTF font extension and available from Suznne at Quietfire Design. I used it in my SCAL (Sure Cuts A Lot) software and printed out the background and other text. Love that font, it's so funky...

I'm using one of the NEWEST quote stamps from Quietfire Design "Life Doesn't Have To Be Perfect...");

Also using a couple electronic cut files from Suzanne available on Silhouette. Click image to purchase. 

https://www.silhouettedesignstore.com/view-shape/247852 https://www.silhouettedesignstore.com/view-shape/48227http://www.quietfiredesign.ca/Chalkline-Funk-Font.html

Opened my projects in my SCAL software, removing portions not needed... Cut everything from white cardstock. Colored with Distress dabber "Walnut Stain" for the main coffee cup. Ran the cup holder piece through my machine with the Elizabeth Craft Designs "Coffee Bean" embossing folder. Sponged all over with the antique linen and hit the high points direct to paper with the walnut stain. Adhered to cup. The steam was inked with Picket Fence pad and embossed with Emerald Creek "Soft Fallen Snow" (love the texture...)
click on either SCAL image to enlarge

On page 2 of my SCAL software, I created my background using the Chalkline font and a bunch of coffee related words in various sizes. Resized the lot to fit my card base. Printed out on white cardstock. Colored the letters with Prisma colored pencils in various brown shades, then went over the whole page with a Distress "Antique Linen" pad (PS mine is a bit dry, I'm lazy and don't fill them very often... But I get nice tonal values this way BIG GRIN)
Scored and folded my dark brown textured cardstock (DCWV pad) to create the easel. Adhered another piece same size as card. Then adhered my text background and the coffee cup. Added the "Friends Cafe" on the cup.


On the floor: Colored the chocolate chip with Prisma colored pencils in various shades of brown. Scored it about mid way and adhered the bottom section to the floor to act as my stopper.

Stamped the quote using Versafine Black Onyx and clear embossed. Die cut with Elizabeth Craft Designs "Stitched Ovals" die set. Sponged around the edges with a dirty brown sponge and then with the antique linen all over. Removed from die and adhered to floor.

Trimmed down and adhered the sentiment.


Wednesday, March 7, 2018

Flourished Shamrock - Atomic Lucky - ECD Friend - May Your Longest List - Side Easel


Yogi here today and it's almost time for St Patrick's Day...

I'm using a stamp that was meant for Christmas... but with a little masking it's now good for any time of the year. How many stamps or dies do you have in your stash that you only use for what they were originally meant for?? Why not look at them again and see what you can do with them - you'd be surprised...

I'm using an A Way With Words dies  "Friends"  from Elizabeth Craft Designs, also available on Quietfire Design HERE

I'm also using a quote and sentiment stamps from Quietfire Design  ("May Your Longest List at Christmas..."); ("You Are..." 5pce set)

Also using a couple electronic cut files from Suzanne available on Silhouette. Click image to purchase. 


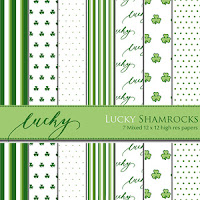
  and the digi paper available from Suzanne on Quietfire Design 

http://www.quietfiredesign.ca/Lucky_Shamrock-Scrapbook-Paper-Digital-Papers.html


Opened the two Silhouette files. Decreased the size of Lucky to 6.5"w. Cut from white cardstock and colored while on my mat with various distress green pads. Removed from mat and embossed both shamrocks using Emerald Creek "Green Sparkle" embossing powder. Clear embossed the tiles for Lucky. Mounted the tiles onto a dark green cardstock and trimmed down.

See template image at right to create the card structure. I used a 12"w light green Bazzill Monochromatic cardstock cut to 5"h. Scored and folded at 7". Then scored diagonally across the 5" section
.


Fold the "A" over and use it as the template to cut a front piece the width of the card and diagonally to the diagonal score line. Image above card template image on template. Adhere to front of card.

Using my Tim's Stamping Platform, stamped the "You Are So" using Versafine Black Onyx and clear embossed.

Adhered the "lucky" strip on the bottom and them the flourished Shamrock of the edge of the fold.

 
On the floor: Printed out the digi paper of the smaller shamrock pattern, trimming down and adhering to floor.

Again used my Stamping Platform, masking of the "Christmas" words and stamping using the black. Stamped the bottom part of the quote onto tracing paper and repositioned my card and stamping. Clear embossed the quote.

Scored the shamrock and adhered to floor to act as my stopper.

Die cut the Friends, fussy cutting the "s" off... inking with a green pad and embossing with the green sparkle embossing powder.

Raided my stash for the letters for "My" (Elizabeth Craft Designs "Upper Case Alphabet")