Thursday, March 23, 2017

May Each Treasured Memory

Sometimes you need a card like this....


When you use a cut file card base the project will actually come together very quickly.  The hardest part is deciding on the paper.
I used the Leafy Garden Frame Card (on Silhouette) with Maja Design patterned cardstock, along with the Quietfire stamped sentiments. It was that easy!


Supplies:
Quietfire Design May Each Treasured Memory
Maja Design Vintage Summer Basics Collection
Imagine Crafts/Tsukineko VersaMagic Midnight Black
Staples #110lb white cardstock
Instructions:
  1. Cut the Leafy Garden Frame Card in colours of your choice.
  2. Stamp May Each Treasured Memory on the smallest oval for the card front.  Stamp With Deepest Sympathy on the inside.


Thanks for stopping in to have a look.  I hope this helps you create your own sympathy card.  It would be nice if we never needed them!
Suzanne

Tuesday, March 21, 2017

Easter Bunny Baskets/ Easter rings

Hi Y'all, Robyn here in
Bunnyville!
These adorable decorations are quick and easy to cut, create and embellish.
They can be filled with candy, grass and other fun spring items.
The assemble so fast they would make lovely table place settings and teacher and class gifts.
 On the Mat
Here is the lamb basket. You could easily mix and match the elements.
The Chick you see peeking out is from the 
Easter rings series:
On the Mat

The children at the Black Mountain Home, enjoyed the Halloween rings so much I cut a
kaleidoscope of butterflies, flock of sheep and chicks,and a herd of bunnies.
We also used the cut sheets as stencils and templates.
I can't show you their beautiful faces, just the work of their hands and hearts.
More about the kids on my blog.

Enjoy the season and create without limits!
Comments and Questions Welcomed.

Thursday, March 16, 2017

It's your lucky day...

Welcome to the digital blog and thank you for stopping by to view my first post here.  It's Teresa here using the new "Lucky Shamrock digital paper" set today and wow was it ever fun to use.  My favorite part about using digital papers is that you can print as much as you need at home without having to go to a store.  And-- if you mess up you can just print another piece right there and then-- so I am totally for that.  I made 3 really quick cards with the sets and I hope that you can do a few quick tonight and pass them out tomorrow with a few chocolates for friends and family....


The best part about each of these card is that they only took about 10 mins or less to make.  The Washi strips are my favorite because they have all these adorable designs on the sheet and they are the perfect size for cards.  I also used the new tag set that goes with it.  These are on a tiny sheet of paper that you can easily cut apart to decorate your cards!!   How fun is that :)


For this card i used a piece of green glitter paper for the base of my card that i had in my stash and added 3 pieces of the Washi tape over the striped paper from the digital file.  It was super easy and to finish it i just added a bow from some ribbons i had in my stash.  


Here is a closeup of the pretty designs in the papers...


And lastly i made this card with strips of paper that i cut from the digital paper file and tied it with a simple piece of jute.  I also found this huge shamrock and it matched perfect so i added that on the top of the papers with a 3D Foam Square and a pretty gold rhinestone for luck.  

Simple, easy and you can make them up in less than an hour!


Supplies for these projects:


Thanks so much for stopping by and Happy St. Patrick's Day to all of you!

Teresa

Wednesday, March 15, 2017

Cutie Pi Scrapbook Layout

Hello, Connie Nichol here today.  It was National Pi day yesterday on March 14, so I've missed it by a day.  Oh well.


This cut file is adorable, whether you are a chemistry geek like I am, you want a pi sign for National Pi Day or you need the word 'cute' for a layout or card.  It's available in the Silhoutte Store here, or if you have a different electronic cutting machine, email Suzanne@quietfiredesign.com to purchase the file as a svg cut file.  It makes such a cute page title.
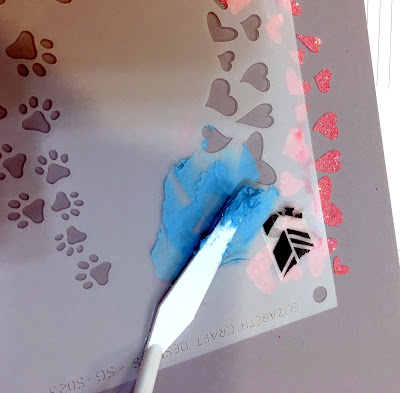
To decorate the background, I used one of the new Quietfire Design heart shaped stencil manufactured by Elizabeth Craft Design.  I mixed molding paste with a few drops of Izinks pigment ink to make blue and pink, and applied it through the stencil (dry between colours so you don't smear the existing hearts).  While the molding paste was still damp, I sprinkled with clear ultra-fine glitter to add some sparkle.


That's pretty much it.  I added small scraps of paper, lace and fabric on the left side of the photo and called it good.  I like that the focus is on the photo in this layout.  It's a small photo so it would be easy to overwhelm.  Happy Scrapbooking! 

Supplies:  Stampin Up cardstock, Ranger molding paste, Clearsnap Izink ink, Elizabeth Craft Design stencil, Silhouette Cameo, cut file by Suzanne Cannon, Brother sewing machine


Wednesday, March 8, 2017

St Patrick's Shamrock Explosion Box/ So Lucky

Hi Y'all Robyn here, exploding with green inspiration!
Let's start with the box!
The stamp is from Celtic Christmas

Remove the lid
and
Voila!
On the mat
Cut and paste and embellish to your hearts content!

The ATC's are sketched, colored and stenciled,
 with ink

with embossing paste 

The stencil is created from the 

 Kiss me! I'm going green!
Happy St Patrick's Day, have fun cutting and do share your creations with us!
If you would like to see what else is going on, on my desk, please visit
RainbowWeaves
Comments and Questions Welcomed!


Wednesday, March 1, 2017

Butterfly Bendi Card - Slainte - May The Wings


Yogi here today with a St Patrick's day card... I'm using parts of a couple Silhouette files. Click on any file image to purchase.

https://www.silhouettedesignstore.com/view-shape/156211  https://www.silhouettedesignstore.com/view-shape/56352 https://www.silhouettedesignstore.com/view-shape/76671 


I'm also using a Quietfire Design Irish Blessings quote stamp "Butterfly Circle - May The WIngs" 5pce set


Opened the "Butterfly Bendi Card" in Silhouette Studio, ungrouped them and repositioned or removed some of the pieces, enlarged it so that my main back piece was 5" wide and overall height 7". It had to be cut in 2 sections and then spliced together at one of the fold line seams. Painted the white cardstock with Distress dabber "Shabby Shutters". I suppose I could have used colored cardstock, but I have a tendency to just use white and then alter...

Cut the shamrocks, enlarging them to approx1.5"w. Painted them as well with the shabby shutters and then went over it lightly with "Peeled Paint".

The "Slainte" was painted with "Lucky Clover" in a dry brush fashion. Cut a shadow layer and painted with "Forest Moss".

I colored the body part of the butterfly with a black marker. Applied adhesive to the wings and sprinkled with various glitters.

Stamped the quote (masking the author's name) using Versafine Black Onyx and clear embossed, Then stamped the author just below.

Assembled and adhered everything.