Wednesday, March 27, 2019

Nouveau Rose Lantern

Hi Y'all!
Robyn here thinking Spring!
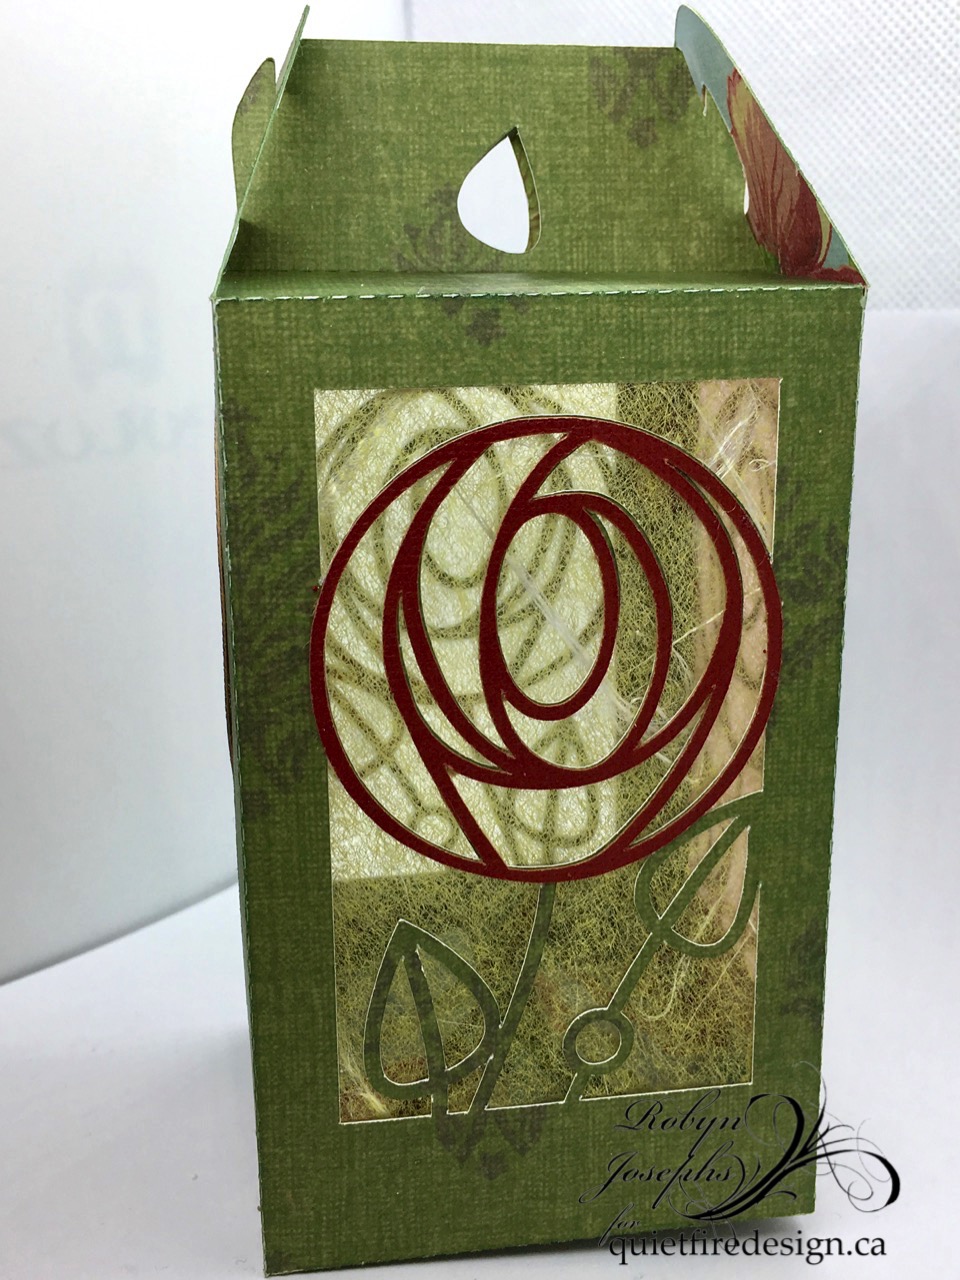
These lanterns have become my go to hostess gift
and this all occasion  Nouveau Rose is only two pieces!
with optional liner.
Almost as easy as buying a plant and you don't have to water it!
On The Mat

A battery votive lights it up!
And it folds flat for mailing!
I couldn't decide on pink or yellow liner so I used both!
Spring Fever!


Please join our FB group
Suzanne Cannon Fan Group
and share your creations with us!
It does seem to be a struggle to leave a blog comment, so use the group for comments and questions too.
Create Without Limits!


Wednesday, March 20, 2019

Assembling the Quietfire Pop Up Box in a Card


Usually, I'm referring to a Card in a Box, but now I'm so confused.  This is a card in a box in a card!  I've just created a series of these for Easter and Spring and I'm using the Baby Bunny Pop Up Box in a Card to show you how it's made.  You can find all my Pop Up Box in a Cards at Silhouette.

Follow along on the video tutorial for all the details.  The box is constructed just like the Card in a Box, except there is a little extra to assemble: The box is inserted in a card base!  These cards are 5x7" and are all basically assembled the same with with variation in embellishments.

If you are receiving this as an email update, CLICK HERE to view the video on YouTube.
Happy Creating!
 Suzanne

Dinosaur Monogram - Wishing You Whimsy - Accordion card

Yogi here today and I wanted to do something with the Periodic Table letters... but then got side tracked with the dinosaur font...  BIG GRIN

Card size is 4.25"h x 5.25"w (card closed) Opens to 31.5"

I'm using sentiment stamps from Quietfire Design ("Wishing You Whimsy..." 4pce set)

And am using an electronic Monogram file (OTF) from Suzanne Cannon available on Silhouette onLine store. Click image to purchase.  
https://www.silhouettedesignstore.com/designs/274090?limit=120&sortby=relevance&search=suzanne+cannon+dinasaur+&submitted_search=true&
Opened SCAL (Sure Cuts A Lot) software and typed the "Badlands" word, one letter at a time. Selected all and enlarged. Cut from white cardstock and while still on the mat colored with colored pencils. Removed from mat and set aside.

Created a large shadow layer for each letter and cut from black cardstock. Adhered both layers together.

 Created the accordion fold structure. Cut an 8.5 x 11" mint green and baby blue cardstock in half length wise to make 2 pieces of 4.25" x 11" of each color. Cut the lengths in half to make a bunch of 4.25"h x 5.5"w pieces. Scored and creased each piece at 1/4". Adhered to the back of the next color. Starting with a green, then a blue, then a green etcetera. 6pcs total for this card.

When all assembled ran through my embossing machine using Cuttlebug Happy Birthday embossing folder, moving the folder over each time - till the whole card was embossed.

Pic below is the back side:

Adhered my colored letters onto each page section, placing 2 smaller letters on one page and the larger letter as a single on the next page.  
 
Stamped the words onto white cardstock using Versafine Clair "Glamorous" ink pad, and masking between the words on the stamp. Cut around each word section and hit the edge direct to paper with Distress "Faded Jeans". Adhered to each page.
 
Final touch, added a bead of Viva Iridescent Glitter down the center of each letter. Sorry hard to see that detail...

 This would make such a cute card for a little boy  (or girl...) who like dinosaurs or things prehistoric. BIG GRIN.


Wednesday, March 13, 2019

Periodic Table Yoga Scrapbook Layout

Hello, Connie Nichol here with a quick and easy yoga themed scrapbook layout.  I used the Periodic Table Yoga cut file designed by Suzanne Cannon to cut the title out of dark purple cardstock using my Silhouette Cameo.  I love periodic element words and Suzanne has designed a whole variety of them as well as a periodic element font that is available in the Silhouette Design store.


Once the title was in place, the rest of the project followed very quickly.  I added pictures (the yoga schedule is a screenshot from a scheduling app on my phone), a few embellishments and a stamped Quietfire Design quote.  I've never tried yoga before but was surprised at how much I enjoyed it and that my old inflexible body could do it.  Ha! I guess you're never too old to try new things.  Thanks for stopping by, Connie

Quietfire Design Products
The Best Thing rubber stamp
Periodic Table Yoga Cut File (Silhouette Design store ID 288288)

Other Products
Elizabeth Craft Design stitched square dies
Colorbox chalk ink
FabScraps patterned paper
Brother Sewing Machine
Glue Dots adhesive
yarn and buttons


Wednesday, March 6, 2019

Pinch Me Gift Card Box

Hey Y'all
Robyn here feeling green! in a good way!
This gift card box shows your love for anyone celebrating spring, new life, St Patty's day and all things green!
On the Mat

The label is pointed pen  calligraphy print and cut.
 The back panel has ample room for a gift card and a personal message or
stamped sentiment.

Please join our Facebook group
Suzanne Cannon Fan  Group
and share your creation with us!

Comments and questions welcomed

Wednesday, February 27, 2019

Barista - But First Coffee - Just For You Celebrate

Yogi here today - and Suzanne came out with more coffee digital images... and you know how much I love coffee. BIG GRIN

I'm using a design element stamps, quote and sentiment stamps from Quietfire Design
("Grid Background"); ("But First Coffee" 8pce set); ("Tea" 7pce set); ("Just For You" 4pce set)

And am using an electronic file from Suzanne Cannon available on Silhouette onLine store. Click image to purchase.
https://www.silhouettedesignstore.com/designs/287861?search=suzanne+cannon+barista&sortby=relevance&submitted_search=true
Opened SCAL (Sure Cuts A Lot software) and the - Barista file. Removed the box piece. Grouped all and increased size so one of the page layers was approx 6.7"w. See layout below. Cut all from white 110# Staples Cover cardstock.

Copied and pasted the "barista" layer to page 2 and flipped it so it hangs off the cutting area. I only wanted the "barista" word. Cut from an alcohol decorated background (see below). Fussy cut the "barista" word apart from the frame and adhered to the background layer.
 
Inked the grid stamp with Versafine "Toffee", repeatedly stamped on both layers and then embossed with Queen's Gold embossing powder. Sponged Distress "Picked Raspberry" and "Mustard Seed" all over.

Inked the cup direct to paper with the Barn Door and embossed several times with UTEE to get a really glossy ceramic look. Adhered to front layer. Inked the shine with white and embossed with Stamp Mania "Glacier White" embossing powder. Adhered to cup. Inked the steam piece with Versamark and embossed with Emerald Creek "Soft Fallen Snow" - love the textural effect.

Cut, scored my easel structure from cream cardstock.

Dry embossed a piece of brownish cardstock using Cuttlebug "Happy Birthday" embossing folder. Hit the high points using Distress Picket Fence pad. Trimmed down to the straight edges of the front layers. Adhered to easel structure.

Adhered the Barista layer using 3D foam tape, then the cup layer with 3D foam tape.

On the floor. Stamped the cup rings with Distress "Vintage Photo" for some of the rings and "Black Soot" for others, overlapping. Sponged some brown around the edges and lightly over the stamping. Misted with water. Dried

Stamped the "Just For You" and "Celebrate" with the black and clear embossed.

Stamped the "Coffee & Friends" with the black on white cardstock. Clear embossed. Die cut the stamped layer and the brown layer with Spellbinder's Petite oval die sets. Adhered both together then onto the floor with 3D foam tape to act as my stopper.

Added a small piece of folded cardstock along the left edge to help with my stopper. 

Applied The inks "Pitch Black", "Teakwood", "Sepia", "Rose Gold" and some Alcohol Blending solution to my felt tool then pressed and twisted the tool onto my photo paper. After doing this to the whole paper, leaving some white areas, started bouncing the tool lightly in some areas.

I love the result I got from the twisting motion. 


Wednesday, February 13, 2019

Balloon Heart Monogram

Hi Y'all.
Robyn here riding the wedding vortex!
Ray and Jillian are tying the knot in September and the 
Balloon Heart Monogram font
was calling out to me.
The card could be used for save the date, place settings, gift card, thank you gift card, and mirror I love you reminder!


They like simple and elegant- no fuss and if up to Ray, no glitter.
Colors are dark reds and purples and hints of rose gold.


On the mat


The background was made using a mask made from hearts in the
Place the larger heart on the card, and using blender brushes, blend Distress wilted violet.
Remove the larger heart, place the smaller heart and blend Barn door.
Go back and forth a bit, carefully and put a little Delicata gold in the center.
It will blend with the barn door to make a rose gold.

Put the card on the mat and use a  pen to sketch the ampersand. (letter "w")


Cut the monograms-glitz up just a bit with a jelly roll gold pen and glossy accents.
Adhere to the card, adding a clear pop up dot to the balloons for dimension.

Up up and away till the wedding day!

Comments and Questions Welcomed!