Wednesday, June 5, 2019

3-D Flower Truck with Pandas- Every day is a journey- love

Hi Y'all!
Robyn here demonstrating what happens when you can't make up your mind.
Panda's take over!
Graduation, moving, get well, this project will be bearer of good news to any recipient!
Scroll down for a digital cutting tip.

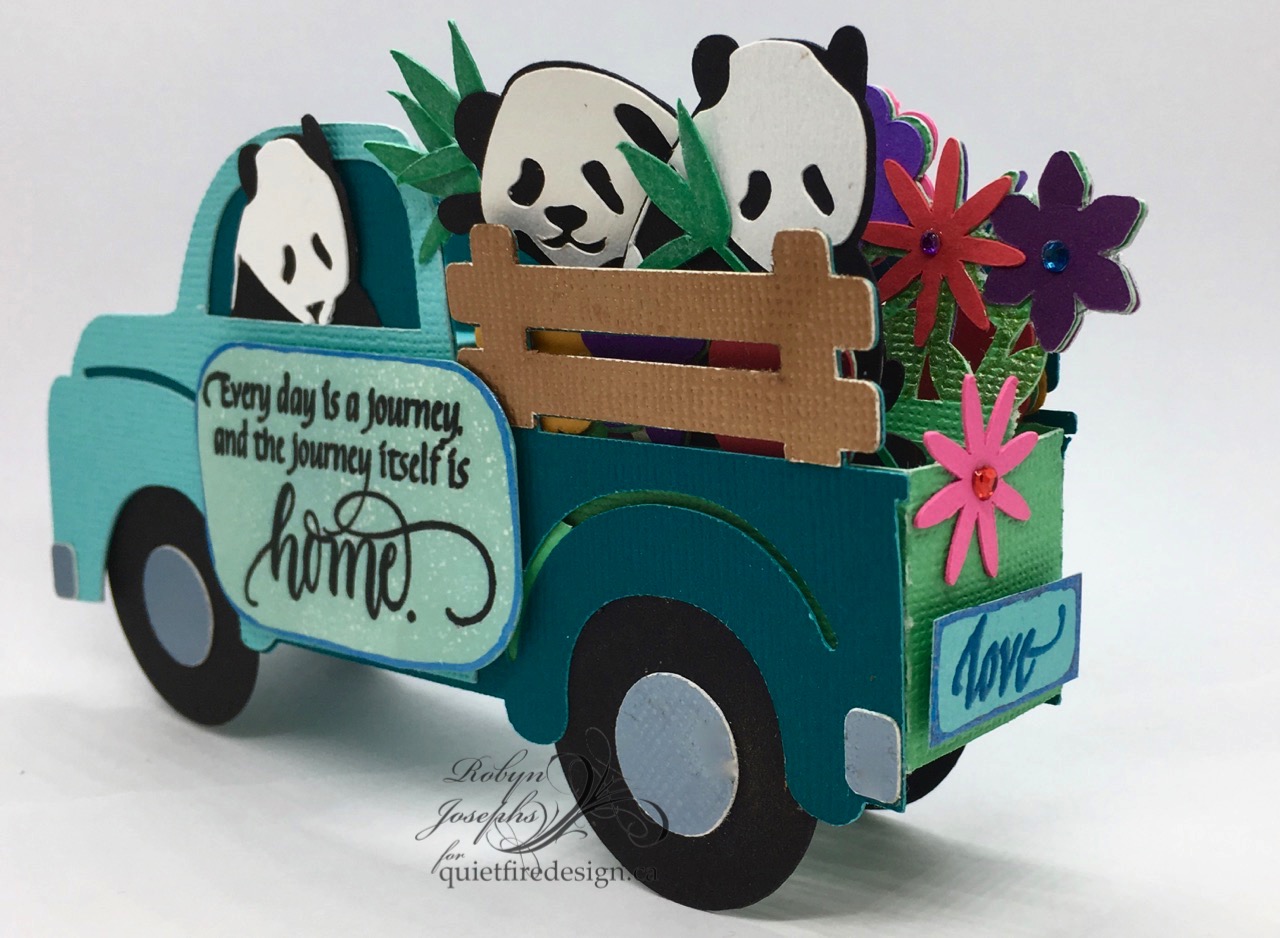
I had to make the truck...
On the mat


Then this file....
Panda Pop-up Box in a Card


Resulted in panda-monium!


Stamps were added by bears request!

Every day is a journey

Follow this link to lots of
Love 
at Quietfire Design

******TIP*****
If you are cutting similar pieces from many colors, cut lots! 
You will use them!

I fyouare having difficulty cutting, don't assume you need a new blade.
It could be:
  • blade hight
  • blade pressure
  • mat too sticky or not sticky enough
  • bits of stuff on the mat


Or in this case the paper
No matter what I tried, that light paper would not cut
 and it came from the same pack as all the other papers.
The darker paper, cut perfectly, was done with the same blade I was using to cut 
the lighter piece- so save yourself some hair and toss that sheet!
If you need that particular color, cut it in white and ink it!

Unbearably cute!

Comments and Questions Welcomed!

Wednesday, May 29, 2019

Ornate Frame - Nouveau Roses - Happy Birthday - A Bit Of Fragrance Easel card


Yogi here today. Suzanne came out with a bunch of beautiful digital frames and had to use one of them. Also love the deco type roses and I was in a colorful mood...

I'm using a design element background stamp from Quietfire Design ("Crackle Background")

I'm using a clear quote stamp sets from Quietfire Design ("A Bit Of Fragrance Collection" 8pce set)  also available from Elizabeth Craft Designs HERE

And am using a few of Suzanne's electronic files available on Silhouette onLine store. Click the image to purchase.


https://www.silhouettedesignstore.com/designs/252223?search=suzanne+cannon+happy+birthday+gear+box&sortby=relevance&submitted_search=truehttps://www.silhouettedesignstore.com/designs/294316?search=suzanne+cannon+ornate+frame&sortby=relevance&submitted_search=true https://www.silhouettedesignstore.com/designs/288594?search=nouveau+rose+lantern&sortby=relevance&submitted_search=true


Opened SCAL (Sure Cuts A Lot) and the Ornate Frame. Pulled out the largest frame and deleted the rest. Flipped, squeezed and elongated it and resized it to approx 7"w x 5"h. Copy & paste, then flip top to bottom. Move to join with the first frame, overlapping slightly, weld together. Cut from white cardstock. Then score through the joined point and the upper one at the half way point through those nodes on either side. You now have your easel structure.
  
Copy and paste one of the frames from page 1 to page 2, keeping it the same size.

Paste 2 more of them and while in the same configuration as the original frame - resize them to 5.695" x 4.002 & 4.628" x 3.248" then move and orientate them on your mat to be cut from white cardstock  

The largest layer was stamped with the crackle background using Versafine Toffee and embossing with Queen's Gold embossing powder. Note: I only stamped around the edges pf the frame. No need to stamp the whole thing... Adhered to the bottom portion of the top folded part.

The next layer was colored with Distress Oxide pads direct to paper ("Twisted Citron" and a bit of "Cracked Pistachio") then dry embossed with Cuttlebug "Swiss Dots" embossing folder. High points hit with "Peacock Feathers"

Top layer: Quote stamped with Versafine Clair "Twilight" and embossed with Emerald Creek Seth Apter "Eclipse" embossing powder, then sponged with Distress Oxides all over with "Broke China" and "Mermaid Lagoon". Dampened a paper towel and wiped of inks from the quote area.


On page 3, opened the Nouveau Rose file. Ungrouped everything and moved the 4 rose pieces to the mat. Cut from white cardstock. Inked the outlines with the twilight and embossed with the Eclipse.

Added a circle the same size as rose (2.122" sq). copied and pasted 3 more and cut from the decorated cardstock below. Adhered the outlines to the decorated circles and adhered 2 of them the card front.


Opened the Happy Birthday Gear Box, ungrouped (do it several times) then delete all the misc pieces, then delete the gears above and below the Happy Birthday. Move to mat and enlarge to 5.701" x 1.356". Flip from left to right (you need a backward image for next step). Cut from white cardstock. While still on mat, apply a very thin bead of glue to each letter - careful, don't get glue on other areas... then press the decorated cardstock used for flowers onto the letters. Allow to dry a couple minutes then remove from mat and trim down to fit card floor.
 

DECORATED BACKGROUND PAPER: Wet some cold press watercolor paper and drop in Ken Oliver Liquid Metals (Verdis Gris, Amethyst, Sky, and Yellow Gold). playing and tilting and adding more water where needed. let dry.
 

On the floor: Direct to paper with the Twisted Citron and the Broken China. Used a sponge to blend colors a bit.

Scored and adhered the rose to act as my stopper.

Adhered the Happy Birthday panel, then adhered the last rose splicing to fit and used the left over and attached to stopper.


Wednesday, May 15, 2019

Leafy Rectangle Frame - Mornings are the most beautiful time

Hi Y'all!
Robyn here, enjoying these beautiful spring mornings.
This leafy frame can be an instant card front or a focal point in a layout or 
(weddings on my mind)
an elegant place card.
The file in Suzanne's Silhouette Store is 
just one piece!
What time of day are you most creative?

On the Mat


The stamps are  designed by Suzanne for Elizabeth Craft Designs


Please join our Facebook group
Suzanne Cannon Fan Group
to get to know us better, find inspiration and instruction
and share your morning, or anytime creations!


Comments and Questions Welcomed!


Wednesday, May 8, 2019

Spring Scrapbook Layout with Tulip Monogram Font

Hello, Connie Nichol here today with a layout inspired by tulips!  Suzanne Cannon created a tulip monogram font and  I thought it would make the perfect title for this scrapbook page.  The font is available in the Silhouette Design Store and you can use some punctuation to access the extra elements (tulip buds and leaves).


I just printed out the title with black ink using onto white cardstock using a cheapo inkjet printer and coloured in the tulips with markers.


I used a couple of Quietfire Design stamps as embellishments.  Alternatively, if you wanted extra tulips of different sizes, you could print some out using the period, comma, back slash and question mark of the Tulip Monogram font, then just cut and colour.


Once all the elements were in place I added a bit of machine stitching and a few sequins.  I ended up putting the journaling on the back of the layout.  This photo is from five years ago when I was in the Skagit Valley of Washington State during tulip festival season.  What a beautiful part of the world to visit and a memory I cherish deeply.  Happy spring to you all, Connie

Supplies Used:  QFD Tulip Monogram Font, Quietfire Design stamps, Versafine ink, Tombow markers, Beacon adhesive, Brother sewing machine, dollar store sequins.


Wednesday, May 1, 2019

Pop up in a box in a card-Pansies, Spring Flowers, Tulips - Mom-Assembly Video

Hi Y'all!
Robyn here.
This quote keeps popping up in one of my lettering communities.
Better done than perfect
This pop up card in a box is a mash-up of 3 files and a stamped layered card front,
 and took longer than the time I allotted for it.
Photos don't lie, and, let's just say, it's done!
All Files available in
Suzanne's Silhouette Design Store.
The assembly video
CLICK HERE

Start with the Pansy file for the base.
Make a dummy to mess around with construction so you are confident with the final cut pieces.

 On the Mat

Bits and pieces choosen from these files

On the Mat

On the Mat


Leads to
Chaos on the mat!

Cut out lots of everything and enjoy the process!

Card front


Keep Calm and call Mom-set of three mounted stamps


opening to
 and


Is it perfect? no.
Is it done? Yes!
Was it fun YES!!
Happy Mothers Day to all who nurture us!
Share your creations with us on FB
in the
Suzanne Cannon Fan Group


Monday, April 29, 2019

Making the Sack Purse Tutorial

 
What a cool little purse!  It's Silhouette Design 293000 - Click Here!
This is a great decoration or gift box.  You can fill it with treats!
Make a whole flock of them all in different colours!
Tie them with coordinating ribbon or cord. 


Instructions:

  1. Open up the file and ungroup once. Cut the base and decorative panels separately in your favourite colours.


2.  Adhere the decorative panels on the purse base as shown (and as they came in the original file) above.  This is the only thing you'll have to glue!

3.  Fold all perforated score lines in a mountain/valley fashion, but make sure the folds beside all the decorative panels are both valley.  They're basically recessed.

4.  Run a cord through the holes and gather the top of the purse. Fill the purse!  Gently tighten and close with a bow!


Wednesday, April 24, 2019

Monogram Playing Card Fonts - Invitation - Party Time


Yogi Here today and I was in a mood to create something with playing cards...

I'm using sentiments and date clear stamp sets from Quietfire Design ("Months & Numbers Collection" 22pce set) and ("Please Join Us Collection" 8pce set) also available from Elizabeth Craft Designs HERE and HERE

And am using a few of Suzanne's electronic files available on Silhouette onLine store. Click images to purchase. 


Scored and folded my white cardstock to create my easel structure. Cut a piece of red textured cardstock, same size as card and adhered to front.

Sprayed my Oxides (Squeezed Lemonade, Abandoned Coral and Broken China) onto my craft sheet and then swooshed my cardstock through the wetness. Continued until completely covered. On the 2nd image below, I sprayed the whole cardstock with the Lemonade to mute the colors. Remember Oxides are basically opaque.


Dry embossed the 2nd background  using Tim's "Poker Face" set. Hit the high points with Distress "Black Soot" and clear embossed. Adhered to card front. PS: if you don't have Tim's embossing folders, just use regular playing cards, or print some out onto cardstock.

Opened SCAL (Sure Cuts A Lot software). Placed the letter from each font on my mat, grouped and enlarged. Cut from white 110# Staples Cover cardstock. Inked the letters using Versafine Clair "Twilight stamp pad and embossing with Emerald Creek "Onyx Frost" embossing powder. Inked the drop out elements with "Glamorous" and clear embossed. Adhered all to a strip of white cardstock, then onto card front.

Stamped the word "Let's" using Just Rite "Times Roman" alphabet set.

On the Floor: stamped the various sentiments and date using Versafine Clair Twilight and clear embossing. The comma's and "pm" were stamped with the Just Rite alphabet set.

Scored and folded a narrow piece of the red cardstock and partially adhered to floor to act as my stopper.