Wednesday, September 26, 2018

Science Alchemy - Periodic Table Father, Lucky - Drop In For A Bite - Trick or Treat

Yogi here today and I had an urge to create this Halloween card. I had the word "Alchemy" floating around in my brain and it wouldn't go away...

I'm using one of the newest stamp sets from Quietfire Design ("Something Wicked 2018..." 6pce set)

And am using several of Suzanne's electronic files available on Silhouette onLine store. Click images to purchase. 


 https://www.silhouettedesignstore.com/view-shape/183445https://www.silhouettedesignstore.com/view-shape/228812

Scored, and folded my white cardstock to create my side fold card (5"w x 7"h). Cut another piece from a deep purple and adhered to front.

Typed the letters - A L C E M using the "Science.otf" font from Suzanne at approx size of 90. Printed on white cardstock and cut into good sized squares.

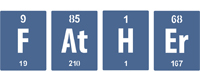
Electronically cut the "H" and the "Y" using the Periodic table words "Father" and "Lucky" from Suzanne. Trimmed everything down to fit my card front. (A 1.5 x 2"h; L & C 1.25 x 2"h; H 1.75 x 2.75"h; E & M 1.75 x 2"h; Y 1.75 x 2.75"h)

Sponged all the letters with Distress "Carved Pumpkin" and then direct to paper around the edges.  Adhered all the letters to card front leaving a central space for my beaker.

Hand cut 3 triangles from white cardstock. The larger one 1.5"w x 4.5"H and the smaller one 1.5 x 1.5"h. The the inner triangle (representing the liquid) I cut a little narrower than the large beaker to simulate the glass wall. Sponged it with Distress "Twisted Citron" and "Dusty Concord". Ran all 3 triangles through my embossing machine with Carabelle Studio "Petites Roues" (something that will give a nice bubble effect to the glass). Assembled and adhered to front. Cut a narrow rectangle for the stir stick, rounded the edges and colored with the Concord.

Applied Quickie glue to the beakers in the font letters and sprinkled with a lime green and a purple glitter.

Stamped the "Trick or Treat" on white cardstock using Versafine Black Onyx and clear embossed. Die cut with Elizabeth Craft Designs "Stitched Circles" set. Sponged edges with the Concord.

Punched out some small 1/4" circles, added Quickie glue to the bubble circles and sprinkled with Stampendous "Crystal Snow" glitter. Used a white gel pen to add very small dots.

On the inside:

Sponged around edges with the Concord.

Electronically cut the words from white cardstock. The "Bite" word is 4.75" w. Colored while still on my mat with the Concord and the Pumpkin. Colored the drop of blood with a red marker. Adhered to inside. Added Glossy Accents to the drop of blood and Liquid Pearls "White Opal" to the teeth... then added some red Liquid Pearls to one edge of the tooth.

Stamped the bats with the black.

Final touch added red rhinestones to the "i's"


Wednesday, September 19, 2018

Nesting Halloween Gift boxes- set of 3

Hi Y'all!
Robyn here with  3D Halloween Gift Boxes
both fun to make and to gift!
Suzanne has quite a Hallow's collection in the 

On the mat
The set  of three.
Use at least 60lb paper to get a nice firm box
and good strong adhesive.
Cat and Bat
The bat stands alone!
Comments and Questions Welcomed!

Wednesday, September 12, 2018

Arches Frame Card with Destiny Quote

Hello Connie Nichol here today with a simple card featuring the Quietfire Arches Frame Card electronic cutting file. 


The cut file can be downloaded in the Silhouette Store here.  It's a lovely cut file that can be used for the basis for many greeting cards.  Cut the components out of plain cardstock, patterned paper or both.  The central circle is perfect for adding a stamped quote to the card.  


I used teal and white cardstock and then dressed the card base up a little bit with a Quietfire Design stencil and some glitter paste.  Use some low tack tape to keep your stencil from moving during the application of the glitter paste.  It will dry quickly and adds such a nice touch to the card.


I stamped the Quietfire Design Destiny quote onto the smallest circle and adhered it to the card along with a bit of ribbon and a few paper flowers.  That's it for today - have a great week!


Wednesday, September 5, 2018

Halloween Fonts and Pumpkins ATC style

Hi Y'all Robyn here
asking,
"What if instead of candy I gave out ATC's to Trick or Treaters?
or
Have a party and create a Halloween Monogram card for each guest
Or if you have friends like mine have them create their own!
Files and fonts available in
and fonts and stamps at 

The monograms are created from Suzanne's
You don't even need a cutter to use them. they are downloadable to any device and can be used in a word processor.
 On the Mat
Comma, Period and Slash give you spider, ghost and cat.

My Brother Brett and SIL Diana were married on Halloween!
Pumpkin from
 stamped in VersaFine Dazzle and dusted with Perfect Pearls.

On the Mat

Working mat


Bats are several layers of 
QFD Batty Monogram Font
Comma, Period and Slash
On the Mat

Boo and the black cat 


Nothing digital on this ATC- it photo bombed the lead photo!

To take a peek at my desk where these are created and visit desks around the world
please visit

Comments and Questions Welcomed!


Wednesday, August 29, 2018

Twinkle Twinkle - Shoot For The Moon

Yogi here today and I had an urge to create this twinkle card. Love the lyrics. I remember creating a calligraphic piece of it in a class I took with Betty Locke eons ago...

I'm using a quote stamp on the inside from Quietfire Design "Soar Collection" 8pce set also available on Elizabeth Craft Designs HERE

And am using the "You're A Star" font from Suzanne available on Silhouette and the Twinkle Twinkle file. Click image to purchase. 


https://www.silhouettedesignstore.com/view-shape/66584https://www.silhouettedesignstore.com/view-shape/267818


Scored, and folded my white cardstock to create my side fold card (7"w x 5"h) splicing another piece on the inside. Adhered a piece of deep blue paper to the front.


Opened my SCAL (Sure Cuts A Lot) software. Resized the star spray to 3.595"w x 2.442"h and the words to 5"w x 3.92"h. Cut from white cardstock. Inked the star burst with Versamark and embossed with silver embossing powder.

Inked the words with Versamark and embossed Emerald Creek "Winter Mistake", but didn't like the lack of contrast against the blue so reinked with Versamark and silver embossing powder. Don't know if you can see it but the words have a beautiful textural effect now. Love the contrast between the stars and the words. Adhered to front.

On the inside - left side:
In Excel, I created the text for the lyrics in Arial font and the letter "H" using "You're a Star" OTF font. Printed out on white cardstock. Die cut with Elizabeth Craft Designs "Stitched Rectangles" die set. Inked around edges direct to paper with Distress "Faded Jeans"
On the inside - right side:
Adhered a piece of the deep blue paper. Stamped the quote using Versamark and embossing with silver embossing powder.

Punched out a 1"circle from white cardstock. Put some blue streaks through the moon and adhered to inside.


Wednesday, August 22, 2018

Baby Scrapbook Layout

Hello, Connie Nichol here today with a 8.5 x 11 layout featuring digital cut files from Suzanne Cannon's Baby Boy Bendi Card cut file available here in the Silhouette Store.  I had one of those tiny wallet sized photographs of my youngest son laying around my house and I wanted to scrapbook it before it got lost or damaged.  It's from the days when you used to take your babies to Sears for the photo packages in the portrait studio.  Those department store photo studios have certainly disappeared in the last few years.

connie nichol, quietfire design, baby boy bendi card

Many of the cut files that are designed by Suzanne Cannon to create cards also typically have many components that work beautifully on scrapbook layouts.  In this case, the title and the adorable little cars, planes and footprints come from the Bendi card cut file.  Here's what the card would look like.  Cute, huh?


In addition to the digital elements, I also used a Quietfire Design Baby stamp from the 'Welcome Little One' collection and the Hearts Spray die to create a temporary stencil.  I just cut the hearts out of a scrap piece of white cardstock and dabbed some blue chalk ink through the cut out shapes.  Just be sure to tack down your temporary stencil with some washi tape to keep it in place while you are using it.


Add a few sequins, beads or dew drops as an accent and make sure to put names and dates on your layout (in this case I put them on the back on the page).  Thanks for stopping by, Connie


Thursday, August 16, 2018

Bless these Blooms Home Decor Project


It's Suzanne here today.  I have these gorgeous Hydrangeas.  Some of the flowers said they wanted to come into the house.....  They needed a container just for them, so I created one.

Check out how it's done in this Tiny Tutorial that I've uploaded to YouTube.  Pause it if it's too fast.  It's a really easy project!
If you're receiving this as an email update, click here to see the video!


Supplies:
Bless these Blooms cutting file - Silhouette ID #264900
A little pail or other container 
Silhouette Matte Vinyl in pink 
Silhouette Transfer Tape