Friday, July 8, 2016

Feather & Holly Card - Remember die - Christmas Is The Day


Yogi here today with a Christmas card... I LOVE this Feather and Holly Silhouette file from Suzanne.

I'm using one of the NEWEST "A Way With Words" dies from Elizabeth Craft Designs ("Remember") (also available on Quietfire Design HERE).

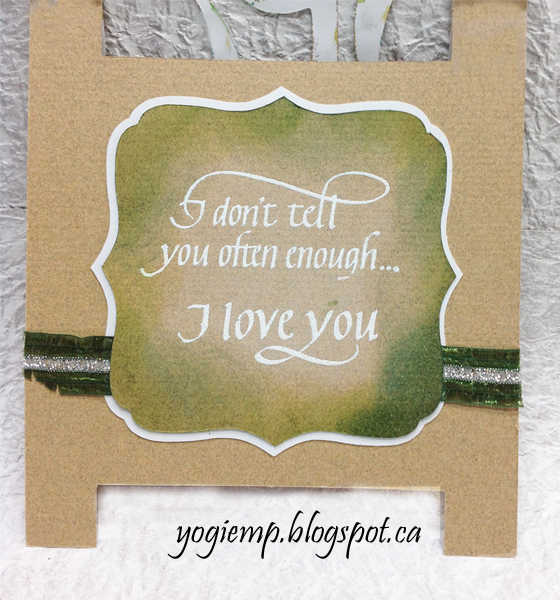
I'm also using a quote stamp on the inside from Quietfire Design 

("Christmas is the Day..." 9pce set); eCut ("Feather & Holly card")

Scored and folded my cream toned cardstock.

Place my feather and holly card on my mat. Ungrouped everything and set the card base to the side. Gathered all my feather and holly elements and increased the height of the feather to 6".  eCut everything from white cardstock.

Scored vein lines in the holly leaves and hit them direct to paper with Distress "Crushed Olive" then a bit more lightly with "Mowed Lawn".

Direct to paper with "Antique Linen" on the feather, then scored lines for the feather details. Went over the feather again with "Aged Mahogany" and then with a bit of "Fired Brick".

The berries I inked with "Candied Apple and embossed with UTEE twice. Adhered them to the white under layer. Added dots of Liquid Pearls "White Opal" to the white areas.

Layered two pieces of Ruche cardstock leaving a 1/4" border all around. Adhered a piece of gold ribbon, then adhered my feather & holly elements, then all of that to the card front.

Die cut the word
"Remember" (also available from Quietfire Design HERE) from cream toned cardstock, inked with Versamark and embossed with Distress "Antique Linen". Die cut another word from the red Ruche and adhered both together slightly off set, then on to card front.

On the inside: stamped the holly detail (Flourishes "Naturally Merry") inking the stamp with the mowed lawn and the berries with the candied apple, misted with water, stamped and clear embossed.

Stamped the quote with Versafine Black Onyx and clear embossed.


Tuesday, July 5, 2016

Butterfly Flourish Frame Card - Elizabeth Craft Designs die Dream - And the Day Came

Yogi here today with a fun card. I've been playing with Tim's "Faux Marble" technique, and it had such a nice summer feel to it. I then was thinking about those butterfly cards Suzanne recently uploaded to the Silhouette onLine store and decided to put the 2 together... Here's how


I'm using an A Way With Words die from Elizabeth Craft Designs "Dream" also available on Quietfire Design HERE

I'm using a quote & sentiment stamps  from Quietfire Design  

I opened the Silhouette file ( HERE )  in Sure Cuts A Lot software. Altered the size to 7"w x 10"h. I only used the frame/card portion cutting it once for my main card from white cardstock,  then moving most of it off my mat and cut again to get the butterflies. Used my scissors to separate the butterflies from the frame.

For the inside: I then moved it of my mat to only get the frame/butterflies portion of the card, flipping it over to get the butterfly on the left side and then cut.  Trimmed off the excess frame following the contours of the design.

Masked off the border and inked the flourish/butterfly with Versafine Vintage Sepia and embossed with Emerald Creek Hot Stuff "Oil Rubber Bronze" embossing powder.

Applied glue to the large butterfly and sprinkled with Glitter Ritz micro fine glitter "Java Bean" for the body and "Warm Highlights" for the wings.

Inked the small butterfly with Distress "Antique Linen", applied glue and sprinkled with the warm highlights.

Sponged various colors of Distress on the frame ("Broken China", "Mustard Seed", "Picked Raspberry", "Peacock Feathers") masking off the butterfly flourish, applied a generous coat of Distress Crackle Medium and set aside to dry. Sponged "Ground Espresso" all over.

The under layer is part of the Tim Holtz "Faux Marble" technique done on white cardstock using acrylic daubers on a craft sheet, misting with water (I used Perfect Pearls "Perfect Pearls" mist) and swishing your cardstock through the wet paint, misting with more water, tilting etc to achieve the marble look. This background was done as a 2nd generation through the paint.. Dried and adhered to frame. Trimmed off the excess. Adhered the glittered butterflies by the bodies only.

Stamped the quote using Versafine Black Onyx and clear embossed.

Die cut the word "Dream" from cream toned cardstock, sponged with "Spun Sugar" and clear embossed. Adhered to frame.
 
On the inside, I adhered a piece of scrapbook paper that matched my colors.

Sponged some of the colors from the front to my butterflies and clear embossed. Carefully inked the rest of the flourishes with the brown and embossed with the bronze. Adhered to inside.

Added the lace trim to the borders.

Stamped the sentiments (Happy Birthday; My Friend") with the black and clear embossed.

Final touch added the amber rhinestones to the large butterfly.
 

Wednesday, June 29, 2016

Canoe and Paddle Scrapbook Layout - with Wheresoever You Go stamp

Hello, Connie Nichol here today.  I was totally inspired to create this scrapbook layout after seeing Suzanne Cannon's canoe and paddle cut files.  How perfect to accent these photos of my husband and son on one of their adventures!


Here's what the cut file looks like.  

You've got water, you've got a lovely canoe and you've got paddles that you can cut in whatever colour and size to best adorn your scrapbook pages.  I cut the paddles and water from a piece of two sided patterned paper - the subtle patterns on the paper add a little bit of interest, and the two-sidedness lets you see some options for colours when you flip the die cuts over and look at the other side.  The Canoe and Paddle cut file is available here in the Silhouette Design Store.  

I also added this stamp from Quietfire Designs.  A sentiment to live by....

Supplies Used:  Quietfire Design stamp and cutting files, Elizabeth Craft Design stitched rectangle dies, Heidi Swapp patterned paper, Bazzill cardstock,  Fancy Pants metal badges, Sizzix Eclips electronic die cutting machine, Clearsnap ink, Brother sewing machine.


Monday, June 27, 2016

Celebrate! It's Time to Wave Your Flag!

Just wanted to share these fun designs with you!  The top 4 large ones are brand new in the Silhouette Online store today. 


I'm thinking I need to make a herd of those lanterns! 
A quick way to find all the older files is to use the search bar just above the Quietfire logo on my profile page.  Search for "Canada" or "4th of July" to filter to get to the good stuff!
Happy cutting!
 
Thanks for looking!
Suzanne
P.S. The video tutorial for assembling the lanterns is on YouTube here!


Saturday, June 25, 2016

Golden Gate Bridge Easel card - Thinking of You die - In a Perfect World

 
Yogi here today using one of the newest files available in the Silhouette onLine store "Golden Gate Bridge" - love it. 


As soon as I saw the newest images, I knew I had to do something with it. So I created an easel to showcase the bridge...

I'm using one of an A Way With Words die sets from Elizabeth Craft Designs created by Suzanne Cannon "Thinking Of You" also available on Quietfire Design HERE

I'm also using a quote stamp from  Quietfire Design  ("In A Perfect World" 4pce set); 


Here's what I did:
The card is 7"w x 5"h when closed
 
I opened the "Golden Gate Bridge" onto my mat.

Placed a standard image of a frame onto my mat to create the window, sized it to my finished card size, then resized the bridge image to fit within the confines of my frame.   Cut both pieces.

I copied and pasted the frame from page 1 to page 2. Placed another basic rectangle image on my mat and sized it to the same size as the frame, then placing the rectangle alongside the frame and welding the 2 together. The weld line will be your score line for a standard top fold card. I decided to block in a section of the window so the floor isn't as visible when the card is closed.


So I placed another rectangle to partially fill the window frame opening. I created it so it would fill half the window.

I used one of the basic images for the state of Illinois (gave me the best contour to create my hilly area...). Placed it along my center line, stretched it, copied and pasted it a couple times to fill the whole width.

I then selected everything and weld it together.

This is a preview of the welding which you should always check prior cutting.

Everything was cut from white cardstock. After cutting I scored to create the easel shape. PS: I cut little slits on the frame edge where the hilly area meets the frame so I wouldn't score through my hills...

The hilly area was stamped with Bees Wax "Coastal Rocks" using "Pumice Stone" and here and there with "Ground Espresso". I just kept inking and stamping till I covered the whole width. PS you can use any nice texture stamp to create your hill details. Mask off the bottom edge with some torn post it notes.

The water area was sponged with "Broken China" and then some "Blueprint Sketch" in a streaky fashion. Used the same technique but without re-inking the sponge for the sky. Added a couple doodle birds.

The outer frame was dry embossed using Darrice "Brick Wall" moving the folder to emboss the whole frame. Sponged with "Pumice Stone" and high points hit direct to paper with "Weathered Wood". Adhered to card front.

The bridge was inked with Distress mini direct to paper with "Carved Pumpkin" then embossed with Emerald Creek Hot Stuff "Thanksgiving" embossing powder. Adhered to frame.

Die cut the "Thinking of You" from white cardstock, inked with "Black Soot" and embossed with Emerald Creek "Onyx Frost" embossing powder. Adhered to frame

On the floor: cut a rectangle the width of the card by 1.25".  Die cut the letters(Elizabeth Craft Designs "Alphabet Caps" from black cardstock and adhered to the stopper adding a deep pink gel heart. Scored at the 1/4" and adhered to floor of card to create the stopper. The view is the back of the stopper.


Saturday, June 11, 2016

Chalkboard Easel - Fedora - Daddy - You Are The Best

http://quietfiredigital.blogspot.ca/
I was in a mood to make a "Father's Day" card in memory of my dad... and was itching to use these new files from Suzanne. "Chalkboard Easel"; "Fedora" and this one that I altered slightly "Daddy & Me"

This is what the parts look like in the file 

https://www.silhouettedesignstore.com/view-shape/80701I'm also using one of the newest sentiment sets ("I Don't Tell You Often Enough" 5 pce set)  and a design element ("Crackle background") stamp  from Quietfire Design 

Please note: opening the files in the Silhouette Studio software is best. Opening in other software like SCAL or ECAL etc, may change some of the score/cut lines.

I opened the "Chalkboard Easel" SVG file in Sure Cuts A Lot software and yes a score line became a cut line which I had to adjust by welding small rectangles over the cut lines.
Increased the image size of the chalkboard easel to 10.5"h keeping the proportions. Ungrouped the items and moved the square that will become the chalkboard to page 2. Also copied and pasted the chalkboard opening to page 2 - making it a shadow layer increased by 1.5mm border (it will be used on the inside of card). Cut the easel part from a textured beige/light brown toned cardstock.

On page 2, I opened the "Fedora" increasing the file size to 5.1" w, again keeping the proportions. Also opened the "Daddy & Me" file, ungrouping it and deleting the "and" and "me" words. Increased the word "Daddy" to 6.5"w. Cut all from white cardstock. Trimmed down the excess letters from Daddy to leave only "Dad".
The "Dad" word - Inked the "Crackle background" using Versafine "Vintage Sepia", stamped and embossed with Queen's Gold embossing powder. Used Distress stains, swiping the colors randomly ("Shabby Shutters", "Broken China", "Mowed Lawn", & "Crushed Olive")

The Fedora: sponged with a dirty yellow sponge all over, then direct to paper with "Antique Linen". It gave a nice mottled look almost like parchment. The hat details I hit direct to paper with "Frayed Burlap". Adhered to fedora adding the real feather in the band.

The chalkboard square was painted with a dark brown chalkboard paint (something I've had for eons...). Applied 2 thin coats, and dried. Adhered to back of card front. 

Cut the sentiment stamp ("I Don't Tell You Often Enough" 5 pce set) between the word "are" and "the" (you could use a stamp positioner instead...) and placed them on my acrylic block. Inked with Distress Picket Fence, stamped and embossed with detail white embossing powder.

Adhered the "Dad" to the top of the card front. The "Fedora" onto the chalkboard. 
http://quietfiredigital.blogspot.ca/
On the inside: Adhered the white shadow layer onto the card. Put down a piece of Sookwang tape and adhered my Sari ribbon.

On the drop out piece of the chalkboard opening from page 1, inked my sentiment stamps ("I Don't Tell You Often Enough" 5 pce set) with the Picket Fence and embossed with white embossing powder. Sponged the edges using "Shabby Shutters' and then some "Broken China". Adhered to card. 


http://quietfiredigital.blogspot.ca/

Thursday, June 9, 2016

Quietfire Digital Doily Cards

I'd like to introduce you to a really handy collection of cards from the Silhouette Design store! To find them, all you have to do is go to my profile and type "doily" in the search box just above the Quietfire logo and all these sweet cards will show up.  Easy peasy!


Okay, so there is one missing from my image above....
Sorry lambie!  (ooooo, so cute with his little ear that flips up!  Kissy!)
These files contain the card base, too.  You can use my colour scheme or choose your own!
 
There are so many different Quietfire stamps that you could choose for the inside of these cards.  Check in to the Quietfire Gentle Thoughts stamp collection and look for the topic that you're needing. Choose one that's just right for the occasion!
 
Thanks for having a look!
Happy creating,
Suzanne