Wednesday, June 26, 2019

Strawberry Pop Up Card - Strawberry Monogram Font - Happy Birthday

 
Yogi here today on the Quietfire Digital Blog and I was really liking the strawberry box by Suzanne that she just uploaded to Silhouette on line store... So of course I had to use it BIG GRIN.

Click on images to purchase 


https://www.silhouettedesignstore.com/designs/296166?search=strawberry+basket+card&sortby=relevance&submitted_search=truehttps://www.silhouettedesignstore.com/designs/296165?search=strawberry+monogram&sortby=relevance&submitted_search=true

Cut, scored and folded my cream toned cardstock to create the side folded card structure.

Placed the letters one at a time on my mat using Arial Bold font, then made sure each touched the letters next to it. Grouped and resized to the width I needed (4.5"w). Welded everything together and cut. Colored with Tombow markers. Adhered to card front.

Printed out the quote using the Arial font and cream cardstock, then cut the lines apart. Added a picot on either end and hit the edges with the red Tombow brush end. Adhered to card front.

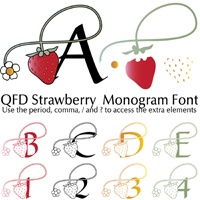
Cut a misc letter to get the strawberry sprig and then cut it apart from the letter. Or you could just cut another of the inserts, or use the .,? features of the font and weld them together.


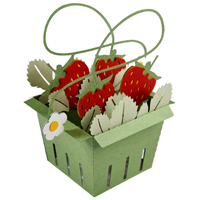
On the inside: Opened the strawberry box file and placed the elements I wanted on my mat, copying and pasting some extras. Selected all and resized till I could see one side of my box was approximately 4"w. Cut from white cardstock and while still on my mat colored the elements. I add details when off the mat.

Assembled the strawberries into the box and adhered one side to the inside of the card, making sure when I closed it nothing interfered with closing.

Cut large H & B letters and colored with markers. Adhered to inside. Printed out the rest of the words from cream cardstock, trimmed down, edged with the red Tombow and adhered to inside.

Stamped the "How Sweet It Is" onto white cardstock using Just Rite "Brayton" alphabet letters and a Versafine Clair "Tulip Red" stamp pad. Clear embossed.

Final touch added a couple more flowers to the open space on the left side...


Wednesday, June 19, 2019

Dad's Toolbox Card in a Box-Knotty Font-Make it work- 3D and Print and Cut

Hi Y'all!
Robyn here with another fun and versatile 
3D project
With some Print and Cut personalization.
Dad's day was long gone, 
so thinking outside of the tool box I came up with
the Make it Work theme.

On the mat

Modified the Print and Cut with

I'm still in V2 software!


From there it is easy and fun assembly with the adhesive of your choice!
It's only about 3"x2" and folds flat for mailing!
My DD would have loved the little tool elements in her miniature period!

Please share you creations with us on our
Suzanne Cannon Fan Group 
on Facebook.
Comments and Questions Welcome!

Tuesday, June 18, 2019

Smile!

**We'd like to welcome Kora to the Quietfire Design Team and will let her introduce herself.  We love what she does with Quietfire Digital Designs!  You can follow Kora on Instagram! and she regularly posts things on the Suzanne Cannon Fan Group!  Welcome Kora, it's wonderful to have you with us!!**

Hi all and hello from Austria. Kora here. I´m new to the design crew. I have been crafting for as long as I can remember and I have always loved paper. I am all into cards, little favour & gift boxes as well as stamping and quilling. Suzanne demonstrated the masking technique on „Letters Live“ the other day and while following the video an idea popped into my mind: Try this technique on a T-Shirt! And so I did. I became an aunt in October and the little lad makes me smile whenever I see him – so I decided on putting the word „SMILE“ on a shirt for him. The word smile was taken from the SMILE FLORAL STEP CARD – CALLIGRAPHY“. 


Just enlarge it to the desired size. I used white heavy cardstock. When cut fully, take the lettering off the cutting mat and put it onto the shirt. To ensure the lettering stays in place I used some „spray glue“. Put some newspaper between the front and back of the shirt to prevent the ink going to the back of the shirt.
Now it´s time to put on the fabric dye. Sponge the colour onto the shirt until the whole word is coverd with colour.


When finished, carefully remove the lettering. 

Taataa!! Now you have your very own personalized shirt. I hope you enjoyed the project. Thanks for stopping by.


Wednesday, June 12, 2019

Father's Day Gift Card Boxes

Hello, Connie Nichol here today with a couple of gift card boxes especially for dad.  These are quick and simple to cut and put together and are sure to bring a smile to anyone's face.  They are designed by Suzanne Cannon and are available in the Silhouette Design store here in lots of different designs.


This is the Gears Gift Card box cut out of purple, white and silver cardstock.   Just cut the pieces out with your electronic cutting machine, fold on the scored lines, adhere the tabs of the box with strong double sided tape such as sookwang tape (leave the top open temporarily) and slip in the inserts.  If you cut more than one gift card box, all the gift card box parts are the same size, so you can interchange and mix the inserts up as desired.  The gift card holder is on the back of the box.


Here's a Tool Gift Card Box from the front, side and back.


Sometime's a gift card is the perfect gift, especially for the dad who is hard to buy for.  These little boxes make it extra special.  Thanks for stopping by and Happy Father's Day!!


Wednesday, June 5, 2019

3-D Flower Truck with Pandas- Every day is a journey- love

Hi Y'all!
Robyn here demonstrating what happens when you can't make up your mind.
Panda's take over!
Graduation, moving, get well, this project will be bearer of good news to any recipient!
Scroll down for a digital cutting tip.

I had to make the truck...
On the mat


Then this file....
Panda Pop-up Box in a Card


Resulted in panda-monium!


Stamps were added by bears request!

Every day is a journey

Follow this link to lots of
Love 
at Quietfire Design

******TIP*****
If you are cutting similar pieces from many colors, cut lots! 
You will use them!

I fyouare having difficulty cutting, don't assume you need a new blade.
It could be:
  • blade hight
  • blade pressure
  • mat too sticky or not sticky enough
  • bits of stuff on the mat


Or in this case the paper
No matter what I tried, that light paper would not cut
 and it came from the same pack as all the other papers.
The darker paper, cut perfectly, was done with the same blade I was using to cut 
the lighter piece- so save yourself some hair and toss that sheet!
If you need that particular color, cut it in white and ink it!

Unbearably cute!

Comments and Questions Welcomed!